PhoneGap 1.3 : HTML5 と JavaScriptで作るWindows Phone アプリケーション
Windows Phone Advent Calendar 2011の24日目です。
PhoneGapとは、HTML5によるアプリケーションプラットフォームで、複数のモバイルデバイスをサポートしています。
2011/12/19 (日本では2011/12/20)にPhoneGap 1.3がリリースされ、Windows PhoneプラットフォームもすべてのPhoneGap APIをサポートするようになりました。
Microsoftからは、Port25でアナウンスがありました。
PhoneGap 1.3を Windows Phoneで利用するのは簡単です。
1. Windows Phone SDK 7.1 をインストールします。当然ですが、Windows Vista/Windows 7のOSを準備してください。
Intel Macで利用される場合は、Bootcampをご利用の上、物理マシン上にOS環境を作成してください。
2. PhoneGapのファイルをダウンロードし、zipファイルを展開します。
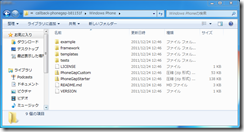
3. PhoneGapStarter.zip ファイルをお使いのコンピュータのドキュメントフォルダーの下にある Visual Studio 2010\Templates\ProjectTemplates サブフォルダへそのままコピーします。zipファイルの展開は不要です。
4. 新しいプロジェクトを作成し、[PhoneGapStarter]テンプレートを選択します。
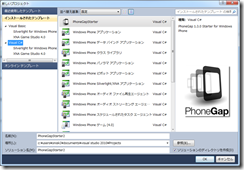
5.ソリューション エクスプローラーに www フォルダがあることを確認しましょう。
HTML、CSS、JavaScript、画像ファイルなどはこちらに、[コンテンツ]として配置します。
6. [F5]キーを押して、デバッグ実行します。PhoneGap 1.3.0が利用できることを確認します。
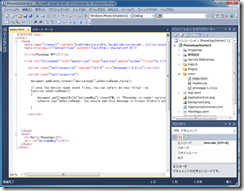
7. PhoneGapのAPIリファレンスを開きます。index.htmlを編集してカメラを利用してみましょう。
APIリファレンスのコードは、phonegap.jsの表記にバージョンが入っていないため、テンプレート内にある記述を残して利用しましょう。
<!DOCTYPE html> <html> <head> <meta name="viewport" content="width=device-width, height=device-height, initial-scale=1.0, maximum-scale=1.0, user-scalable=no;" /> <meta http-equiv="Content-type" content="text/html; charset=utf-8"/> <title>PhoneGap WP7</title> <link rel="stylesheet" href="master.css" type="text/css" media="screen" title="no title" charset="utf-8"/> <script type="text/javascript" charset="utf-8" src="phonegap-1.3.0.js"></script> <script type="text/javascript" charset="utf-8"> var pictureSource; // picture source var destinationType; // sets the format of returned value // Wait for PhoneGap to connect with the device // document.addEventListener("deviceready",onDeviceReady,false); // PhoneGap is ready to be used! // function onDeviceReady() { pictureSource=navigator.camera.PictureSourceType; destinationType=navigator.camera.DestinationType; } // Called when a photo is successfully retrieved // function onPhotoDataSuccess(imageData) { // Uncomment to view the base64 encoded image data // console.log(imageData); // Get image handle // var smallImage = document.getElementById('smallImage'); // Unhide image elements // smallImage.style.display = 'block'; // Show the captured photo // The inline CSS rules are used to resize the image // smallImage.src = "data:image/jpeg;base64," + imageData; } // Called when a photo is successfully retrieved // function onPhotoURISuccess(imageURI) { // Uncomment to view the image file URI // console.log(imageURI); // Get image handle // var largeImage = document.getElementById('largeImage'); // Unhide image elements // largeImage.style.display = 'block'; // Show the captured photo // The inline CSS rules are used to resize the image // largeImage.src = imageURI; } // A button will call this function // function capturePhoto() { // Take picture using device camera and retrieve image as base64-encoded string navigator.camera.getPicture(onPhotoDataSuccess, onFail, { quality: 50 }); } // A button will call this function // function capturePhotoEdit() { // Take picture using device camera, allow edit, and retrieve image as base64-encoded string navigator.camera.getPicture(onPhotoDataSuccess, onFail, { quality: 20, allowEdit: true }); } // A button will call this function // function getPhoto(source) { // Retrieve image file location from specified source navigator.camera.getPicture(onPhotoURISuccess, onFail, { quality: 50, destinationType: destinationType.FILE_URI, sourceType: source }); } // Called if something bad happens. // function onFail(message) { alert('Failed because: ' + message); } </script> </head> <body> <button onclick="capturePhoto();">Capture Photo</button> <br /> <button onclick="capturePhotoEdit();">Capture Editable Photo</button> <br /> <button onclick="getPhoto(pictureSource.PHOTOLIBRARY);">From Photo Library</button> <br /> <button onclick="getPhoto(pictureSource.SAVEDPHOTOALBUM);">From Photo Album</button> <br /> <img style='display:none;width:60px;height:60px;' id='smallImage' src='' /> <img style='display:none;' id='largeImage' src='' /> </body> </html> |
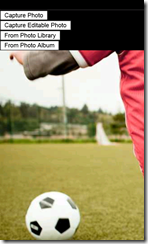
8. [F5]キーを押して、Windows Phone エミュレーターで確認しましょう。
次の画像は、[From Photo Album]を実行した後の例です。
9. Visual Studioで展開先を[Windows Phone Device]に変更し、アプリケーションを配置します。
WPConnectを利用していない場合は、USBケーブルを外した状態で、実行確認しましょう。
HTML5アプリケーションから、Windows Phoneのカメラ機能やPicturesハブにある写真にアクセスできることが確認できました。
JavaScriptから利用するPhoneGap APIに慣れる必要がありますが、HTML5でアプリケーションを記述するという新しいスタイルの開発を始めることができます。冬休み、HTML5の学習と併せて、PhoneGapに触れてみるのも良いかもしれません。
