Understand and Work with Build Workspaces MSDN Preview
I plan to publish a set of MSDN topics to consolidate and bolster coverage of some of the most fundamental aspects of Team Foundation Build. The content will focus attention on key concepts that include: build triggers and reasons, build numbers, and the build workspace. I’m writing to preview a sample of this update and highlight some content strategies I use. I strive to make the MSDN library better serve needs for knowledge that may be most keenly felt by people new to Team Foundation Build. But I want to do so in the most minimal manner possible with respect for the advanced skills and busy schedules among the people who do this important work.
Preview of “Understand and Work with Build Workspaces”
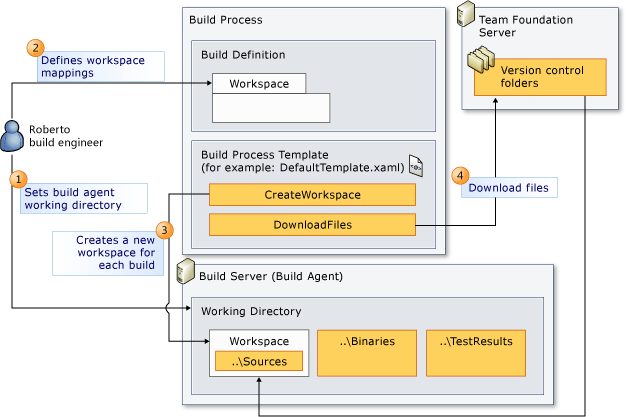
During the build process, the build agent compiles and does other work with your source files. Before the build agent can do this work, it downloads the files from folders on your version control server into a local working directory. To facilitate downloading these files, the build agent creates a version control workspace, which maps the folders on the server to the local folders in the working directory for the build agent.
Before the build process starts
 You set the working directory for each build agent in your build system. For more information, see Create and Work with Build Agents.
 When you create your build definition, on the Workspace tab, you specify the folders that contain the files that you want to download and how these folders should be mapped to local folders on the build agent.
During the build process
 The build process passes your workspace specifications to the CreateWorkspace workflow activity to create a workspace in its working directory.
 The build process uses the DownloadFiles activity to download the files into the workspace. After this step, the build agent can start work (such as compilation) on these files.
Design a Workspace for Your Build Definition
When you design the workspace for your build definition, you should follow some best practices.
Include all required folders.
Make sure that you include all folders that contain files that your build process requires. For example, if you add another solution to the Items to Build field on the Process tab, you may need to add another mapping to the workspace.
Include only required folders.
Map with a Status of Active only the folders that your build process needs. If a subfolder of a mapped folder contains files not required by the build process, make sure to map it with a Status value of Cloaked. In many situations, when you create a build definition, the root folder of team project is mapped in the workspace. This configuration results in the build agent downloading all the files in the version control folder of your team project. If this folder contains lots of data, your build could waste build system resources and slow down your build process by downloading large amounts of data that it does not need.
When you remove items from the Items to Build field on the Process tab, look for mappings that you can remove from the workspace.
Use the $(SourceDir) token to map a server folder to a local folder in the ..\Sources subdirectory.
In most cases, the best location for the source files on the build agent is under the ..\Sources subdirectory in the working directory. You can specify this location by using the $(SourceDir) token in the Build Agent Folder box.
Be aware of how the workspace affects a build definition that is triggered by check-ins.
If you have set the Trigger of the build definition to Continuous Integration, Rolling builds, or Gated Check-in, the server folders that you map are bound to the build process. For example, if a developer checks in changes to a folder that is mapped in the workspace of a build definition that has a Gated Check-in trigger, those changes will be blocked until the build process is complete.
For more information about triggers, see Understand and Work with Build Triggers and Reasons.
Build Definition Workspace Example
Roberto, the build engineer, created the Storefront Nightly build definition.
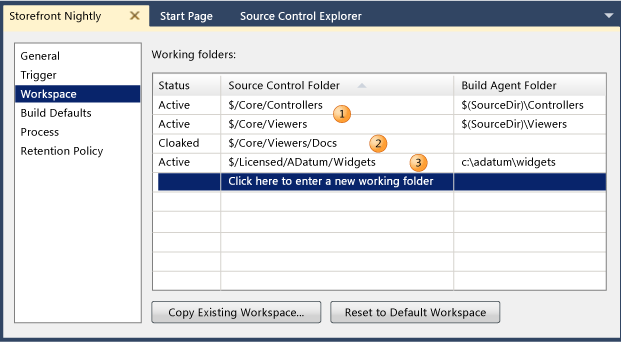
This build definition builds two solutions: $/Core/Controllers/Controllers.sln and $/Core/Viewers/Viewers.sln. As a result, it must map the two folders that contain these solutions, the projects that they contain, and all the other files that they require.
To improve build process efficiency, Roberto excludes a folder that contains documentation files that his build process does not require: $/Core/Viewers/Docs.
The solutions depend on some binaries in a component library from another company. These binaries are protected by a proprietary mechanism that requires them to be located in a specific physical folder: c:\adatum\widgets.
Copy Data Among Workspaces
You can save time by copying mappings from one workspace to another.
To copy mappings from one of your workspaces
Click Copy Existing Workspace.
In the Select a Workspace to Copy dialog box, copy the mappings from the workspace.
To copy mappings from another build definition workspace or another team member’s workspace
Perform one of the following steps:
- To copy mappings from another build definition workspace, open the build definition, and then click the Workspace tab.
- To copy mappings from another team member’s workspace, ask the team member to open the File menu, click Source Control, and then click Workspaces. Select the workspace, and then click Edit.
Right-click a row in the Working folders table, and then click Select All.
Right-click a row in the Working folders table, and then click Copy.
Create a text file, paste the contents of the Clipboard into the text file, and then save it.
Create a build definition, or modify an existing build definition that is the target of the mappings that you are copying.
For more information, see Create a Basic Build Definition or Edit a Build Definition.
On the Workspace tab, right-click a row in the Working folders table, and then click Paste.
As necessary, adapt the mappings for use by the build agent. In particular, make sure that the value in the Build Agent Folder box is correct and includes the $(SourceDir) token as appropriate.
For More Information
You define the build agent workspace when you create a build definition. For more information, see Create a Basic Build Definition.
A built agent workspace is basically the same mechanism as the version control workspace that a developer uses to work with source files in a team project. You can copy mappings between a version control workspace and a build agent workspace. For more information about version control workspaces, see Set Up your Development Machine to Work with your Team's Project.
Key strategies
I hope you find the above information to be useful and that it works better because it leverages the following strategies.
Explain key concepts in one place: This topic and others in the set will provide support to the other topics that support higher-level goals. For example, this topic provides background material that you can leverage whether you are managing a build agent, creating a simple build definition, or developing a customized build process template.
Emphasize best practices and avoid step-by-step guidance for trivial tasks: This goal can be elusive, so while I may not always hit it perfectly for every audience, I know its importance warrants that I continue to aim for it. As a Team Foundation Build customer you probably can figure out how to navigate a simple UI such as the workspace tab of the build definition editor. But even many advanced users still initially require an explanation of how a build workspace needs to be thought about and managed, especially when dealing with a large and complex codebase.
Use graphics to convey complex concepts and illustrate examples of success: Graphics are generally expensive, and there are additional costs to create and maintain them within the MSDN library system. So I don’t like to sprinkle them like candy into my topics just to make them look more approachable. That said, I know how daunting it is for a reader to face a wall of text about some complicated system. So with each major chunk of information I produce, I lift my hands from the keyboard and think for a moment about what kind of visual might do a better job of offering the information I’m about to type. I spend an extra moment doing so when I need to convey complex concepts or model how the product appears when it is being used successfully.
Offer links to peripheral information at the bottom when possible: Links are powerful tools that can serve a variety of purposes. But they can also distract attention and make material less readable. When a link goes to important but peripheral information, I try to offer it at the bottom of the topic to avoid distraction.
Feedback
As always, I welcome your thoughts and feedback about the content and the strategies, or any other suggestions for improving Team Foundation Build content.