Building an Azure Analysis Services Model on Top of Azure Blob Storage—Part 1
In a comment to a recent blog article, Bill Anton raised a question about the target scenarios for the modern Get Data experience in Tabular 1400 models, especially concerning file-based data sources. So, let’s look at a concrete example from my personal to-do list: Building a Tabular model on top of industry standard synthetic data for testing purposes.
Performance testing and benchmarking is an important part of quality assurance for Analysis Services. A prerequisite is a representative workload and TPC-DS provides such a workload, widely accepted across the industry. It defines a relational database schema and includes tools to generate data files at various scale factors (see TPC-DS on the TPC.org site). It also defines SQL queries to evaluate performance in a replicable way. Of course, for Analysis Services, these SQL queries must be converted to DAX and/or MDX queries, but that’s beside the point. The point is that TPC-DS can generate a large amount of file-based source data, which I want to bring into a Tabular model to enjoy blazing fast query performance.
Of course, I am particularly interested in testing Azure Analysis Services across all tiers from the smallest to the largest offering. This requires me to bring potentially terabytes of TPC-DS source data into the cloud. A scalable way to accomplish this is to use Azure blob storage in conjunction with Azure Data Factory to orchestrate the data movement into an Azure SQL Data Warehouse that then serves as the backend for Azure Analysis Services. The following diagram highlights typical technologies that may be found in an Azure SQL Data Warehouse environment. For details about getting data into Azure SQL Data Warehouse, see “Load data into Azure SQL Data Warehouse.” 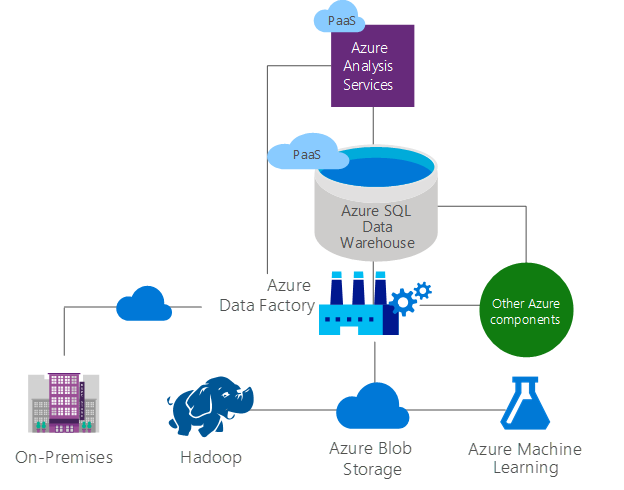
There are many good reasons to use Azure SQL Data Warehouse for enterprise workloads, ranging from true elasticity, high reliability, and global availability all the way to automatic threat detection. Another is to implement an infrastructure that helps focus dedicated teams on specific tasks to extract, transform, load, and maintain the data with high reliability and consistency. It is hard to overstate the importance of accurate and trustworthy data for BI solutions.
On the other hand, the TPC-DS source data requires little more than a bulk insert operation. Ensuring accuracy can be as trivial as counting the rows in the destination tables after import. In this situation, Azure SQL Data Warehouse would merely be used as staging repository. By using the Azure Blob Storage connector in Tabular 1400, it makes sense to simplify and streamline the data pipeline significantly, as the following diagram illustrates. Not only is the environment relatively easy to deploy, it also accelerates the movement of data into the Tabular model because an entire bulk insert step is eliminated. 
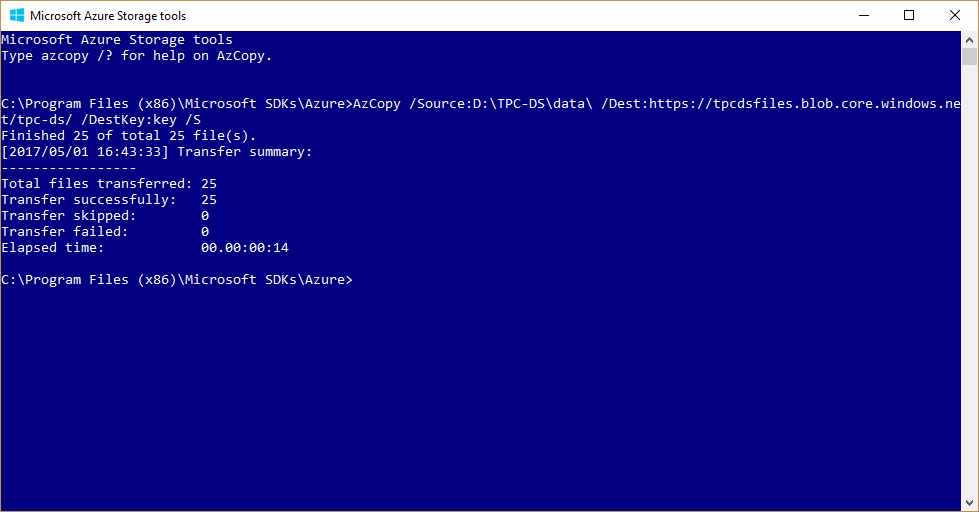
Having provisioned an Azure Analysis Services server and a blob storage account, the next step is to generate the source data with the desired scale factor. TPC-DS includes the source code for the data generator tool (dsdgen.exe) for this purpose. For an initial test, it might be a good idea to start small, using the command dsdgen /scale 1 to generate only about 1GB of source data. The dsdgen tool generates this data relatively quickly. It also doesn’t take too long to upload the resulting data files to Blob storage by using the AZCopy command-line utility, as the following screenshot reveals.
With the data files in Blob storage, the moment has come to create a Tabular model in 1400 compatibility mode and import the data by using the Azure Blob Storage connector. Unfortunately, however, the Azure Blob Storage connector does not recognize the individual blobs as tables. Instead, the Import from Data Source flow produces a single table with the list of all files (see the following Query Builder screenshot). 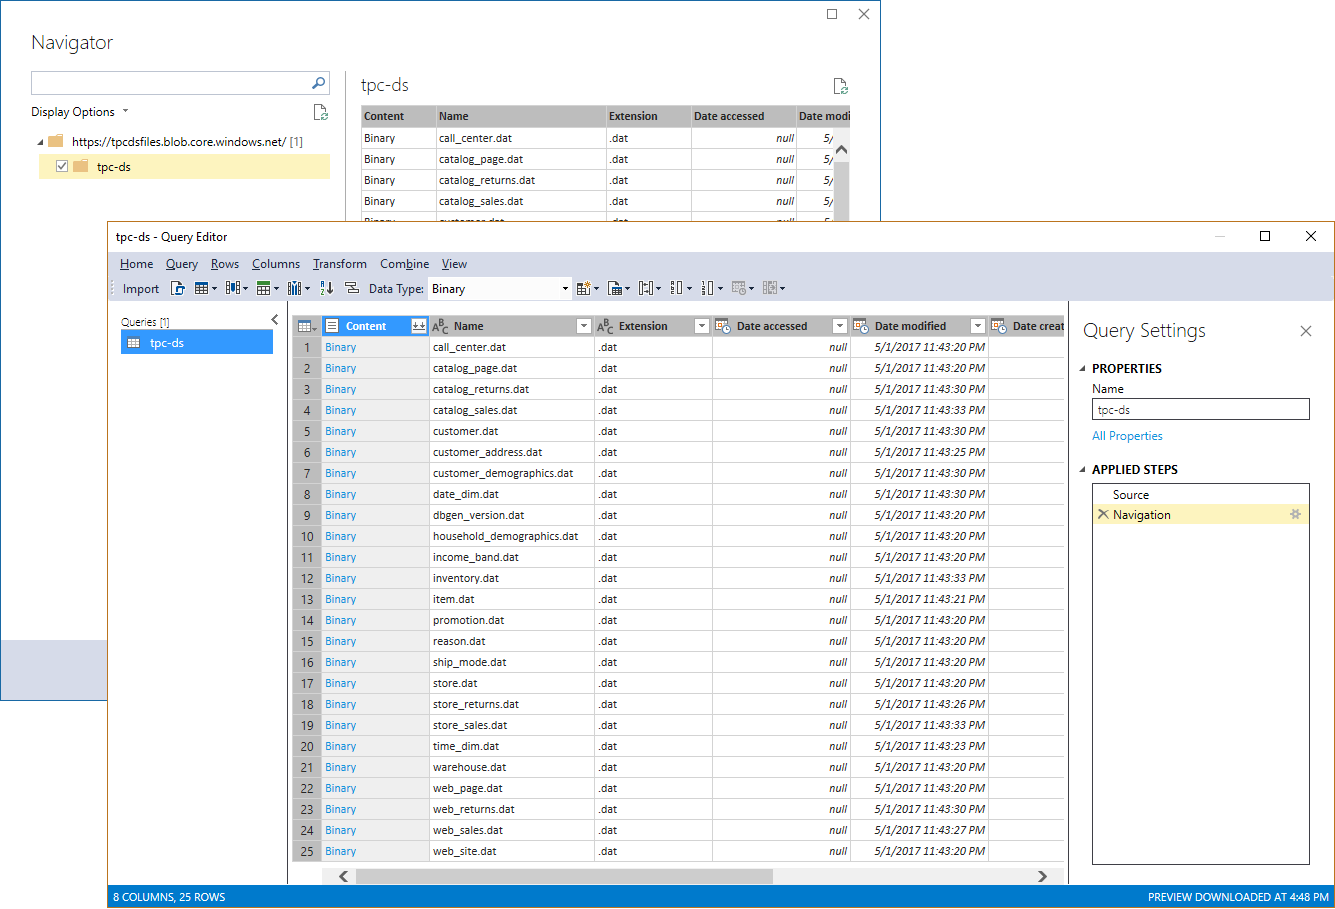
The goal is to create 25 tables. One for each file. This is perhaps more quickly accomplished programmatically by using the Tabular Object Model (TOM), as outlined in “Introducing a Modern Get Data Experience for SQL Server vNext on Windows CTP 1.1 for Analysis Services,” but it’s also doable in SSDT Tabular. In Query Editor, I could repeatedly open the Query menu and then click Duplicate Query to create a total of 25 queries (or right-click on an existing query and then choose Duplicate from the context menu). The next step would be to rename the queries using the table names per TPC-DS database schema, as documented in the tpcds.sql file included in the TPC-DS toolset. Essentially, the table names correspond to the data file names. And then for each table query, I would click on the Binary content link (or right-click on the link and select Drill Down) to drill down and include only the content of the relevant file, as in the following screenshot. 
The Query Editor automatically discovers the delimiter in the TPC-DS source data and shows the file contents neatly organized in columns, but it cannot discover the column names because these names are not included in the data files. It would be necessary to rename the columns manually. At this point, you might be wondering if there is a way to avoid all the tedious work. Renaming hundreds of columns manually in Query Builder across 25 rather wide tables, isn’t exactly a pleasant undertaking.
There are several options to streamline the process of defining the tables in the model. An obvious one is to generate the tables programmatically by using TOM. Another is to modify the dsdgen source code to include the column names in the first line of each data file so that Query Builder can discover the column names automatically. In the end, I chose a slightly different approach that is taking some elements from both. I would parse the tpcds.sql file to get the tables with their columns, but instead of generating the tables programmatically, I would write the columns per table into a header file. I could then upload the header file together with the data file per table into a separate Azure Blobs container and combine them in the table query to get the column names and the content.
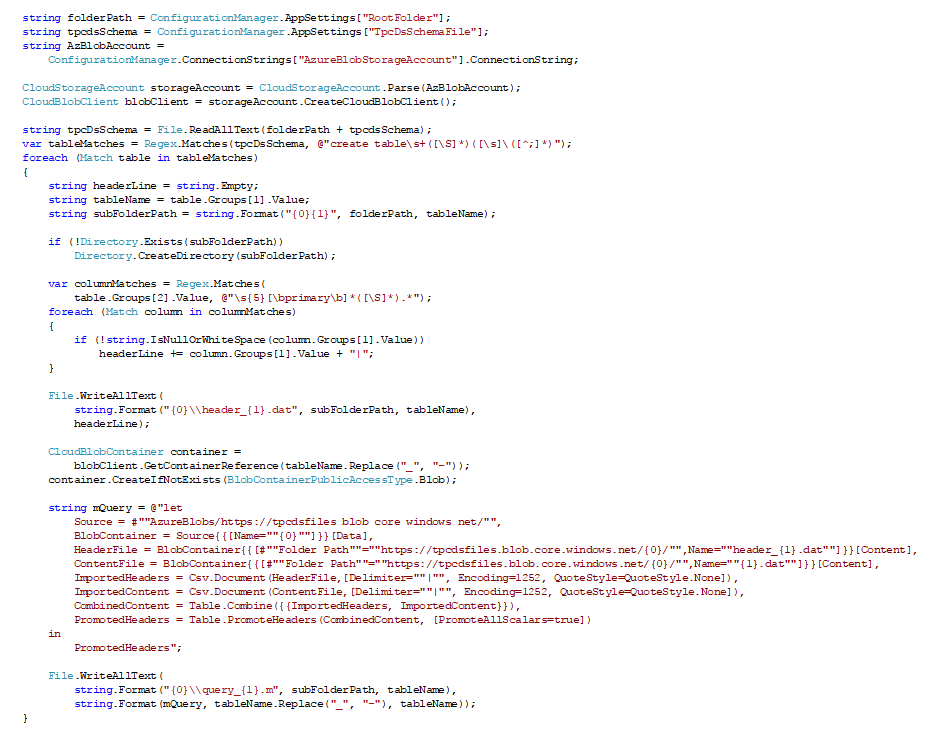
The following code snippet uses a couple of Regex expressions to extract the table and column names from the tpcds.sql file. It then creates a separate subfolder for each table and saves a header file with the column names in it. It also uses the Microsoft.WindowsAzure.Storage API to create a separate container for each table in the Azure Blob storage account from which Azure Analysis Services is going to import the data. The only caveat is that underscores cannot be used in Azure Blob container names, so the code replaces the underscores in the table names with hyphens (it is not too much work to flip these characters back again later in the Tabular model). The code also generates the M queries for the tables and writes them into separate files. The queries can then be pasted into the Advanced Editor window of the Query Builder in SSDT. Note that the line “Source = #""AzureBlobs/https://tpcdsfiles blob core windows net/"",” is specific to my Tabular model because it refers to the data source object with the name “AzureBlobs/https://tpcdsfiles blob core windows net/ ”. If the data source had a different name, that line would have to be updated accordingly.
The data files for each table, generated by using dsdgen, can now be placed in each table’s subfolder and uploaded together with the header file to the corresponding Azure Blob container. The following batch file gets the job done. It takes the URL to the Azure Blob service endpoint as a command line parameter, loops through the subfolders and calls dsdgen to generate each table file within its subfolder, and even handles the special child tables catalog_returns, store_returns, and web_returns, which are generated together with their corresponding *_sales tables in a single dsdgen command. The batch simply moves these *_returns.dat files to their correct subfolders after dsdgen finishes.
@ECHO OFF
FOR /D %%A IN ("D:\TPC-DS\data\*") DO (
ECHO.%%~nA| FIND /I "_returns">Nul && (
ECHO.Skipping %%~nA child table
) || (
ECHO Generating data for %%~nA
dsdgen /scale 1 /dir %%~fA /table %%~nA
)
setlocal enabledelayedexpansion
ECHO.%%~nA| FIND /I "_sales">Nul && (
set "file=%%~nA.dat"
set "file=!file:_sales=_returns!"
set "srcFolder=%%~fA"
set "destFolder=!srcFolder:_sales=_returns!"
set "filePath=!srcFolder!\!file!
move /-y !filePath! !destFolder!
)
endlocal
)
FOR /D %%A IN ("D:\TPC-DS\data\*") DO (
setlocal enabledelayedexpansion
set "table=%%~nA"
set "table=!table:_=-!"
set "target=%1/!table!"
ECHO Uploading data to !target!
"C:\Program Files (x86)\Microsoft SDKs\Azure\AzCopy\AzCopy.exe" /Source:%%~fA /Dest:!target! /DestKey:<key> /S
endlocal
)
And that’s it! After uploading all header and data files into their specific Blob containers, it’s straightforward to import the tables with their column names. As the following screenshot reveals, it is now possible to select all Blob containers in the Navigator window, each container corresponds to a table with the relevant files, and the queries are quickly copied and pasted into the Advanced Editor from the .m files generated with the code snippet listed earlier. No more manual creating or renaming additional queries or columns in the Query Builder dialog box! 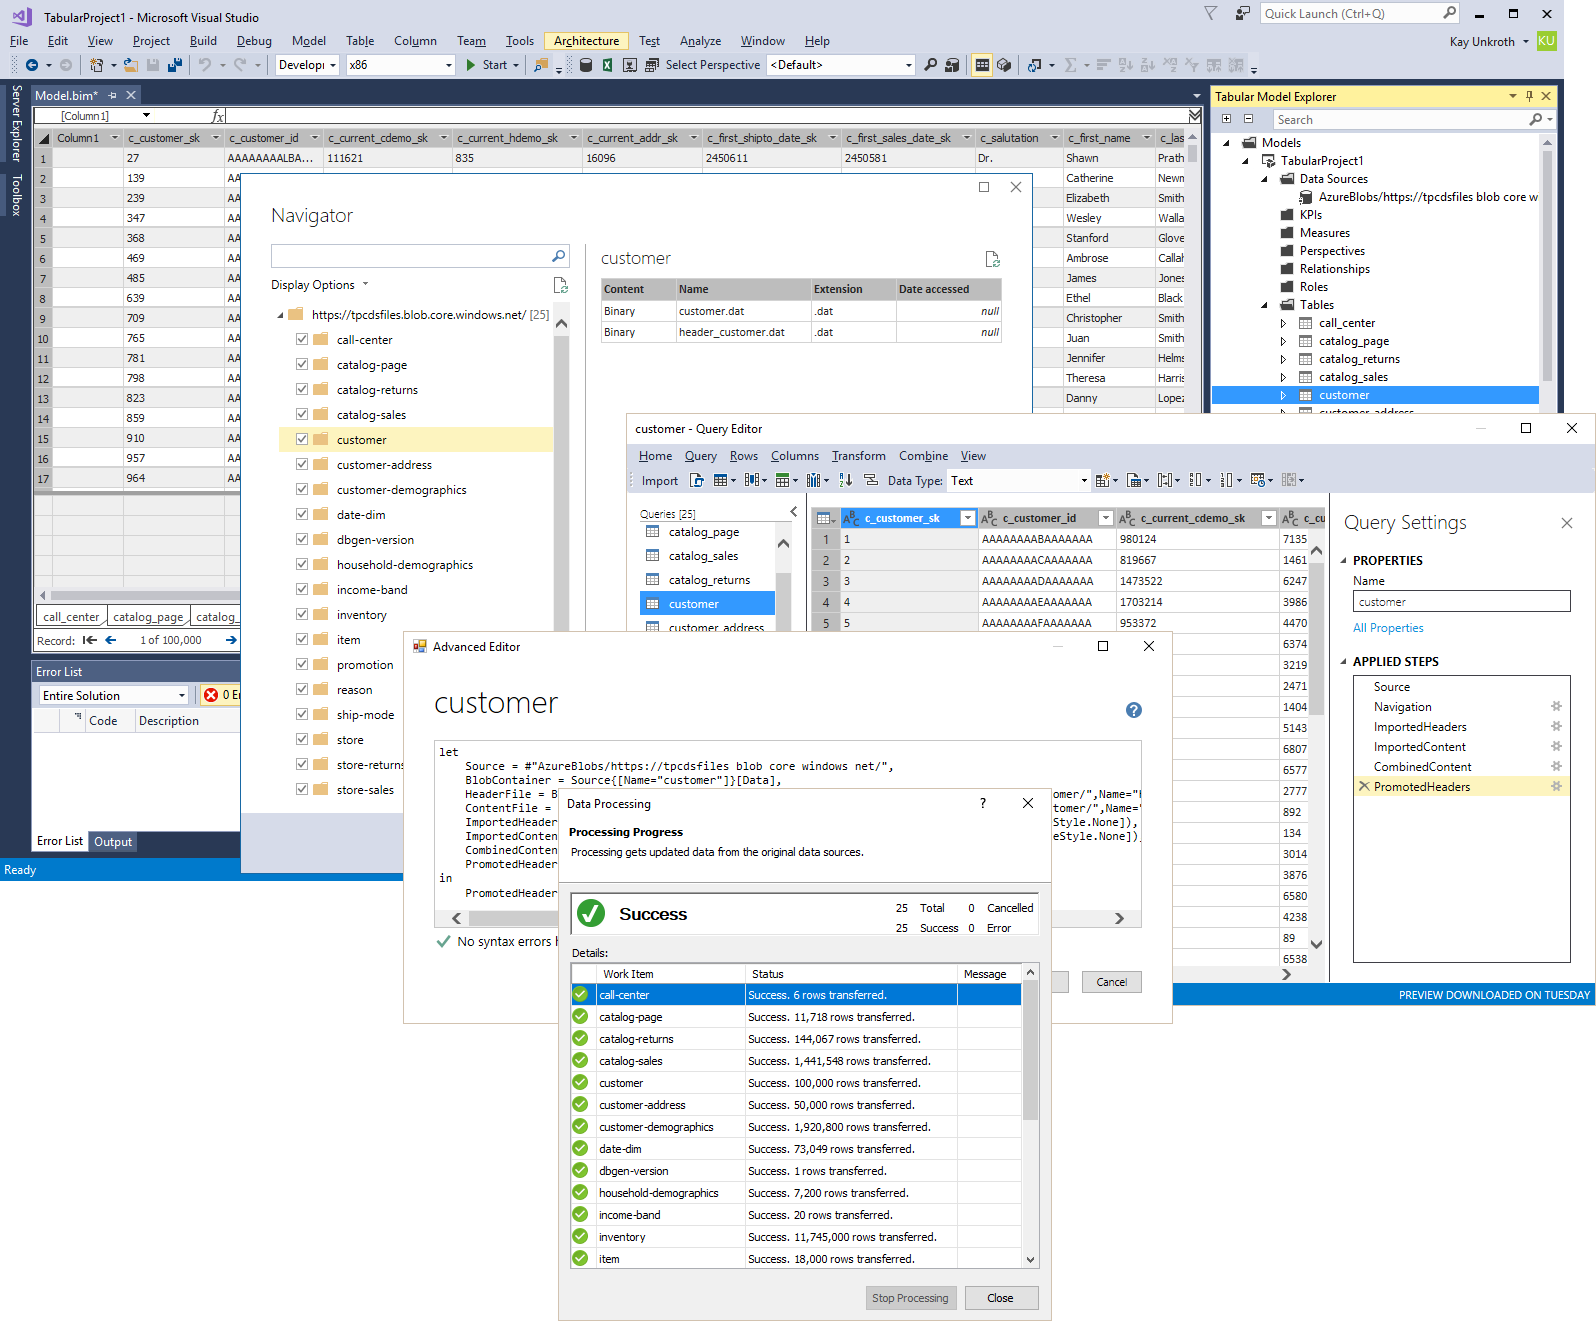
So far, the resulting solution is nice toy, only suitable for small scale factors. Serious data volumes require a slightly modified approach. The data needs to be generated in chunks distributed over many source files per table, the tables should be based on multiple partitions, and the partition queries should take advantage of named expressions. As soon as SSDT Tabular supports named expressions in a forthcoming release, a second blog post will cover how to take the current model to enterprise scale and run it on the largest tiers in Azure Analysis Services.
But there is one more aspect that must be touched: table relationships. The TPC-DS schema defines quite a few table relationships, as you can discover by analyzing the tpcds_ri.sql file. Using an approach like already covered, you could parse the tpcds_ri.sql file and create the relationships programmatically in the Tabular model by using TOM. Some relationships depend on multiple columns, for which you would need to create calculated columns to concatenate these multiple key columns into a single column. But before doing so, keep in mind that the purpose of table relationships is fundamentally different between a relational system and Analysis Services. In a relational system, relationships help to ensure referential integrity, among other things. In Analysis Services, relationships establish how the data should be correlated and filtered across tables. So, instead of analyzing the tpcds_ri.sql file and blindly creating a large number of relationships, it would be better to only create those relationships that are actually required for data analysis.
There’s one more aspect, and that is that table relationships in Analysis Services do not enforce referential integrity. This is important to keep in mind if you are planning to build production solutions without a relational database or data warehouse in the backend. If accuracy and consistency of data matters—and it usually does in a BI solution—some controls must be implemented to ensure data integrity. Building Tabular models in Azure Analysis Services directly on top of Azure blobs may seem attractive from an infrastructure complexity and data processing perspective, but the advantages and limitations should be carefully evaluated.
And that’s it for this first blog post covering Tabular 1400 in Azure Analysis Services on top of Azure Blob Storage. Stay tuned for the second blog post to take the data volume to more interesting scale factors. And as always, please deploy the latest monthly release of SSDT Tabular and use it to take Tabular 1400 for a test drive. Send us your feedback and suggestions by using ProBIToolsFeedback or SSASPrev at Microsoft.com. Or use any other available communication channels such as UserVoice or MSDN forums. Influence the evolution of the Analysis Services connectivity stack to the benefit of all our customers!