Exploring the PowerPivot for SharePoint Configuration Tool
The PowerPivot Configuration Tool included in SQL Server Code Name “Denali” CTP3 is undoubtedly a great new utility for SharePoint administrators. This tool doesn’t just enable you to configure or upgrade PowerPivot in a SharePoint farm. It takes PowerPivot configuration to a whole new level. Here are some key improvements in comparison to what’s available with SQL Server 2008 R2:
- No special SharePoint or PowerPivot knowledge required to create a PowerPivot-enabled SharePoint farm.
- Configuration tasks are separated from installation tasks—SharePoint configuration issues no longer interfere with the SQL Server Setup process.
- All configuration settings are validated prior to applying changes.
- The configuration process can be interrupted and resumed at any time.
- Settings and results are automatically documented (except passwords and passphrases).
Let’s have some fun exploring this tool. First, you need an installation of Denali CTP3 PowerPivot for SharePoint. Thanks to the separation of installation and configuration tasks, this is relatively quickly accomplished, especially if you are deploying a single-server test environment. Log on using a domain account with administrative permissions on the local computer, install SharePoint 2010 (choose the options Server Farm and Complete – Install All Components) without running the SharePoint 2010 Products Configuration Wizard afterwards, and then update this installation with Service Pack 1 for SharePoint 2010, again without running the SharePoint 2010 Products Configuration Wizard. Next, launch Denali CTP3 Setup. On the Setup Role screen, select the options SQL Server PowerPivot for SharePoint and Add SQL Server Database Relational Engine Services to this Installation, and then click Next in all remaining wizard screens to accept the default settings as suggested. You only need to provide a domain account and a password for the Analysis Services service. Note that you must use a domain account to support PowerPivot for SharePoint, but this domain account does not require administrative permissions on the local computer.
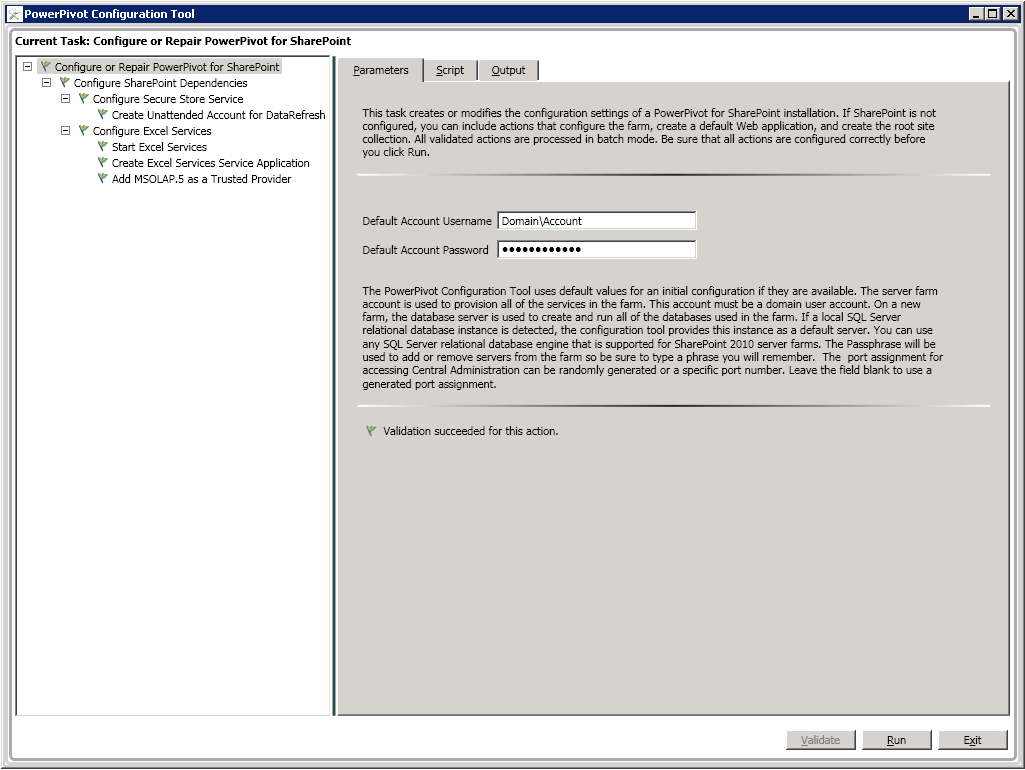
Moving on to the PowerPivot Configuration Tool, the first thing to note is that Denali CTP3 Setup only installs and configures the SQL Server program files and services on the local computer, but it doesn’t configure the SharePoint farm. This is where the new PowerPivot Configuration Tool comes into play. Start it by clicking on the PowerPivot Configuration Tool link, which you can find on the Start menu under All Programs, Microsoft SQL Server Denali CTP3, and Configuration Tools. You can also start it from within SQL Server Installation Center, if you look under Tools. On the PowerPivot Configuration Tool’s first screen, click Configure or Repair PowerPivot for SharePoint, as depicted in the following screenshot.
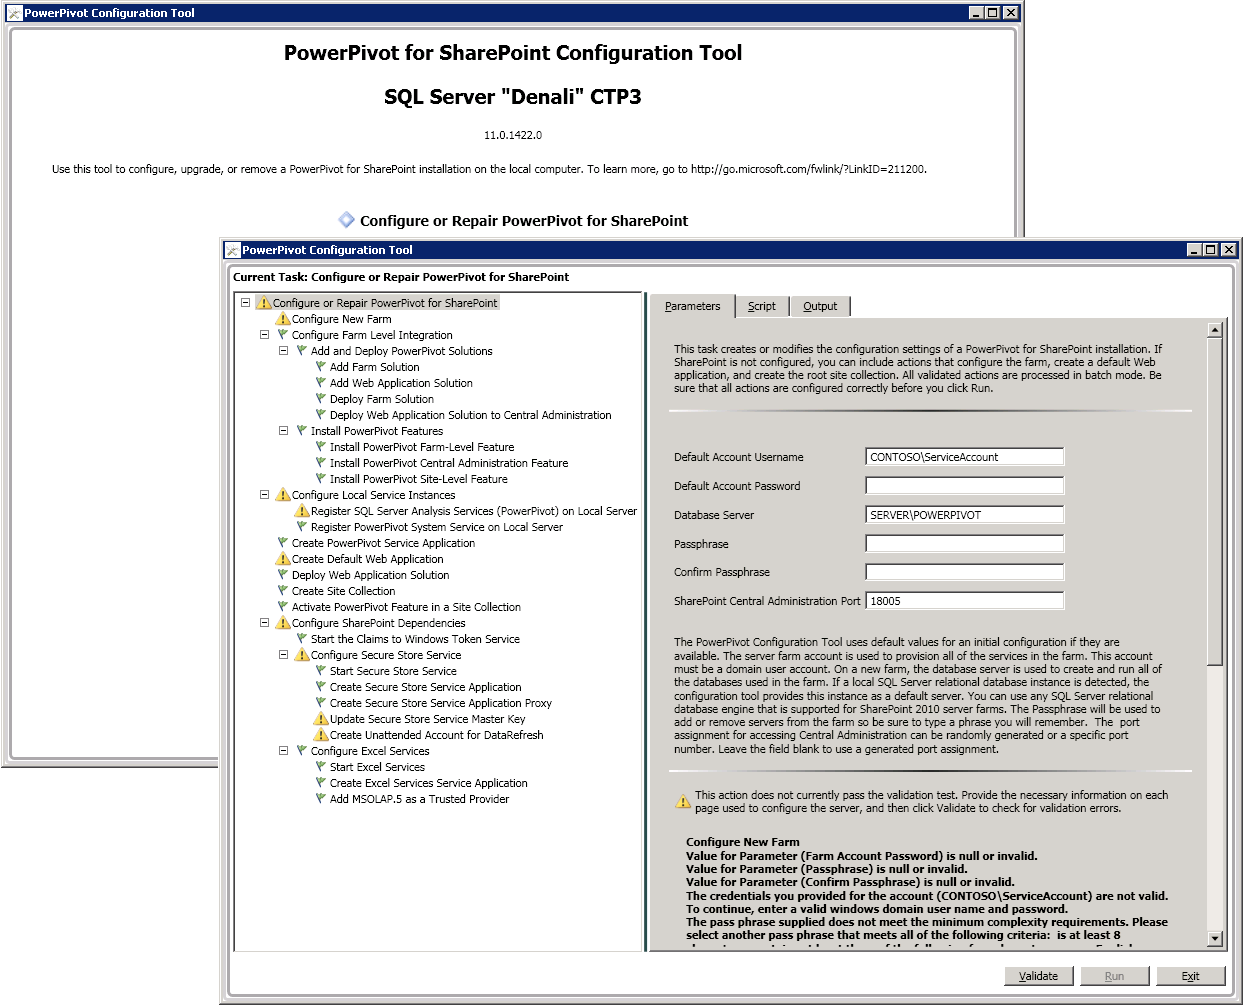
At a first glance, the PowerPivot Configuration Tool might be overwhelming. It just covers a lot of ground. Take a moment to get familiar with the user interface. The left pane shows you a long list of actions that the tool is designed to carry out, neatly organized in a tree view for informational purposes. The right pane has three tabs: Parameters, Script, and Output. Their purpose is self-explanatory. As you can see in the screenshot above, you only need to specify five parameters to configure a new SharePoint farm for PowerPivot: service account, password, database server name, passphrase, and TCP port for Central Administration. The configuration tool even makes an attempt to suggest meaningful default parameters, so you only need to specify password and passphrase.
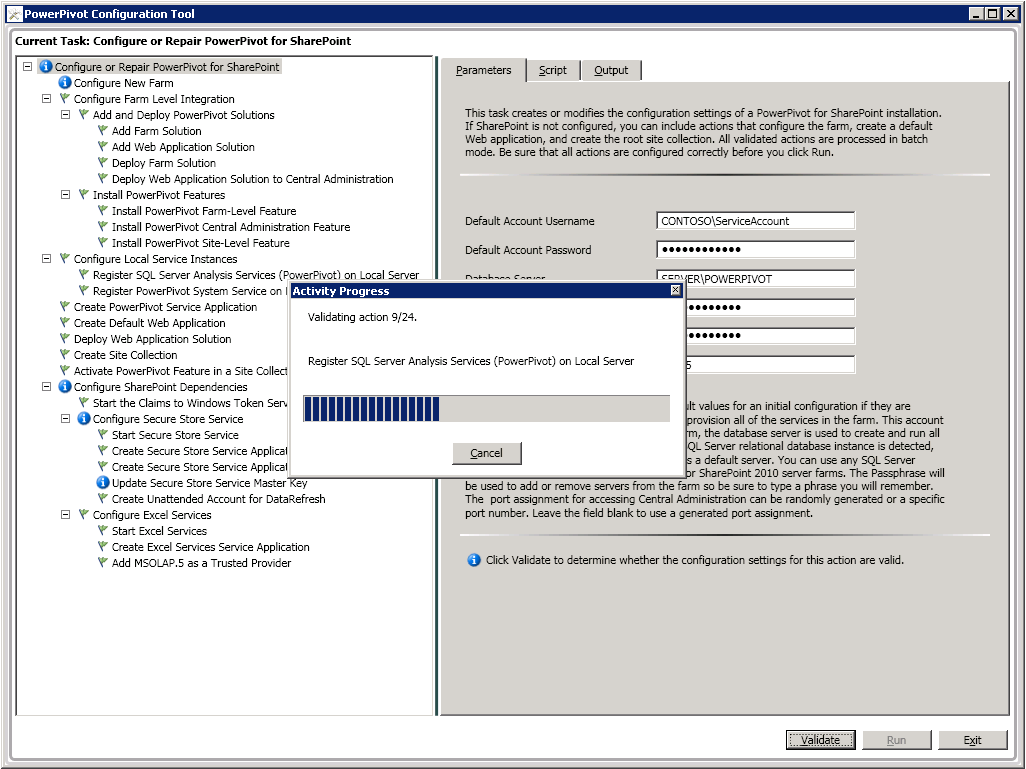
There are some subtle features in the PowerPivot Configuration Tool that only a connoisseur can truly appreciate. My absolute favorite is parameter validation carried out without performing any actual configuration tasks in SharePoint. This is one of those work items that is usually taken for granted and yet it takes so much to do it right. If you have written software, you know how tedious it is to validate user input, and here you see a tool that doesn’t just validate input, but goes through an exhaustive series of checks to ensure the PowerPivot for SharePoint configuration can succeed, as shown in the following screenshot. If you happen to change a setting after validation, the tool automatically flags the affected steps in the left pane and requires you to validate the configuration parameters again. Kudos to Software Developer Engineer Fernando Godinez Delgado, who built the PowerPivot Configuration Tool!
Perhaps you are not as excited about parameter validation as I am, but if you are an experienced SharePoint administrator or troubleshooter, you might get excited about the Script tab. This tab shows you the commands that the tool is going to execute when you click on the Run button. You can say that the PowerPivot Configuration Tool is essentially a script executor and nothing stops you from executing the commands manually. Note that the commands on the Script tab include the user input from the Parameters tab. It’s easy to copy all or individual sections of the script to the clipboard and paste them into a PowerShell window. Here’s an example demonstrating how helpful this is in a troubleshooting situation:
- Run the PowerPivot Configuration Tool, specify the service account password as required, and then make sure you type AYX$dcv?00 into the Passphrase and Confirm Passphrase textboxes.
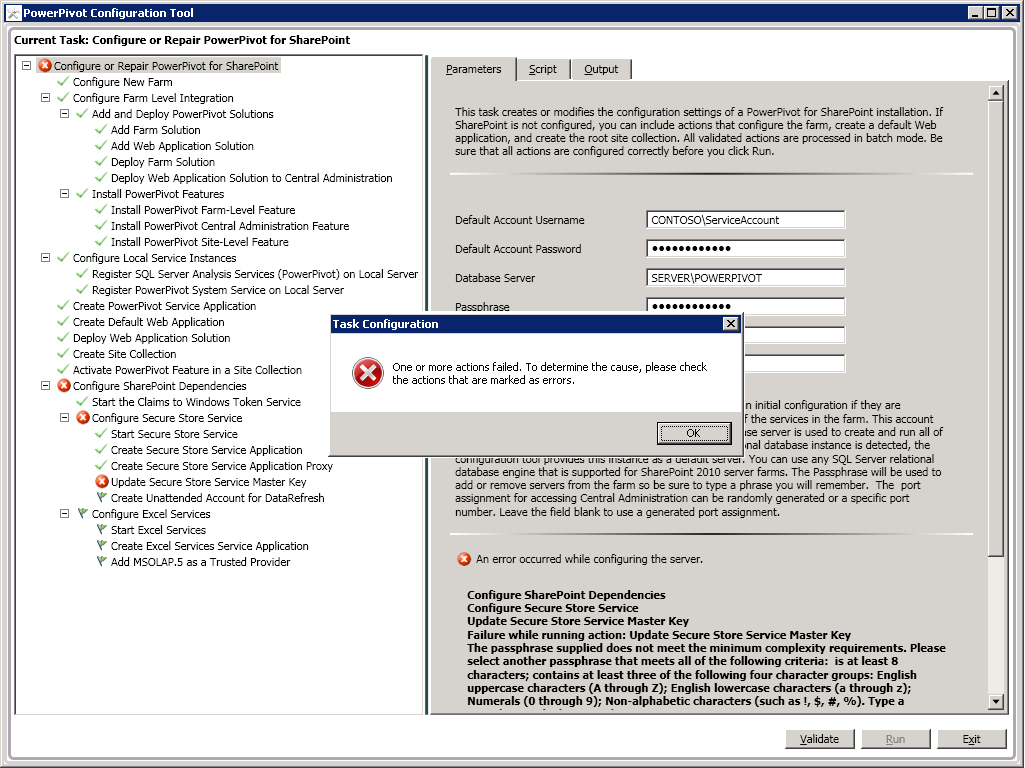
Hint: The dollar sign in the passphrase is super important because it causes the Secure Store configuration to fail, as shown in the following screenshot, even though the passphrase meets the complexity requirements. I’m exploiting a known CTP3 issue, which causes the error. The issue is most likely going to be fixed in the final release.
- Click Validate, which correctly succeeds, and then click Run.
- In the dialog box informing you that all configuration settings flagged as valid will be applied to the SharePoint farm, click Yes.
- Note that the configuration unexpectedly fails when trying to update the Secure Store Master Key. In the Task Configuration dialog box, informing you that one or more actions failed, click OK.
Prior to Denali CTP3 and the PowerPivot Configuration Tool, such configuration issues would have caused SQL Server Setup to fail and roll back the entire deployment. Now, you can just switch to SharePoint 2010 Central Administration, click on Manage Service Applications, click on Secure Store Service, click on Generate New Key, and then under Pass Phrase and Confirm Pass Phrase, type the passphrase, and then click OK. Having generated the master key in this way, you can switch back to the PowerPivot Configuration Tool, reevaluate the configuration, and continue with the remaining steps. Yes, the PowerPivot Configuration Tool enables you to succeed even if you encounter unexpected configuration issues along the way.
But why does this update of the master key fail in the PowerPivot Configuration Tool? The error message includes an important hint: The passphrase supplied does not meet the minimum complexity requirements. This isn’t true because AYX$dcv?00 certainly meets the requirements. So, what exactly is failing? Let’s switch to the Script tab, locate the command, and investigate the root cause. The command line in question is undoubtedly:
UpdateSecureStoreMasterKey "Secure Store Proxy" "********"
The ConfigurePowerPivot.ps1 library that ships with the PowerPivot Configuration Tool implements the UpdateSecureStoreMasterKey function. By default, this library is located in the %ProgramFiles%\Microsoft SQL Server\110\Tools\PowerPivotTools\ConfigurationTool\Resources folder. You can determine the exact path on the Script tab. Just check the very first line, such as
# Open PowerShell library from: C:\Program Files\Microsoft SQL Server\110\Tools\PowerPivotTools\ConfigurationTool\Resources\ConfigurePowerPivot.ps1. Open this .ps1 file in Notepad, search for UpdateSecureStoreMasterKey, and you should find the corresponding function, which is implemented as follows:
Function UpdateSecureStoreMasterKey
{
param($proxyName, $farmPassPhrase)
### Retrieve secure store service application proxy
$proxy = Get-SPServiceApplicationProxy | where {$_.DisplayName -eq $proxyName}
if($proxy)
{
Update-SPSecureStoreMasterKey -ServiceApplicationProxy $proxy -Passphrase $farmPassPhrase
start-sleep -s 60
Update-SPSecureStoreApplicationServerKey -ServiceApplicationProxy $proxy -Passphrase $farmPassPhrase
start-sleep -s 60
}
else
{
throw "Secure Store Service Application proxy doesn't exist"
}
}
As you can see, this function relies on standard SharePoint 2010 cmdlets and the parameters $proxyName and $farmPassPhrase receive the strings "Secure Store Proxy" and “AYX$dcv?00”. Let’s run these cmdlets manually to see what happens:
- Start the SharePoint 2010 Management Shell by right-clicking on the corresponding link in the Microsoft SharePoint 2010 Products program group in the Start menu, and clicking Run as Administrator.
- In the User Account Control dialog box, asking you if you want to continue, click Yes.
- Type $proxyName = "Secure Store Proxy" and press Enter to set the first parameter.
- Type $farmPassPhrase = "AYX$dcv?00" and press Enter to set the second parameter.
- Type $proxy = Get-SPServiceApplicationProxy | where {$_.DisplayName -eq $proxyName} and press Enter to retrieve the Secure Store Service Application Proxy exactly as the PowerPivot Configuration Tool would do.
- Type $proxy and press Enter to verify that the SharePoint cmdlet has successfully retrieved the service application proxy. The output should include DisplayName, TypeName, and ID.
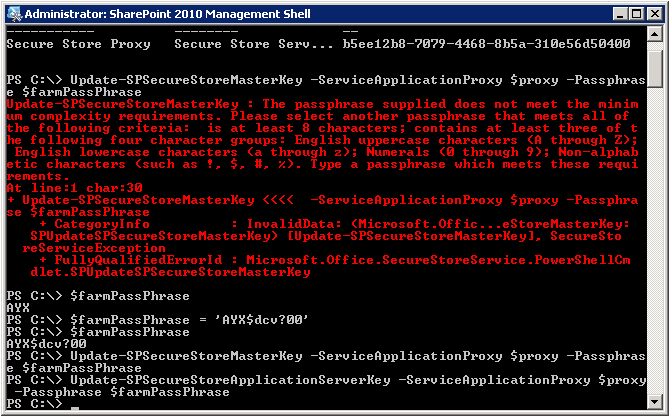
- Type Update-SPSecureStoreMasterKey -ServiceApplicationProxy $proxy -Passphrase $farmPassPhrase and press Enter to update the Secure Store Master Key. Note that the Update-SPSecureStoreMasterKey fails with the same error message that you already encountered in the PowerPivot Configuration Tool, as in the following screenshot.
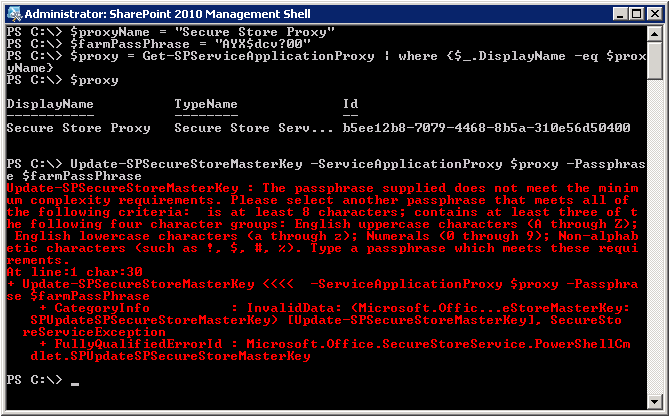
So, it is the Update-SPSecureStoreMasterKey cmdlet that is failing. Does it incorrectly reject the specified passphrase? Well, not really. The Update-SPSecureStoreMasterKey cmdlet is fine. It’s our script that forgets to escape the dollar sign in the passphrase. The passphrase is enclosed in double quotation marks, so PowerShell is interpreting the dollar sign as a special character. You can verify this by typing $farmPassPhrase in the PowerShell window and pressing Enter. The output only includes AYX. Clearly, not a valid passphrase! To fix this, type $farmPassPhrase = 'AYX$dcv?00' and press Enter. The single quotation marks turn the passphrase into a literal string and eliminate the need to escape the dollar sign. Type $farmPassPhrase again and press Enter to verify that the entire passphrase is now returned. Repeat the command Update-SPSecureStoreMasterKey -ServiceApplicationProxy $proxy -Passphrase $farmPassPhrase and it will now succeed, as the following screenshot proves. And then, finish the configuration procedure by typing Update-SPSecureStoreApplicationServerKey -ServiceApplicationProxy $proxy -Passphrase $farmPassPhrase and pressing Enter again.
At this point, the master key issue has been resolved and you can switch back to the PowerPivot Configuration Tool to continue, as mentioned earlier. If you already closed the tool, you can start it again. Choose Configure or Repair PowerPivot for SharePoint, type any required information, such as the Default Account Password, and then click Validate. Note that the PowerPivot Configuration Tool detects the SharePoint configuration and continues with the correct step after the master key update (see the following screenshot).
Additionally, you can examine the individual steps that the PowerPivot Configuration Tool performed in great detail if you switch to the Output tab. Note that the tool automatically scrolls to the output section that corresponds to the selected action in the left pane. If you select Create Unattended Account for DataRefresh in the left pane, for instance, the tool scrolls down to display the relevant sections for CreateUnattendedAccountForDataRefresh and so forth. Note also that you can analyze the output outside of the PowerPivot Configuration Tool. Every time you run the tool, it writes the output into an xml file, which stores the values you entered and the results from the run. Output files are located in the %ProgramFiles%\Microsoft SQL Server\110\Tools\PowerPivotTools\ConfigurationTool\Log folder.
This concludes this excursion into the PowerPivot Configuration Tool. I hope you find it useful in your work as a SharePoint administrator. In one of the next posts, I’m going to show you how to use this tool to configure a multi-server SharePoint farm. Stay tuned!