Making the Most of Markup
Before I started working on HDi, I was a web developer. I found the transition to HDi pretty easy because the markup and the script were already so familiar to me. There is, however, a very big difference with HDi markup that web developers should learn in order to make their applications more efficient. Unlike HTML, HDi can use timing that is a subset of SMIL to modify the UI. Those of us who come from the web world might want to shy away from this because it's unfamiliar. We know how to animate the UI via the script and we are comfortable with that. But, if you take the time to learn markup timing, you can make your applications more efficient, your animations smoother, and your script cleaner.
title clock vs. page clock vs. application clock
Timing elements can use the page, application, or title clocks. In timing elements that uses the title clock, times are relative to the timeline of the title that is playing. In timing elements that uses the application clock, times are relative to the point that the initial markup page loaded. In timing elements that use the page clock uses, times are relative to the point that the current markup page loaded. If your application has only one markup page, page and application clocks will behave the same way. When using a title clock, you can go back in time to re-trigger cues. You cannot go back in time with a page or application clock.
Because times are relative to the title timeline, timing elements that use the title clock can only be used in a title application. Also, XPath expressions cannot be used with the title clock. However, because this clock is tied to the title timeline, this timing element is very useful when doing a linear presentation that is tied to the movie that is playing such as the Warner Bros. IME or Universal's U Control. If there are elements you want to appear on screen at specific points in the movie, use the title clock. If you want to your subvideo to appear at a particular point in the movie and fade out at another point, send an event to your script using the title clock.
When using a timing element to modify style based on which element has the focus or which menu is opened, you will most likely use the application or page clock. If you want to use an XPath expression or an XPath variable to trigger a cue, it must exist in a timing element that uses a page or application clock.
And, something to note - your markup can contain multiple timing elements. So, you may have a title clock on one timing element that triggers your picture-in-picture to appear on screen and specified points in the movie. And, you may have a timing element with an application clock that manages the UI for the menu that allows the user to specify the size and position of the picture-in-picture when it does appear.
<!-- PIP should appear on screen at specific points in the movie-->
<timing clock="title">
<par>
<cue select="id('some_div')" begin="00:00:05:00" end="00:01:20:00">
<event name="PIP">
<param name="display" value="show"/>
</event>
</cue>
<cue select="id('some_div')" begin="00:01:20:00" end="00:05:50:00">
<event name="PIP">
<param name="display" value="hide"/>
</event>
</cue>
</par>
</timing>
<!-- User can control settings which specify if PIP appears at trigger points -->
<timing clock="application">
<par>
<cue begin="id('button_hide_pip')[state:actioned()]" end="id('button_hide_pip')[not(state:actioned())]">
<event name="settings">
<param name="PIF" value="off"/>
</event>
</cue>
<cue begin="id('button_show_pip')[state:actioned()]" end="id('button_show_pip')[not(state:actioned())]">
<event name="settings">
<param name="PIF" value="on"/>
</event>
</cue>
</par>
</timing>
XPath variables
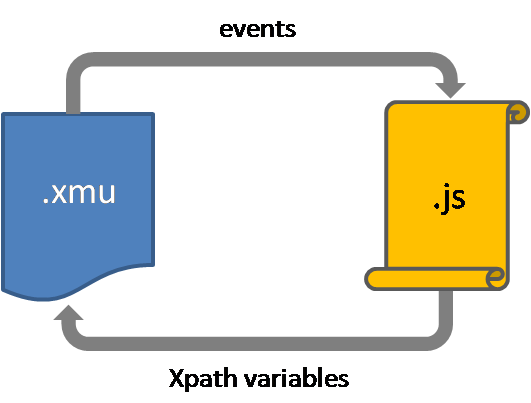
The markup is very good for modifying the style, but not so good at handling more complex logic - that's where the script comes in. Markup communicates with the script via events - that a button has been focused or actioned or a time code has passed. Script can communicate back by setting XPath variables - that the UI needs to be updated.
Markup sends event:
<cue begin="id('btn_custom')[state:actioned()]" end="defaultNode()[not(state:actioned())]">
<event name="custom">
<param name="foo" value="bar"/>
</event>
</cue>
Script receives event:
addEventListener("custom", handleCustom, false);
Script sets XPath variable
function handleCustom(evt) {
document.setXPathVariable("CUSTOM_VAR",evt.foo);
}
Markup uses XPath variable:
<par begin="($CUSTOM_VAR = 'bar')" end="($CUSTOM_VAR != 'bar')">
<!-- put cues here -->
</par>
An important note about XPath variables - they are strings that you can reference in "select", "begin", or "end". They cannot be anything other than a string. They cannot be used in a "set".
Nesting pars
As we put more UI work on the markup, we inevitably will have more XPath expressions to evaluate at each tick. More XPath expressions to evaluate at each tick will slow your application, so the key is to nest your pars and seqs so that XPaths expressions that don't need to be evaluated aren't.
For instance, let's say you have a menu with sub menu A and sub menu B. Sub menu A has buttons 1, 2, and 3. Sub menu B has buttons 4, 5, and 6. You do not need to listen for focus or action on buttons 4, 5, or 6 if sub menu B is closed, and conversely, you do not need to listen for focus or action on buttons 1, 2, or 3 when sub menu A is closed.
<par begin="id('mainMenu')[style:display='auto']" end="id('mainMenu')[style:display='none']">
<par begin="id('subMenuA')[style:display='auto']" end="id('subMenuA')[style:display='none']">
<cue begin="id('button1')[state:focused()]" end="id('button1')[not(state:focused())]">
...
</cue>
...
</par>
<par begin="id('subMenuB')[style:display='auto']" end="id('subMenuB')[style:display='none']">
<cue begin="id('button4')[state:focused()]" end="id('button4')[not(state:focused())]">
...
</cue>
...
</par>
</par>
Note that the cues contained within these pars will end when their parent does regardless of the cue's end trigger.
Choosing the right "end"
Cues need to have an "end" or a "dur". Cues that last too long might result in button triggers being missed because the cue was not able to restart in time. Cues that are too short might result in the trigger being missed completely should frames be dropped.
When triggering an event when a button is actioned, you can use the state of the button no longer actioned as a cue end.
<cue begin="id('btn_custom')[state:actioned()]" end="defaultNode()[not(state:actioned())]">
<event name="custom">
<param name="foo" value="bar"/>
</event>
</cue>
In the example above, a node was selected in begin. The same node is used for our end trigger, so we can use defaultNode() instead of selecting by id again.
Perhaps you want to use markup to set the focus on a button. The cue that does this can end as soon as that button gets focus.
<cue select="id('btn_custom')" begin="($MODE = 'custom')" end="id('btn_custom')[state:focused())">
<set state:focused="true"/>
</cue>
And if you've done done your nesting as shown above, maybe your cue shouldn't end until its parent has. In this case you can set your cue's end to false and it will only end when its parent does.
<par begin="($MODE = 'bet')" end="false()">
...
</par>
fill="hold"
Sometimes you don't want to set the style of an element; you want to animate it over a duration. Using "hold" for the fill attribute tells the markup to maintain the final value at the end of the animation. Note that even with fill="hold", the style will be reset when the parent par ends.
<cue select="id('subMenuA_div')" begin="($MODE = 'subMenuA')" dur="1s" fill="hold">
<animate style:y="900px;500px"/>
</cue>
The fill attribute is particularly useful when you animate a style. Be careful about using it on a set tag or where a parent par does not end or you may end up holding a style for longer than you intended.
Use the Schemas as Your Guide
The markup schemas can be downloaded and associated with your XML editor to assist you as you are writing your markup. With the schemas associated in Visual Studio, Intellisense will guide you through allowed tags and available attributes and the corresponding chapter in the spec as you type. More information about downloading and associating the schemas can be found in one of my previous blog posts (https://blogs.msdn.com/amyd/archive/2007/05/07/intellisense-it-s-a-good-thing.aspx)
Mixing script and markup
There will be times that you want to modify your markup styling with script. Keep in mind that when you use script to modify the style that the script now has control over that style until you call unset. In general, I try to avoid having both script and markup modify the same element. Use markup as much as you can. But, if you have a situation where you have to modify the style with markup and script, definitely read Peter Torr's blog about using unSetProperty (https://blogs.msdn.com/ptorr/archive/2006/09/08/746678.aspx)
Final Thoughts
HDi developers should keep in mind that players currently on the market may exceed the minimum performance requirements in the spec and that it's best to consider how your HDi code can be made more efficient overall and not benchmarking performance against specific players. Firmware for players may be released periodically to improve performance; however the markup engine may permit greater performance improvements than the script engine as the player knows exactly how your markup will behave at each tick. It can not predict the path your script will take at each tick. This does not mean script is bad - good script is still good, and bad markup is still bad. But, this does mean that you can create more efficient applications with smoother animations if you offset some of your application's load to well structured markup.