My Take on an Azure Open Source Cross-Platform DevOps Toolkit–Part 3
| My Take on an Azure Open Source Cross-Platform DevOps Toolkit–Part 1 | Click Here |
| My Take on an Azure Open Source Cross-Platform DevOps Toolkit–Part 2 | Click Here |
| My Take on an Azure Open Source Cross-Platform DevOps Toolkit–Part 3 | Click Here |
| My Take on an Azure Open Source Cross-Platform DevOps Toolkit–Part 4 | Click Here |
| My Take on an Azure Open Source Cross-Platform DevOps Toolkit–Part 5 | Click Here |
| My Take on an Azure Open Source Cross-Platform DevOps Toolkit–Part 6 | Click Here |
| My Take on an Azure Open Source Cross-Platform DevOps Toolkit–Part 7 | Click Here |
| My Take on an Azure Open Source Cross-Platform DevOps Toolkit–Part 8 | Click Here |
| My Take on an Azure Open Source Cross-Platform DevOps Toolkit–Part 9 | Click Here |
| My Take on an Azure Open Source Cross-Platform DevOps Toolkit–Part 10 | Click Here |
| My Take on an Azure Open Source Cross-Platform DevOps Toolkit–Part 11 | Click Here |
| My Take on an Azure Open Source Cross-Platform DevOps Toolkit–Part 12 | Click Here |
Jenkins Pipelines Need to Track State – Hello Relational Databases
The previous two posts got us all set up to start the main work.
This post is about:
(1) Managing state in the pipeline
(2) The MySQL database to store state
(3) Downloading all the assets: (1) Python code (2) Dockerfile (3) httpservice – the app
(4) Details about the http-based service we are deploying (MySQL data, the unit test, the MVC architecture)
Managing State in the Pipeline – If the Pipeline Breaks, then what?
A core challenge is storing and tracking state. If the pipeline breaks somewhere, it needs to stop and notify the dev team that someone broke the build. All subsequent Python scripts must stop executing.
There's a few things you need to get done obviously based on the prior posts. I'm going to assume the you've followed the instructions in the last post.
As you saw in Part 2, we setup MySQL for this purpose.
Let’s now create a database and a table
For the moment, to keep things simple, go ahead and create a database along with the table called, "messages." As the pipeline executes, we will track state in the messages table. As explained previously, a persistent, centrally available persistent store is important.
Using a persistent store to control pipeline workflow
In later posts you will see how this data store is used. When a specific step in the pipeline executes, . The first task is to verify that the pipeline is still functioning correctly. If it failed in a previous pipeline step, then we need to stop processing. Ideally, we will notify the developer who broke the build. And as each step successfully executes, we also need to store that in a persistent way.
Here is what it should look like:
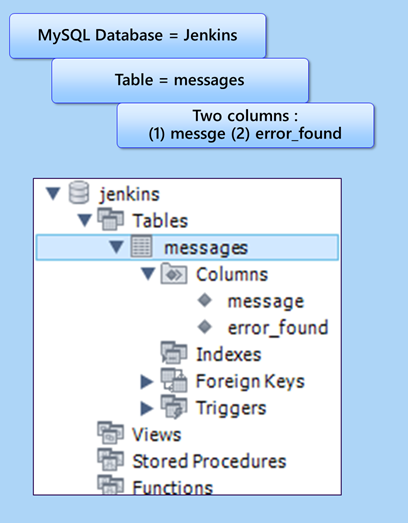
Figure 1: Configuring your MySQL database
Periodic Build - How will our pipeline begin execution
There are two general approaches to kicking off the pipeline. The first approach is to leverage web hooks. The way web hooks work is that as soon a developer checks in code to github, github will call into your Jenkins server to notify that the github repo got updated.
At that point, Jenkins will begin the downloading of the code repo to begin the pipeline.
Stephen Connolly writes, "Jenkins (and in fact any CI systems) works best when builds are triggered after each and every commit. That provides you, the developer, with the most instant feedback possible. That, in turn, means you get fix(es) to the problems you introduced before you leave the context of what you were working on."
https://www.cloudbees.com/blog/better-integration-between-jenkins-and-github-github-jenkins-plugin
The Jenkins GitHub plugin
I spent a fair bit of time trying to get the Jenkins pipeline to execute when someone committed the code to Github. However, I was able to get Github to issue a post command to Jenkins. And with respect to Jenkins, I was able to receive this post command. But I was unable to execute the pipeline once I received the notification from Github. Several hours later I just gave up.
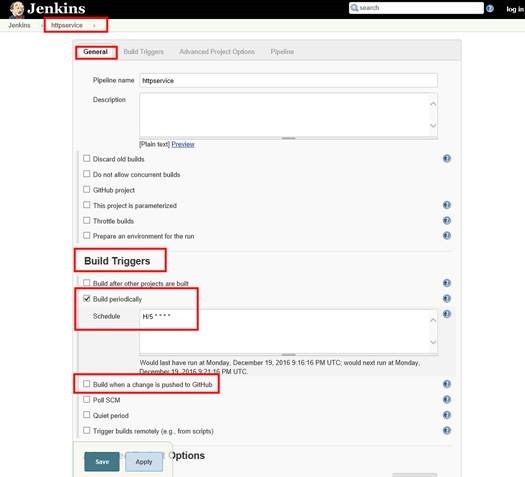
Instead I opted for a periodic build until I revisit this later.
Below you can see my httpservice pipeline project. It will essentially execute the httpservice pipeline every five minutes.
Figure 2: Setting a Pipeline build to execute every 5 minutes
Viewing the Pipeline Output
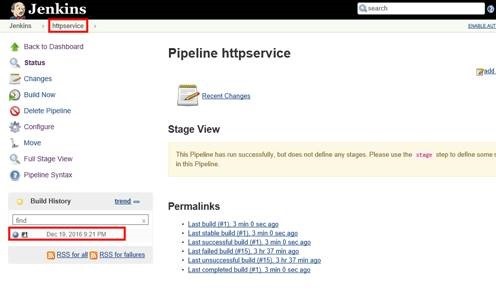
After 5 minutes, you will see this. Notice for our pipeline that the build history shows one job. I can double-click on this job and see the console output.
Figure 3: We created a new Jenkins Pipeline called httpservice
Read about Pipeline here
https://github.com/jenkinsci/pipeline-plugin/blob/master/TUTORIAL.md
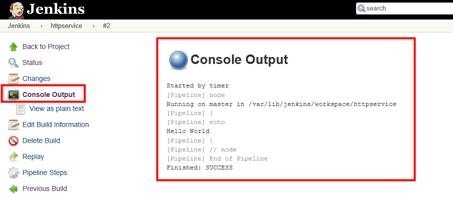
We can see that are simplistic pipeline did in fact show, "Hello World." We had clicked Build now then viewed the build job's console output.
Figure 4: Looking at the output of our primitive pipeline
Our pipeline is pretty much empty right now. What we need to do is execute a bunch of Python code and really define out pipeline.
Where does all the python code come from, including the Dockerfile?
So how do we get Python code available to execute in our pipeline?
The answer is simple. We need to put on our lower Python code in a Github repo.
Kick off by downloading our DevOps pipeline code written Python
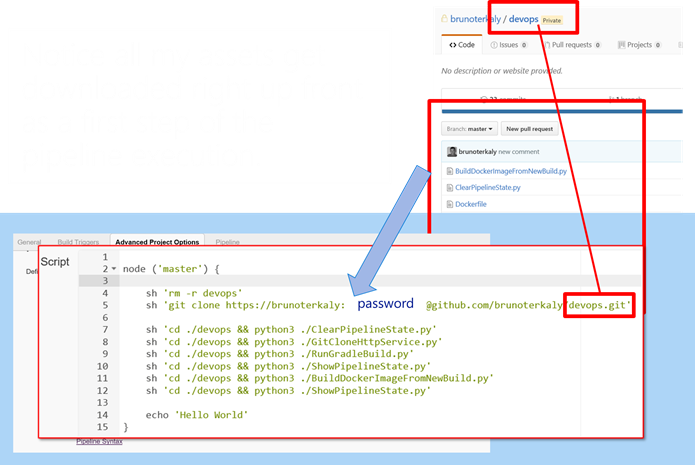
This is the first step the pipeline will execute will be to do a git clone or git pull to bring in the necessary files to execute the pipeline. In the graphic below this means we need to clone devops.
Figure 5: What our pipeline will look like when we are done. But not ALL the steps - yet
Here you can see that I am downloading my DevOps repo. As you can see from the diagram above, it contains all the Python code I need to execute my pipeline. It also includes the Dockerfile.
You can also see that after initializing the pipeline state (line 7), I am downloading my httpservice (line 8).
Special Note about SSH
The one thing that you should improve is not to pass in the username and password, but rather rely on SSH keys.
Notice that on line 2 below a passing username and password for this private repo. I did this for simplicity.
Downloading all our assets that need to be built and tested
This python script (GitCloneHttpService.py) does the trick, using subprocess. It downloads my enter code repo of httpservice.
Remember, httpservice is our core project that we will now explain below.
Figure 6: Python script that downloads our core project (httpservice)
The httpservice project
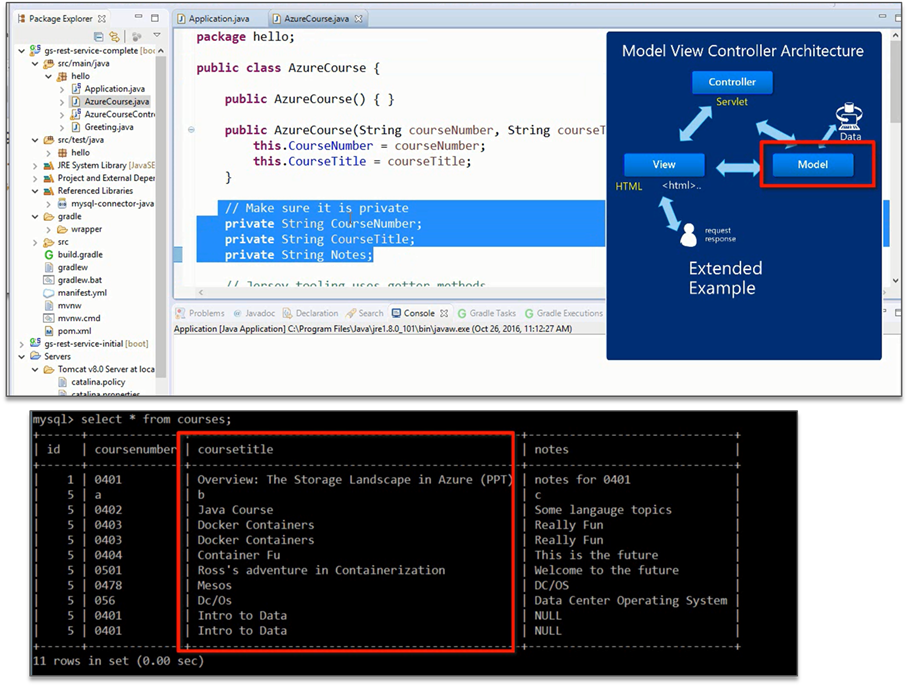
This is a simple project. It is an http-based service that returns json data that comes from a MySQL database. In my case I used Eclipse/Spring to build out this project. It has just one method to call that returns JSON data.
Essentially, a user queries a database through a web endpoint.
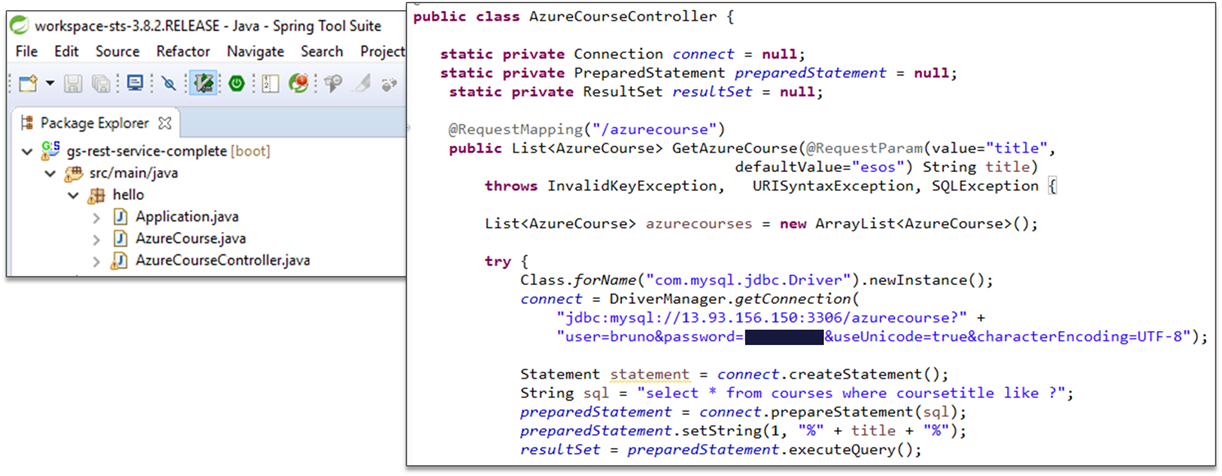
If the user goes to https://host_address/azurecourse, a method gets called: GetAzureCourse() .
Figure 7: Our core project (httpservice)
Notice that GetAzureCourse() takes a string coursetitle that ends up being used in the where clause. Notice the default value for title (if none is passed) is "esos."
You can pass your own CourseTitle like this:
https://host_address/azurecourse?coursetitle=Mesos
Figure 8: A view of the model of our MVC App as well as the courses table to which it maps
The unit test
The point of all this is that unit tests get automated into the build pipeline before deployment takes place. That is why we are doing all of this work.
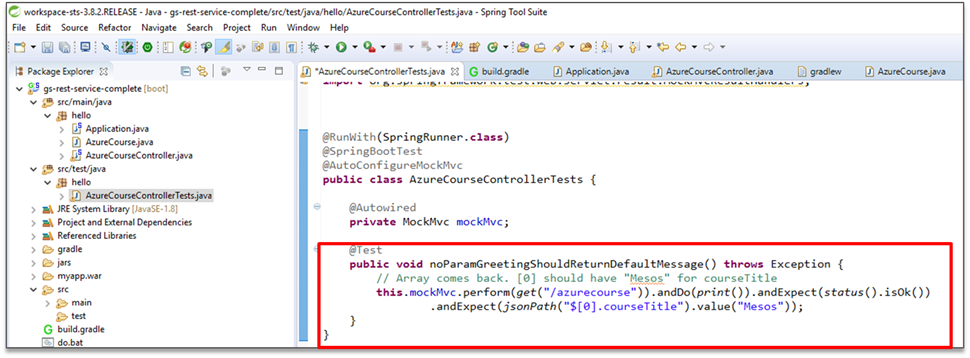
Notice the test class below. We essentially validate that a restful call returns "Mesos" based on the query. It is part of the Eclipse/Spring project.
This is the unit test - a simple one
Notice the unit test simply verifies that the call to the database succeeds and that the appropriate string comes back.
Figure 9: The Unit Test
If the endpoint https://host_address/azurecourse is hit, then the courseTitle in the JSON code that comes back should be Mesos.
Figure 10: Notice the default parameter for GetAzureCourse()
Conclusion
This post brought up a few key topics:
(1) Managing state in the pipeline
(2) The MySQL database to store state
(3) Downloading all the assets: (1) Python code (2) Dockerfile (3) httpservice – the app
(4) Details about the http-based service we are deploying (MySQL data, the unit test, the MVC architecture)
.
