Creating a Response Group #4: Creating and configuring a workflow
This is the last step in our journey in creating a response group: creating and configuring a workflow. We started by enabling our Lync user for enterprise voice then we created an agent group and in the previous post we created and configured a queue. The response group workflow determines the actions that are taken when the response group receives a phone call. In this example, we will configure a simple workflow, this mean that we are not going to configure an IVR (interactive voice response) but a hunt group. A hunt group provides additional settings such as a welcome message, availability (hours of business and vacation) and music on hold.
As for previous objects, let's start by looking at the properties of the workflow object:
- Parent <RgsIdentity>: The service where the workflow will be hosted.
- Name <String>: Unique name assigned to the workflow.
- PrimaryUri <Uri>: SIP address for the workflow, must begin with "sip:" prefix.
- Active <$true | $false>: If set to true, means that the workflow is active and available to accept phone calls.
- Anonymous <$true | $false>: If set to true, the identities of the agents will be masked (for incoming call). This also enable to make call on behalf of the workflow.
- BusinessHoursID <Nullable>: The ID of the HoursOfBusiness object defines the days of the week and times of the day that the workflow agents are available to answer calls.
- CustomMusicOnHoldFile <AudioFile>: Represents custom music to be played when callers are placed on hold. If not defined, the callers will hear the default music on hold.
- Description <String>: Description of the workflow, this is displayed in the Lync contact card.
- DisplayNumber <String>: Phone number for the workflow as displayed in Lync 2010, allow to be formatted as wanted.
- EnabledForFederation <$true | $false>: Indicates whether the workflow is available to federated users.
- HolidayAction <CallAction>: Action to be taken if the call is received on a holiday.
- HolidaySetIdList <RgsHolidaySet>: Represents days (RgsHoliday) when workflow agents are not available to answer calls.
- Language <String>: The language used to read workflow text-to-speech (TTS) prompts.
- LineUri <Uri>: Phone number for the workflow, must be prefixed with "tel:+".
- NonBusinessHoursAction <CallAction>: Action to be taken if a call is received outside the workflow business hours.
- TimeZone <String>: Time zone information used when determining holidays and business hours.
To set the workflow you can either use the Lync Management Shell or the web interface. Keep in mind that the web interface does not enable all features of the workflow but can be convenient to quickly create a workflow.
Let's have a quick try with the Response Group configuration tool:
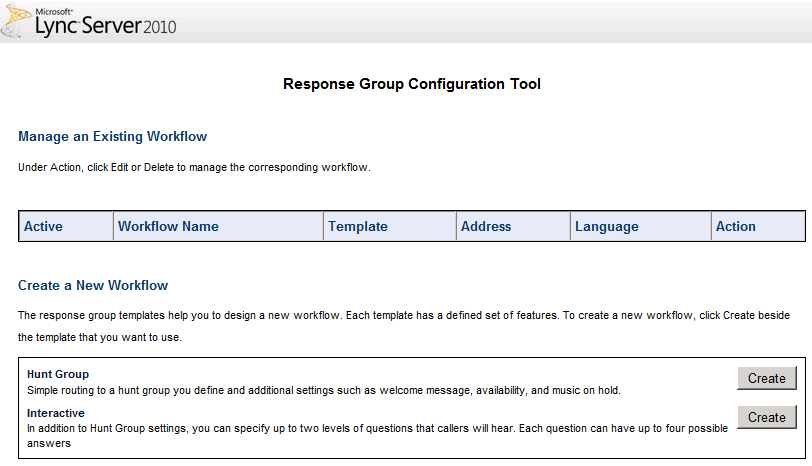
Figure 1: Response Group Configuration Tool
- 1. Open the Response Group Configuration Tool (https://pool.fqdn.com/RGSConfig)
- 2. Click on Create to create a new hunt group
- 3. Enter values to set you workflow (primary uri, display name, queue, ...)
- 4. Click the deploy button
- 5. Now you response group should be up and running in two minutes maximum.
To get more control over our hunt group settings we will now go ahead and use the Lync Management Shell to create our workflow.
- 1. Open the Shell or Import the Lync module to your PowerShell console.
PS C:\> Import-Module Lync - 2. Get the service identity that will host your workflow
PS C:\> $serviceId="service:"+(Get-CSService | ?{$_.Applications -like "*RGS*"}).ServiceId; - 3. Create the new workflow with some default settings
PS C:\> $w = New-CsRgsWorkflow -Name "My first workflow" -PrimaryUri "sip:first@vdomain.com" -Parent $serviceId - 4. Enter a description (optional)
PS C:\> $w.Description = "First workflow created" - 5. Set the display number (optional)
PS C:\> $w.DisplayNumber = "+41 12 345 67 89" - 6. Set the line Uri (optional) - make sure your gateway is properly configured
PS C:\> $w.LineUri = "tel:+41123456789" - 7. Create a call action for the default action
- 7.1. Get the queue identity (the queue name is "My First Queue"
PS C:\> $q = Get-CsRgsQueue |? {$_.Name -Like "My First Queue"} - 7.2. Create a prompt to be played as the welcome message
PS C:\> $prompt = New-CsRgsPrompt -TextToSpeechPrompt "Thank you for calling our Response Group, we are looking for an agent to answer you." - 7.3. Create the call action transferring to the queue
PS C:\> $defaultAction = New-CSRgsCallAction -Prompt $prompt -Action "TransferToQueue" -QueueId $q.Identity - 7.4. Set the workflow default action to the call action
PS C:\> $w.DefaultAction = $defaultAction
- 7.1. Get the queue identity (the queue name is "My First Queue"
- 8. Activate the workflow
PS C:\> $w.Active = $true - 9. Save the workflow to the database
PS C:\> Set-CsRgsWorkflow $w
At this point your workflow can be reached from the PSTN or from any voice enabled user in the enterprise.
I will be showing how to configure a workflow with hours of business and holidays. Keep Reading!