Introduction to Maps for Windows Phone 8
Windows Phone 8 Maps Control
Windows Phone 8 contains a new Maps API that is different from the Bing Maps available in Windows Phone OS 7.1. One major difference between the two controls is that the WP7 control is a Silverlight control, while the new WP8 control is native and hence part of the WP8 SDK libraries. Another difference is the fact that the WP7 control was based on Bing Maps while the new WP8 control is based on Nokia’s Here Maps. However, the old WP7 control is still supported on the WP8 SDK but is deprecated and is only recommended for upgrading WP7 apps to WP8.
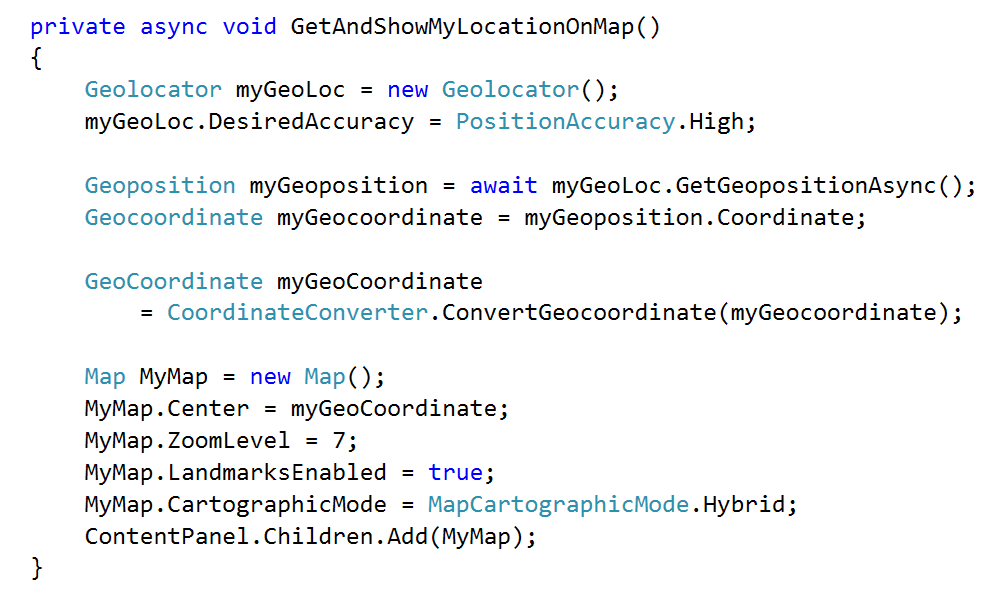
To get us started, we are going to create a sample WP8 app that gets our current location and displays it on a map using the new WP8 control. To do this:
- Activate the ID_CAP_LOCATION capability under the app manifest file.
- To get access to the user’s current geographic location, we need an instance of the Geolocator class. It is important to mention that location info comes from the Windows Location Provider which uses Wi-Fi triangulation, IP address data or even a GPS device to determine geolocation. The geolocation API provides the most appropriate data from all available sources.
- It is also important to note that our Geolocator instance returns our location info as Windows.Devices.Geolocation.Geocoordinate while our map control expects System.Device.Location.GeoCoordinate. We therefore need a helper class that converts the location info between the two formats (the class is included in the full project attached on this blog post).
- Final step is to add a map control into our application. There are two approaches to doing this: we could drop the control from the Toolbox onto our design view, which will generate the necessary XAML code for us; or, we could add the control via code. We choose the latter.
Maps Task
Launchers and choosers provide an easy way of that applications can use Windows Phone 8 features. The Maps task therefore simply launches the Maps application without having to write complex code to display the map. Some of the optional features provided by the Maps Task at startup include using a search string to find and mark a location on the map, specifying the map center and zoom level.
Note that unlike native Maps Control, the Maps Task doesn’t require the map capability reference (no need to activate ID_CAP_MAP in the app manifest).
To use the Map Task:
- Add a reference to the System.Device assembly. You also need to include references to Microsoft.Phone.Tasks and System.Device.Location namespaces
- Sample code is as shown below; note that if we don’t specify the center option, then the map picks our current location by default.

Maps Direction Task
One of the most common tasks in mapping apps is routing, which ideally is getting valid directions between two points. The Maps direction tasks helps in implementing this easily on Windows Phone 8. The directions task launches the Maps applications and displays the possible route between the points of interest.
At startup, we can specify both the start and end points, or choose to omit one of them, in which case our current location will be selected by default. The start and end points are specified using a LabeledMapLocation, which contains a string label, and geographic coordinates specifying the latitude and longitude of the location.
Below is the sample code required to launch the task.

The output will be as show below.

I also recommend having a look at this link, it provides a great overview on Windows Phone 8 mapping and a sample Maps Explorer project to get you started.