Ask Learn
Preview
Ask Learn is an AI assistant that can answer questions, clarify concepts, and define terms using trusted Microsoft documentation.
Please sign in to use Ask Learn.
Sign inThis browser is no longer supported.
Upgrade to Microsoft Edge to take advantage of the latest features, security updates, and technical support.
Note
Access to this page requires authorization. You can try signing in or changing directories.
Access to this page requires authorization. You can try changing directories.
Today, I was trying to connect legacy VS2010 Project onto Team Foundation Server on cloud. This was on an old laptop that I have which hasn’t been upgraded to VS2012. The following are the prerequisites that are required to accomplish this task.
Failure to having the above perquisites installed results into this error: HTTP code 203: Non-Authoritative Information as few users complained here.
After installing the prerequisites, fire up Visual Studio 2010 and click on File > Open > Team Project from the IDE to connect to TFS as shown below.

Clicking on the Open Team Project will open a window as shown below. This window is used to select the server and select the necessary steps to connect to TFS on the Cloud. Now click on the Servers button from the Connect to Team Project window as highlighted in the screen below.

Now we can see a new window with an empty server list. Click on the Add button to add our TFS Server on the cloud as shown below.

Now we can see a pop up window requesting for the name or URL of the Team Foundation Server and the connection details as shown below.

Now go back to the web interface of the team foundation server and copy the TFS URL as highlighted in the screen below.

Paste the copied TFS in the cloud URL(https://sebichondo.visualstudio.com/) and paste it to the Name or URL of the Team Foundation Server input box and click OK button as shown in the screen below.

Now enter the username and password (Live ID) and click on Sign In as shown in the screen below.

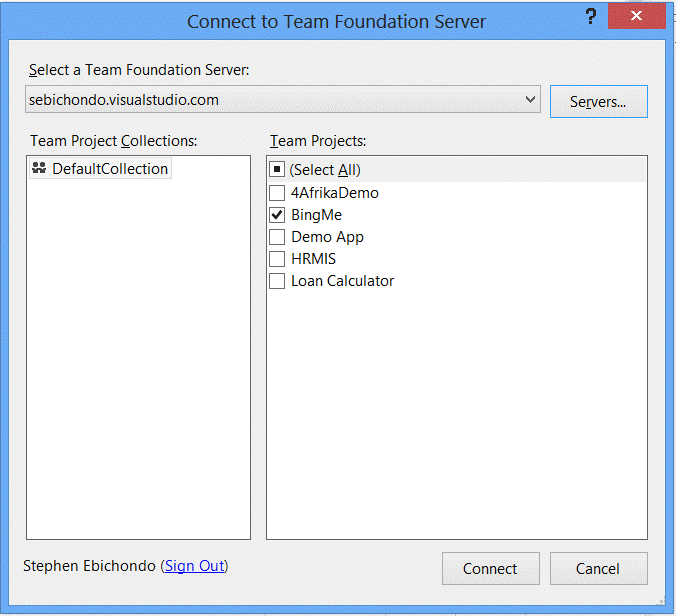
Now we can see that the team projects listed in the Team Projects section as shown below.
Clicking on Connect will go back to the main interface of the Visual Studio IDE and we can see the Team Explorer showing status of connecting to the Team Project. Once TFS on the cloud is connected successfully we can see the work items, Builds, Source
Control folders getting synched from the Cloud Server.
Now click on each item and we can see the list downloaded from the cloud available here. Just select the respective section and make the changes appropriately to build the new version and upload back to TFS on the Cloud.

Happy Coding!
Ask Learn is an AI assistant that can answer questions, clarify concepts, and define terms using trusted Microsoft documentation.
Please sign in to use Ask Learn.
Sign in