EF Feature CTP5: Code First Model with Master-Detail WPF Application
The information in this post is out of date.
Visit msdn.com/data/ef for the latest information on current and past releases of EF.
For WPF Databinding with EF see https://msdn.com/data/jj574514
In December we released ADO.NET Entity Framework Feature Community Technology Preview 5 (CTP5). In addition to the Code First approach this CTP also contains a preview of a new API that provides a more productive surface for working with the Entity Framework. This API is based on the DbContext class and can be used with the Code First, Database First, and Model First approaches.
This post provides an introduction to creating your model using Code First development and then using the types defined in the model as data sources in the “master-detail” WPF application.
In this walkthrough, the model defines two types that participate in one-to-many relationship: Category (principal\master) and Product (dependent\detail). Then, the Visual Studio tools are used to bind the types defined in the model to the WPF controls. The WPF data-binding framework enable navigation between related objects: selecting rows in the master view causes the detail view to update with the corresponding child data. Note, that the data-binding process does not depend on what approach is used to define the model (Code First, Database First, or Model First).
In this walkthrough the default Code First conventions are used to map your .NET types to a database schema and create the database the first time the application runs. You can override the default Code First conventions by using Data Annotations or the Code First Fluent API. For more information see: EF Feature CTP5: Code First Walkthrough (section 9 - Data Annotations) and EF Feature CTP5: Fluent API Samples.
Install EF CTP5
If you haven’t already done so then you need to install Entity Framework Feature CTP5.
Create a solution and a class library project to which the model will be added
1. Open Visual Studio 2010.
2. From the menu, select File -> New -> Project… .
3. Select “Visual C#” from the left menu and then select “Class Library” template.
4. Enter CodeFirstModel as the project name and CodeFirstWithWPF as the solution name. Note, to be able to specify different names for the project and the solution names must check the “Create directory for solution” option (located on the right bottom corner of the New Project dialog).
5. Select OK.
Create a simple model
When using the Code First development you usually begin by writing .NET classes that define your domain model. The classes do not need to derive from any base classes or implement any interfaces. In this section you will define your model using C# code.
1. Remove the default source code file that was added to the CodeFirstModel project (Class1.cs).
2. Add reference to the EntityFramework assembly. To add a reference do:
2.1. Press the right mouse button on the CodeFirstModel project, select Add Reference…
2.2. Select the “.NET” tab.
2.3. Select EntityFramework from the list.
2.4. Click OK .
3. Add new class to the CodeFirstModel. Enter Product for the class name.
4. Replace the Product class definition with the code below.
public class Product
{
public int ProductId { get; set; }
public string Name { get; set; }
public virtual Category Category { get; set; }
public int CategoryId { get; set; }
}
5. Add another new class. Enter Category for the class name.
6. Implement the Category class as follows:
using System.Collections.ObjectModel;
public class Category
{
public Category()
{
this.Products = new ObservableCollection<Product>();
}
public int CategoryId { get; set; }
public string Name { get; set; }
public virtual ObservableCollection<Product> Products { get; private set; }
}
The Products property on the Category class and Category property on the Product class are navigation properties. Navigation properties in the Entity Framework provide a way to navigate an association\relationship between two entity types, returning either a reference to an object, if the multiplicity is either one or zero-or-one, or a collection if the multiplicity is many.
The Entity Framework gives you an option of loading related entities from the database automatically whenever you access a navigation property. With this type of loading (called lazy loading), be aware that each navigation property that you access results in a separate query executing against the database if the entity is not already in the context.
When using POCO entity types, lazy loading is achieved by creating instances of derived proxy types during runtime and then overriding virtual properties to add the loading hook. To get lazy loading of related objects, you must declare navigation property getters as public, virtual (Overridable in Visual Basic), and not sealed (NotOverridable in Visual Basic). In the code above, the Category.Products and Product.Category navigation properties are virtual.
Create a derived context
In this step we will define a context that derives from System.Data.Entity.DbContext and exposes a DbSet<TEntity> for the classes in the model. The context class manages the entity objects during runtime, which includes retrieval of objects from a database, change tracking, and persistence to the database. A DbSet<TEntity> represents the collection of all entities in the context of a given type.
1. Add reference to the EntityFramework assembly. That is where DbContext and DbSet are defined. To add a reference do:
1.1. Press the right mouse button on the CodeFirstModel project, select Add Reference…
1.2. Select the “.NET” tab.
1.3. Select EntityFramework from the list.
1.4. Click OK.
2. Add new class to the CodeFirstModel. Enter ProductContext for the class name.
3. Implement the class definition as follows:
using System.Data.Entity;
public class ProductContext : DbContext
{
public DbSet<Category> Categories { get; set; }
public DbSet<Product> Products { get; set; }
}
4. Build the project.
In the code above we use a “convention over configuration” approach. When using this approach you rely on common mapping conventions instead of explicitly configuring the mapping. For example, if a property on a class contains “ID” or “Id” string, or the class name followed by Id (Id can be any combination of upper case and lower case) the Entity Framework will treat these properties as primary keys by convention. This approach will work in most common database mapping scenarios, but the Entity Framework provides ways for you to override these conventions. For example, if you explicitly want to set a property to be a primary key, you can use the [Key] data annotation. For more information about mapping conventions, see the following blog: Conventions for Code First.
Create a WPF application
In this step we will add a new WPF application to the CodeFirstWithWPF solution.
1. Add a new WPF application to the CodeFirstWithWPF solution.
1.1. Press the right mouse button on the CodeFirstWithWPF solution and select Add -> New Project…
1.2. Select “WPF Application” template. Leave the default name (WpfApplication1).
1.3. Click OK.
2. Add reference to the CodeFirstModel class library project. That is where our model and the object context are defined.
2.1. Press the right mouse button on the project and select Add Reference…
2.2. Select the “Projects” tab.
2.3. Select CodeFirstModel from the list.
2.4. Click OK.
3. Add reference to the EntityFramework assembly.
4. Add the classes that are defined in the model as data sources for this WPF application.
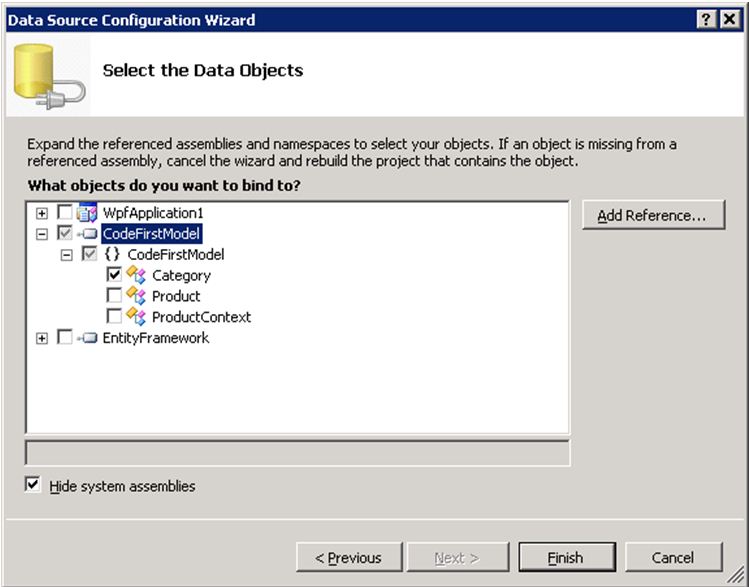
4.1. From the main menu, select Data -> Add New Data Source…
4.2. Select Objects and click Next.
4.3. In the “What objects do you want to bind to” list click to open the CodeFirstModel until you see the list of data sources, select Category. There no need to select the Product data source, because we can get to it through the Product’s property on the Category data source.
4.4. Click Finish.
5. Show the data sources (from the main menu, select Data -> Show Data Sources). By default the Data Sources panel is added on the left of the Visual Studio designer.
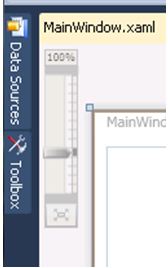
6. Select the Data Sources tab and press the pin icon, so the window does not auto hide. You may need to hit the refresh button if the window was already visible.
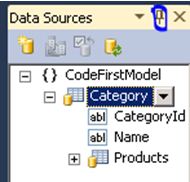
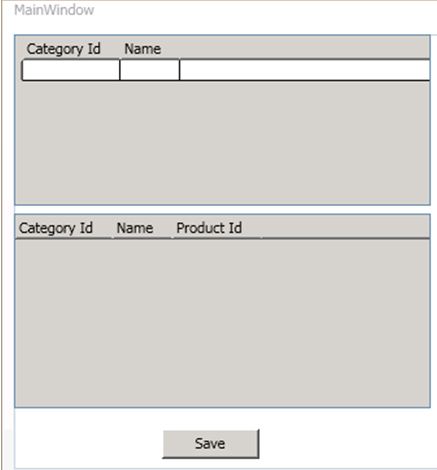
7. Select the Category data source and drag it on the form. Let’s see what happened when we dragged this source:
7.1. By default, the CollectionViewSource categoryViewSource resource and the DataGrid categoryDataGrid control are added to XAML. For more information about DataViewSources, see https://bea.stollnitz.com/blog/?p=387.
7.2. The categoryViewSource resource serves as a binding source for the outer\parent Grid element. The binding source is specified by setting the parent Grid element DataContext property to "{StaticResource categoryViewSource }". The inner Grid elements then inherit the DataContext value from the parent Grid (categoryDataGrid’s ItemsSource property is set to "{Binding}").
<Window.Resources>
<CollectionViewSource x:Key="categoryViewSource" d:DesignSource="{d:DesignInstance my:Category, CreateList=True}" />
</Window.Resources>
<Grid DataContext="{StaticResource categoryViewSource}">
<DataGrid AutoGenerateColumns="False" EnableRowVirtualization="True" Height="132" HorizontalAlignment="Left" ItemsSource="{Binding}"
Name="categoryDataGrid" RowDetailsVisibilityMode="VisibleWhenSelected" VerticalAlignment="Top" Width="321">
<DataGrid.Columns>
<DataGridTextColumn x:Name="categoryIdColumn" Binding="{Binding Path=CategoryId}" Header="Category Id" Width="SizeToHeader" />
<DataGridTextColumn x:Name="nameColumn" Binding="{Binding Path=Name}" Header="Name" Width="SizeToHeader" />
</DataGrid.Columns>
</DataGrid>
</Grid>
8. Select the Products property from under the Category data source and drag it on the form. The categoryProductsViewSource resource and productDataGrid grid are added to XAML. The binding path for this resource is set to Products. WPF data-binding framework will do its magic so that only Products related to the selected Category show up in productDataGrid.
9. Add a button to the form and set the Name property to buttonSave and the Content property to Save.
10. The form should look similar to this:
11. Add the event handler for the save button by double-clicking on the button. This will add the event handler and bring you to the code behind for the form. The code for the buttonSave_Click event handler will be added in the next section.
Add the code that handles data interaction
In this section you will create a WPF client application that queries the conceptual model, updates entity objects, and saves the data to the database.
1. Implement the code behind class (MainWindow.xaml.cs) as follows. The code comments explain what the code does.
using CodeFirstModel;
using System.Data.Entity;
/// <summary>
/// Interaction logic for MainWindow.xaml
/// </summary>
public partial class MainWindow : Window
{
private ProductContext _context = new ProductContext();
public MainWindow()
{
InitializeComponent();
}
private void Window_Loaded(object sender, RoutedEventArgs e)
{
System.Windows.Data.CollectionViewSource categoryViewSource =
((System.Windows.Data.CollectionViewSource)(this.FindResource("categoryViewSource")));
// Load is an extension method on IQueryable, defined in the System.Data.Entity namespace.
// This method enumerates the results of the query, much like ToList but without creating a list.
// When used with Linq to Entities this method creates the entity instances and adds to the context.
_context.Categories.Load(); // Load is defined in the System.Data.Entity namespace.
// After the data is loaded call the DbSet<T>.Local property to use the DbSet<T> as a binding source.
categoryViewSource.Source = _context.Categories.Local;
}
private void buttonSave_Click(object sender, RoutedEventArgs e)
{
// When you delete an object from the related entities collection (in our case Products),
// The Entity Framework doesn’t mark these child entities as deleted.
// Instead, it removes the relationship between the parent and the child
// by setting the parent reference to null.
// So we manually have to delete the products that have a Category reference set to null.
// The following code uses LINQ to Objects against the Local collection of Products.
// The ToList call is required because otherwise the collection will be modified
// by the Remove call while it is being enumerated.
// In most other situations you can do LINQ to Objects directly against the Local property without using ToList first.
foreach (var product in _context.Products.Local.ToList())
{
if (product.Category == null)
{
_context.Products.Remove(product);
}
}
_context.SaveChanges();
// Refresh the grids so the database generated values show up.
this.categoryDataGrid.Items.Refresh();
this.productsDataGrid.Items.Refresh();
}
protected override void OnClosing(System.ComponentModel.CancelEventArgs e)
{
base.OnClosing(e);
this._context.Dispose();
}
}
Test the WPF application
When you run the application the first time, the Entity Framework uses the default conventions to create the database on the localhost\SQLEXPRESS instance and names it after the fully qualified type name of the derived context (CodeFirstModel.ProductContext). The subsequent times, unless the model changes, the existing database will be used. You can change the default behavior by overriding the Code First default conventions. For more information, see EF Feature CTP5: Code First Walkthrough.
1. Set the WpfApplication1 project as a startup project.
1.1. Click the right mouse button on the WpfApplication1 project and select “Set as StartUp project”.
2. Compile and run the application.
3. Enter a category name in the top grid and product names in the bottom grid. (Do not enter anything in ID columns, because the primary key is generated by the database).
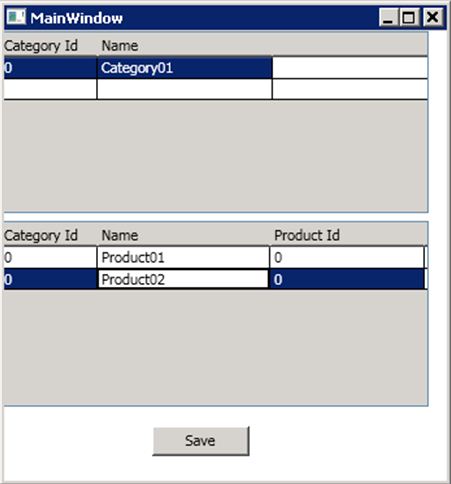
4. Press the Save button to save the data to the database. After the call to DbContext’s SaveChanges(), the IDs are populated with the database generated values. Because we called Refresh() after SaveChanges() the DataGrid controls are updated with the new values as well.

Summary
In this post we demonstrated how to create a model using Code First development and then use the types (that participate in the inheritance hierarchy) defined in the model as data sources in the “master-detail” WPF application.
Julia Kornich
Programming Writer