Introducing the Portable Extensible Metadata
Introduction
The Portable Extensible Metadata is a subset of the schema metadata enabled scenarios (the most common ones) built on the Entity Framework Designer extensibility model that enable rich development experience in tools and auto-generation of code. Much in the same way that MIME is a mechanism for extending and annotating media with metadata, schema metadata is about extending and annotating storage elements from different systems with metadata. Amongst other features this will better enable the ability to auto-generate parts of an application.
Looking into the future, we would like to bake these concepts in as core elements into a domain so your feedback is really important. Please give it a try and let us know what you think. The steps below assume basic familiarity with the EDM and uses the AdventureWorks sample database, or any other database you choose, will work as well.
Walkthrough
Install
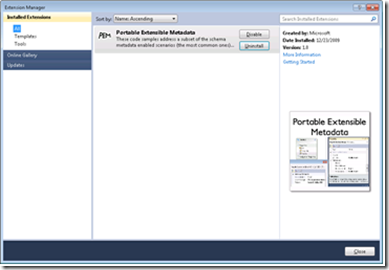
Launch the “Extension Manager” from the Visual Studio “Tools” menu. The download is available from the online gallery, and you can find it quickly by entering “Metadata” into the search field. The samples are available for download from the Visual Studio Gallery here:
https://visualstudiogallery.msdn.microsoft.com/en-us/e6467914-d48d-4075-8885-ce5a0dcb744d
A successful PEM install will display in the “Extension Manager”:
Add metadata to adjust the entity Display
There are scenarios in which the developer needs to adjust the entity display (like order and visibility) without affecting the data in the database.
1. Create a C# solution containing a Windows Form Application project.
2. Add a new, blank ADO.NET Entity Data Model to the web application.
3. If you do not have it already set up, add the AdventureWorks.MDF database to the web application’s App_Data folder.
4. Double-click the model file to open it with the designer.
5. Right click on the designer surface and select “Update Model from Database”.
6. Select the connection to AdventureWorks.MDF, which will be automatically created for you when the MDF file is added to App_Data. If you are using your own database, you may need to create a new connection to it.
7. Proceed through the update wizard, accepting all the defaults, adding no new objects. This process will set up the database connection for you.
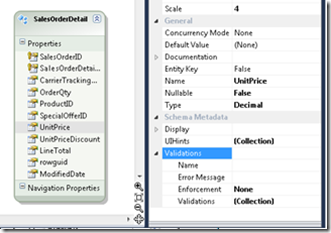
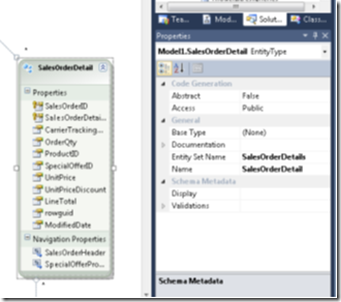
8. Select an entity in the designer and note the properties grid displays the metadata items grouped in the Schema Metadata section:
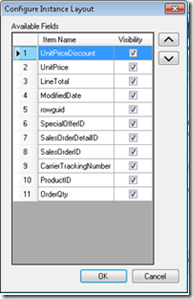
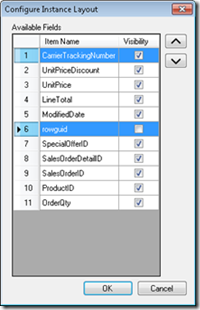
9. Click on the ellipses next to the Display property to open the Configure Instance Layout dialog:
10. This dialog allows changing both the order (by pressing the up and down arrows) and the visibility (by un-checking the button next to affected property).
11. Let’s choose that the application will not display the rowguid and have the CarrierTrackingNumber being display first. Select the CarrierTrackingNumber item and click the up arrow until it is the top of the list. Un-check the visibility checkbox next to rowguid.
12. Click OK and close the designer
13. Open the edmx file using the Open With option and select XML Editor
14. Note that the metadata was persisted in the CSDL section as a new element (Display) created under the CarrierTrackingNumber property with attribute Order set to 0:
 <Property Name="CarrierTrackingNumber" Type="String" MaxLength="25" Unicode="true" FixedLength="false" >
<pem:Display Order="0" Visible="true" xmlns:pem="https://schemas.microsoft.com/PEM/2009/01" />
</Property>
The metadata was persisted in the CSDL section as a new element (Display) created under the rowguid property with Visible attribute set to true:
 <Property Name="rowguid" Type="Guid" Nullable="false" >
       <pem:Display Order="5" Visible="false" xmlns:pem="https://schemas.microsoft.com/PEM/2009/01" />
</Property>
Validating data at the property level
A value constraint restricts the population of a value to a finite set of values specified either in full (enumeration), by start and end values (range), or some combination of both (mixture). The values themselves are primitive data values, typically character strings or numbers. Let’s constraint the UnitPrice to be between $0 and $1000 (products more expensive than $1000 are not allowed) and have it required when entering new data.
1. In the same SalesOrderDetail entity select the UnitPrice property and in the properties grid, click on the arrow next to the Validations to expand it:
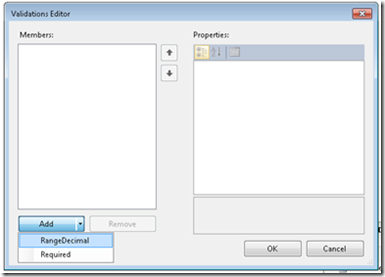
2. Click on the ellipses next to the Validations collection property to open the Validations Editor
3. Click on the arrow on the Add button to display the available vaildators for the property data type (in this case decimal) and select Range:
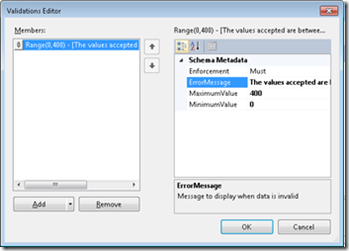
4. Note that once the Range Validator was added to the Members list, the enforcement was automatically set to must. Must means that the definition is an absolute requirement and data violating the constraint will not be entered in the system.
5. Set the MinimumValue and the MaximumValue properties to the minimum and maximum (in this case 0 and 400). In case of violation, the user needs to be notified, so let’s set the ErrorMessage property to the text to be displayed to the user: “The values accepted are between 0 and 400. No change was performed to the database”.
6. Click on the arrow on the Add button to display the available validators and select Required:
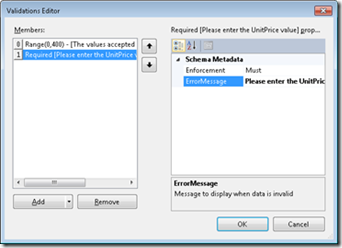
7. Note that the enforcement was correctly set to must, so the Validator will be enforced, the only thing left is setting the ErrorMessage to the text to be displayed: “Please enter the UnitPrice value”.
8. Click OK to close the dialog
9. Close the designer and open the edmx file using the XMLEditor. Note that both validators are persisted in the CSDL section under the UnitPrice element:
 <pem:Validations xmlns:pem="https://schemas.microsoft.com/PEM/2009/01">
   <pem:Range MinimumValue="0" MaximumValue="400" ErrorMessage="The values accepted are between 0 and 400"     Enforcement="Must" />
   <pem:Required ErrorMessage="Please enter the UnitPrice value" Enforcement="Must" />
</pem:Validations>
10. Open the designer (double click on the edmx file in the solution explorer)
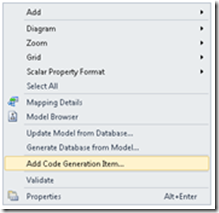
11. Right-click anywhere in the designer and select Add Code Generation Item…
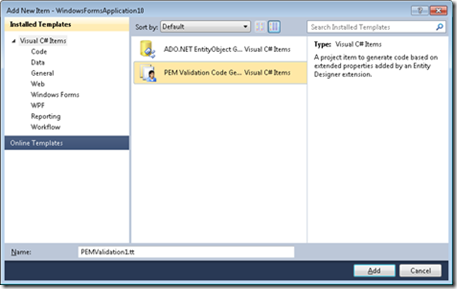
12. Select in the PEM Validation Code Generator option and click Add
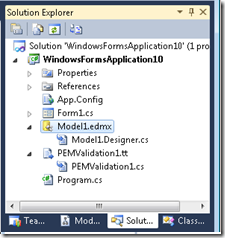
13. Note that in the solution explorer a new template file was created (PEMValidation1.tt) with an associated code file (PEMValidation1.cs).
14. Open the code file (PEMValidation1.cs) and note that code was generated for enforcing both validators set in the designer:
 public bool Validate(out List<string> warnings, out List<string> errors)
        {
         bool isOK = true;
         warnings = new List<string>();
         errors = new List<string>();

//Required
        if((this.ProductID == null))
 {
  errors.Add("ProductID\tError: Field is required");
  isOK = false;
 }

// Range
        if((this.UnitPrice < 0) || (this.UnitPrice > 400))
 {
   errors.Add("UnitPrice\tError: The values accepted are between 0 and 400");
   isOK = false;
 }
Validating data at the entity level
Let’s consider a more advanced validation scenario with the following business rule: if UnitPriceDiscount value is specified then the SpecialOfferID needs to be specified and the other way around (if SpecialOfferID value is specified then the UnitPriceDiscount needs to be specified).
1. Select the SalesOrderDetail entity in the designer:
2. Click on the arrow to the Validations property to expand its items and click on the ellipses next to the Validations collection property to open the Validations Editor
3. Click on the arrow on the Add button to display the available validators for the entity and select Equality:
4. Note that once the Equality Validator was added to the Members list, the enforcement was automatically set to must. Must means that the definition is an absolute requirement and data violating the constraint will not be entered in the system
5. In case of violation, the user needs to be notified, so let’s set the ErrorMessage property to the text to be displayed to the user: “If UnitPriceDiscount value is specified, then the SpecialOfferID needs to be specified and the other way around. No change was performed to the database”.
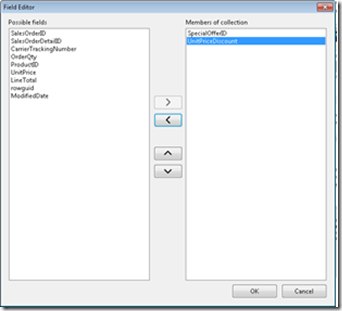
6. Click on the ellipses next to the Fields property to open the Fields Editor.
7.Note that the available fields’ collection was automatically populated to all the fields in the entity. Select from the available fields on the left and add to the list on the right, the two fields participating in the business rule: UnitPriceDiscount and SpecialOfferID:
8. Click OK to close all dialogs
9. Close the designer and open the edmx file using the XMLEditor. Note that the equality validator is persisted in the CSDL section at the entity level:
 <pem:Validations xmlns:pem="https://schemas.microsoft.com/PEM/2009/01">
   <pem:Equality ErrorMessage="If UnitPriceDiscount value …." Enforcement="Must">
            <pem:Field>SpecialOfferID</pem:Field>
            <pem:Field>UnitPriceDiscount</pem:Field>
   </pem:Equality>
 </pem:Validations>
10. Open the designer (double click on the edmx file in the solution explorer)
11. Right-click anywhere in the designer and select Add Code Generation Item…
12. Select in the PEM Validation Code Generator option and click Add
13. Note that in the solution explorer a new template file was created (PEMValidation1.tt) with an associated code file (PEMValidation1.cs).Open the code file (PEMValidation1.cs) and note that code was generated for enforcing the Equality Validator:
 public bool SetValidate(out List<string> warnings, out List<string> errors)
    {
         bool isOK = true;
         warnings = new List<string>();
         errors = new List<string>();

// Equality
if (!((SpecialOfferID == null && UnitPriceDiscount == null) ||
(SpecialOfferID != null && UnitPriceDiscount != null)))
{
       errors.Add("\tError: If UnitPriceDiscount value is specified….");
       isOK = false;
}

          return isOK;
  }
Conclusion
This walkthrough does not touch on some of the additional capabilities and concepts, such as: Subset (the set of instances of the source population must always be a subset of the population of the target population: "If a patient has second given name then the patient has first given name" but not the other way around); all Ring types (the ability to specify that no instance is related to itself: "no patient is treated by itself"); all Mutual (the constraints in which a number of correspondent types are true or false simultaneously: "A patient has aplastic anemia if AtLeast (or "All”, “Exactly” and “AtMost") two of the three mandatory blood tests get a low count") and all mutual derivatives: Exclusive (Mutual with AtMost), InclusiveOR (Mutual with AtLeast), ExclusiveOR (Mutual with Exactly). We will touch on those in the next blogs and releases.
Again, this release is mostly about getting your feedback before baking these concepts in as core elements into a domain, so please let us know what you think.
Irinel Crivat
Program Manager, Microsoft
