Tutorial: Entity Data Source Control
Last month we announced the beta release of Service Pack 1 for Visual Studio 2008. This release includes the Entity Framework, including a wizard that can be used to generate a model and a graphical model designer. It also includes the EntityDataSourceControl, which lets you bind ASP.NET data bound controls to data from a model.
This tutorial grew out of a project I created during a recent bug-bash of the Entity Framework and the modeling tools. This posting is the first of several in which I will show you how use the Entity Data Model wizard to add an AdventureWorks-based model to a simple Web project. It also shows how to bind data to controls in the web app, both through the EntityDataSource, and by executing queries directly against the entity data model.
Prerequisites
- Visual Studio 2008
- The beta release of Visual Studio 2008 Service Pack 1 - available for download here.
- The AdventureWorks sample DB, which is available in the database samples on CodePlex. I used the version of AdventureWorks that has been updated for SQL Server 2008, but the SQL Server 2005 version should work as well. The AdventureWorksLT database won’t work for the specific tutorial steps as written.
Initial Setup
These are the steps used to create a simple web project which we will use throughout the tutorial. The steps are written to create a C# based Web project as it’s the .NET language with which I’m most comfortable.
- Open Visual Studio and create an ASP.NET Web Application project named EDMWorks.
a. Click File, point to New, and click Project.
b. Select the ASP.NET Web Application template and change the project name to EDMWorks. - Rename the Default.aspx page to Products.aspx
- Add three web pages to the project named ProductDetails.aspx, ProductReview.aspx, and ReadImage.aspx.
a. In Solution Explorer, right click the project name (EDMWorks), point to Add, and click Add New Item.
b. Select the Web Form template, and rename it ProductDetails.aspx. Click Add.
c. Repeat for the 2 remaining web pages.
Use the Designer to add the AdventureWorks model to the Web site
- Right click the EDMWorks project and select Add New Item
- Select the ADO.NET Entity Data Model template, and name the model AdventureWorksModel.edmx. Click Add.
- On the Choose Model Contents page of the wizard, select Generate from database and click Next.
- On the Choose Your Data Connection page of the wizard, click New Connection to open the Connection Properties dialog box to generate a connection string for the AdventureWorks database you want to connect to.
- In the Save entity connection settings in Web.Config as text box, enter AdventureWorksModelConnection, and click Next.
- In the Choose Your Database Objects page of the wizard, select Tables, Views, and Stored Procedures. Use AdventureWorksModel for the namespace. Click Finish.
We won’t use the actual designer for this tutorial, but you can double-click the AdventureWorksModel.edmx file in Solution Explorer to take a look at the model that was generated by the wizard.
Add EntityDataSource controls to the Products.aspx web page
This page allows the user to view details about all the products AdventureWorks sells. We will add four data-bound controls and an EntityDataSource control for each as follows:
| Data source name | Purpose | Associated data-bound control |
| dsCategory | Select the ProductCategory entity’s Name and ProductCategoryID properties. | DropDownList named ddCategory |
| dsSubCategory | Based on the category selected in the Category drop down list, select the ProductSubcategory entity’s Name and ProductSubcategoryID properties. |
GridView named gvwSubcategories |
| dsProduct | Display all the products for the subcategory selected in the Subcategories grid view. |
GridView named gvwProduct |
| dsProductDetails | Display details in a DetailsView control about the product that is selected in the Products grid view. | DetailsView named dvwProduct Selected fields are Name, Color, and Price |
Add the dsCategory data source control
Open the Products.aspx web page in Design view.
Add the four data-bound controls to the page
a. Drag a DropDownList control from the Toolbox to the designer surface. Rename the control to ddCategory, and change its AutoPostBack property to True.
b. Drag two GridView controls to the designer surface and rename them gvwSubcategories and gvwProduct.
c. Drag a DetailsView control to the designer surface and rename it dvwProduct.Build the project. This is needed to generate the metadata for the model before we can connect the EntityDataSource control to it.
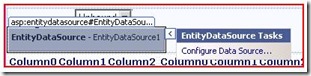
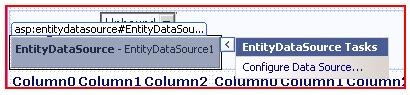
Drag an EntityDataSource control from the Toolbox to the designer surface, next to the ddCategory drop down list.
NOTE: if the EntityDataSource control is not available in the Data section of your Toolbox, Guy Burstein's blog post on the EntityDataSource control tells how to add it:
Under the EntityDataSource Tasks flyout, click Configure Data Source
The Configure Data Source wizard launchesOn the Configure Object Context page of the wizard, select AdventureWorksModelConnection in both the Named Connection and the DefaultContainerName drop down lists. Click Next.
On the Configure Data Selection page of the wizard, in the EntitySetName drop down list, select ProductCategory. In the Select list box, check ProductCategoryID and Name. Click Finish.
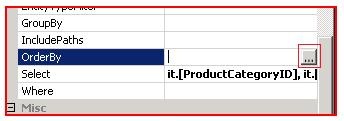
This configures the selection for the data source, but we also want to add an OrderBy clause to ensure the returned list of categories is ordered by the category’s name, and not its Id.
In the Properties window for the data source control, click the field next to OrderBy and click the ellipsis button
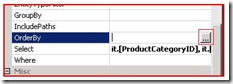
This opens the Expression Editor for the data source control.In the OrderBy Expression text box, enter it.Name. Click OK.
Rename the control to dsCategory.
Bind the dsCategory data source control to the ddCategory drop down list
Click the flyout for the ddCategory drop down list, and under DropDownList Tasks, select Choose Data Source
The Data Source Configuration Wizard launches
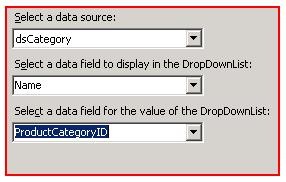
On the Choose a Data Source page of the wizard, select dsCategory in the Select a data source drop down list.
Configure the control to display the Name property in the drop down list, and to use the ProductCategoryID for the list’s value:
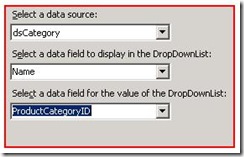
Click OK to finish binding the data source to the control.
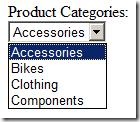
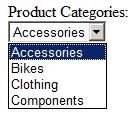
At this point you can run the Web project to verify that the control is correctly picking up the product categories from the AdventureWorks database:
Add the dsSubCategory data source control
This control is hooked to a grid view, and is used to display a product subcategory based on the selection in the ddCategory drop down list.
Drag an EntityDataSource control from the Toolbox to the designer surface. Name the control dsSubCategory.
Under the EntityDataSource Tasks flyout, click Configure Data Source. Use the Configure Data Source wizard to select the ProductSubcategory entity’s ProductSubcategoryID and Name properties.
For this data source, we need to add a Where clause to filter the selection based on the ProductCategory that was selected in the ddCategory drop down list.
NOTE: In the beta release of the service pack, you can’t use the expression editor to generate a parameterized clause that is bound to a control’s value. Because of this, we’ll create the Where clause in the .aspx file.
Switch to Source view to edit the Products.aspx file.
Find the code for the dsSubCategory control, and add a Where clause and WhereParamaters, so it looks like the following:
<asp:EntityDataSource ID="dsSubCategory"runat="server"
ConnectionString="name=AdventureWorksModelConnection"
DefaultContainerName="AdventureWorksModelConnection"
EntitySetName="ProductSubcategory"
Select="it.[ProductSubcategoryID], it.[Name]"Where="it.ProductCategory.ProductCategoryID = @ProductCategoryID">
<WhereParameters>
<asp:ControlParameter ControlID="ddCategories"
Type="Int32"Name="ProductCategoryID" />
</WhereParameters>
</asp:EntityDataSource>
Bind the dsSubCategory data source control to the Subcategories grid view
- Switch back to the Design view of Products.aspx.
- Click the flyout for the gvwSubcategories grid view to open the GridView Tasks.
- In the GridView Tasks, select the Enable Selection option.
- Select dsSubCategory in the Choose Data Source list.
- Click Edit Columns to open the Fields dialog box.
- Clear the check box for the Auto-generate fields option.
- Click the Refresh Schema link. This updates the available fields with the bound fields ProductSubcategoryID and Name from the data source.
- Select the Name bound field from the Avaliable fields list, and click Add. This adds the Name field to the Selected fields list.
- In the BoundField properties, change the HeaderText property from Name to Subcategories.
- In the Selected fields list, click the Select command. Click the button with the blue down arrow to move the Select field to the bottom of the list.
- In the CommandField properties, change the value for the SelectText property to [>] .
- Switch to the Source view , and set the DataKeyNames for the control to ProductSubcategoryID as follows:
 <asp:GridView ID="gvwSubcategories" runat="server"
AutoGenerateColumns="False" DataSourceID="dsSubCategory"
      DataKeyNames="ProductSubcategoryID">
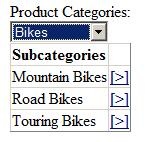
At this point you can run the Web site to verify that the grid view displays the subcategories
based on the selected category:
Add the dsProduct data source control
This control is hooked to a grid view, and is used to display all products for a given subcategory, based on the selection in the Subcategories grid view
- Drag an EntityDataSource control from the Toolbox to the designer surface and name it dsProduct.
- Use similar steps to those you took to create the dsSubcategory data source, except this time the you want to select the Product entity’s ProductID and Name properties, and your Where clause should select the Products whose SubcategoryID matches the selection in the Subcategories grid view.
The finished markup code should look something like:
<asp:EntityDataSource ID="dsProduct"runat="server"
ConnectionString="name=AdventureWorksModelConnection"
DefaultContainerName="AdventureWorksModelConnection"
EntitySetName="Product"
Select="it.[ProductID], it.[Name]"OrderBy="it.[Name]"
Where="it.ProductSubcategory.ProductSubcategoryID =
@ProductSubcategoryID">
<WhereParameters>
<asp:ControlParameter ControlID="gvwSubcategories"
Name="ProductSubcategoryID"
PropertyName="SelectedValue"Type="Int32"/>
</WhereParameters>
</asp:EntityDataSource>
Bind the dsProduct data source control to the gvwProduct grid view
- Click the flyout for the gvwProduct grid view to open the GridViewTasks.
- In the GridView Tasks, select the Enable Paging and Enable Selection options.
- In the Choose Data Source list, select dsProduct.
- Click Edit Columns to open the Fields dialog box.
- Clear the check box for the Auto-generate fields option.
- Click the Refresh Schema link. This updates the available fields with the bound fields ProductID and Name from the data source.
- Select the Name bound field from the Avaliable fields list, and click Add. This adds the Name field to the Selected fields list.
- In the BoundField properties, change the HeaderText property from Name to Products.
- In the Selected fields list, click the Select command. Click the button with the blue down arrow to move the Select field to the bottom of the list.
- In the CommandField properties, change the value for the SelectText property to [>] . Click OK.
- Switch to the Source view , and set the DataKeyNames for the control to ProductID as follows:
 <asp:GridView ID="gvwProduct" runat="server" AllowPaging="True"
AutoGenerateColumns="False" DataSourceID="dsProduct"
DataKeyNames="ProductID">
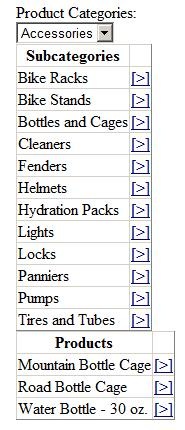
At this point you can run the Web site to verify that the grid view displays the products based
on the selected subcategory:
Add the dsProductDetails data source control
This control is hooked to a details view, and is used to display information about the product selected in the Products grid view.
- Drag an EntityDataSource control from the Toolbox to the designer surface, and name it dsProductDetails.
- Use similar steps to those you took to create the previous data sources, except this time you want to select the Product entity’s ProductID, Name, Color, and ListPrice properties, and your Where clause should select the Product whose ProductID matches the selection in the gvwProducts grid view.
The finished markup code should look something like:
 <asp:EntityDataSource ID="dsProductDetails" runat="server"
ConnectionString="name=AdventureWorksModelConnection"
DefaultContainerName="AdventureWorksModelConnection"
EntitySetName="Product"
Select="it.[ProductID], it.[Name], it.[Color], it.[ListPrice]"
      Where="it.ProductID = @ProductID">
      <WhereParameters>
          <asp:ControlParameter ControlID="gvwProduct"
Name="ProductID" PropertyName="SelectedValue"
Type="Int32" />
      </WhereParameters>
</asp:EntityDataSource>
Bind the dsProductDetails data source control to the dvwProduct details view
Click the flyout for the dvwProduct details view to open the DetailsViewTasks.
Select dsProductDetails in the Choose Data Source list.
Click Edit Fields to open the Fields dialog box.
Clear the check box for the Auto-generate fields option.
Click the Refresh Schema link. This updates the available fields with the bound fields ProductID, Name, Color, and ListPrice from the data source.
Add the Name, Color, and ListPrice fields to the selected fields. Change the HeaderText properties for the Name and ListPrice fields to Product and Price, respectively.
Select TemplateField in the available fields list, and click Add twice to add two template fields to the selected fields.
Click OK to close the Fields dialog box.
You can use the ItemTemplate editor, but I find it easier to edit templates directly in the source code
Switch to the Source view to edit the two item templates you just added. Edit the code for your details view so the TemplateFields look like the following:
 <asp:TemplateField>
    <ItemTemplate>
        <a href='ProductDetails.aspx?ProductID=<%# Eval("ProductID") %>'>
             [More Details...]</a>
        </ItemTemplate>
    </asp:TemplateField>
<asp:TemplateField>
    <ItemTemplate>
        <a href='ProductReview.aspx?ProductID=<%# Eval("ProductID") %>
&ProductName=<%# Eval("Name") %>'>
[Product Reviews...]</a>
    </ItemTemplate>
</asp:TemplateField>
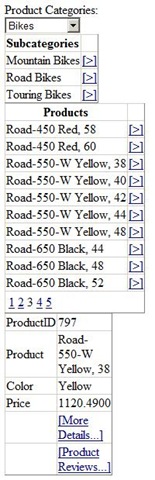
At this point you can run the Web site to verify that the details view displays the Name, Color, and Price for the correct product:
That’s it for the first post in this tutorial. In later postings, I’ll show how to implement the code for the ProductDetails and ProductReview pages. I’ll also show how to read the images for the selected products using Entity SQL queries executed against the model.
Additional Links:
Guy Burstein has created a screencast about the EntityDataSource control on Channel 9.
Eric Dettinger
Software Design Engineer in Test, ADO.NET Entity Framework