Getting started with Azure Information Protection
Creating a classification label matrix for my organization
Before you start your Azure Information Protection deployment and configuration you should identify if your organization has a well-defined classification taxonomy and information handling policy that defines:
- Sensitivity levels of data that exist in the organization
- What can be done with this data?
- With whom it can be shared?
- What level of encryption is required for each level (if at all)?
Such information handling policy or classification taxonomy is usually defined by the CISO or data owners in various business units. In cases where there is no defined policy or taxonomy you can use the pre-defined taxonomy that is shipped as part of enablement of Azure Information Protection on your Azure tenant.
Once you have a well-defined organization wide classification taxonomy you should use Azure Information Protection management console to customize your classification policies:
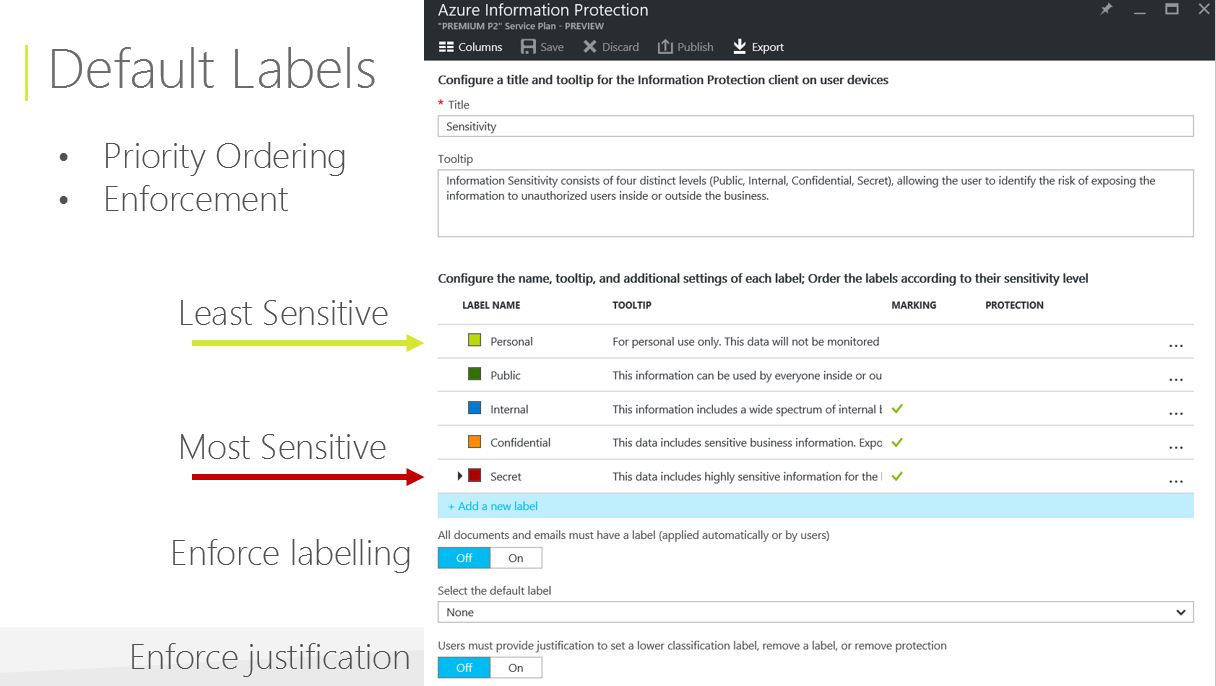
There are five pre-defined sensitivity levels - you can adjust these classification labels to reflect your classification taxonomy, or remove and create new ones.
Adjust all relevant fields for each sensitivity level you set. Pay attention to:
- Description. A short explanatory text that is displayed to the end user as a tooltip on the endpoint.
- Color. Color of sensitivity level shown in the client endpoints.
- Content marking. Depending on your information handling policy some (or all) define a footer, header, and/or watermark. Visualized text can include dynamic information, like document name, username of the person that classified the document etc.
- Order. The order of the labels is used to identify sensitivity level of classifications in a situation where multiple labels may apply.
Adjust sub-levels’ definition. The most sensitive pre-defined level includes two sub-levels by default. You may choose to omit implementation of compartmentalization / sub labeling on the first phase of the deployment. In case you chose to do so, remove existing sub-levels, or delete and re-create your own top level. Note: To simplify the deployment, it’s recommended to use flat, one-level classification at the initial phase and introduce sub-levels on later phases.
Set default classificationper your information handling policy. Even if it’s not required in your policy, it’s recommended to enable default classification to get users accustomed to classification concepts, and in this way, educate and raise their awareness of classification importance.
Set mandatory classification behavior. Most organizations require every single document stored in their network to be classified. If this applies, enable mandatory classification.
Note: Setting default classification can reduce user interruptions if the mandatory classification setting is enabled. If default classification is enabled users must classify files manually only if the previous classification was intentionally removed.Set desired behavior for sensitivity level decrease. You can require your users to provide justification if they lower the sensitivity level.
By completing the steps above, you have defined everything necessary from a policy point of view to enable any user in your organization to classify documents per your taxonomy.
Users without Azure Information Protection software can work with classified documents as they could before Azure Information Protection classification was applied on the document, but they will not see the current classification using Azure Information Protection classification bar unless you applied a visualization mechanism (footer, header, or watermark).
Note: no encryption was enabled during this phase, which means everybody, inside your organization or outside, can continue to work with the documents in exactly same work flow, consume and edit documents. By completing the steps above, you have defined everything necessary from a policy point of view to enable any user in your organization to classify documents per your taxonomy.
POST CREDIT: Azure Information Protection Customer Experience Team.
Thank You :-)
Yoad M. Dvir
יועד דביר