Azure SharePoint 2016 Farm with HNSC published on Internet and multiple IP addresses
Hi all,
On this post we'll talk about how to set up a 3-tier SharePoint Server 2016 Farm on Azure by using Powershell.
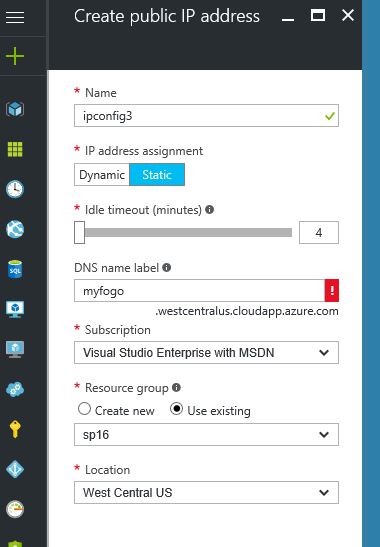
Once farm has been created we will assign a new IP address to the Virtual Machine hosting the SharePoint 2016 Server by following this TechNet article: (we need to request access to this feature sending an email to MultipleIPsPreview@microsoft.com with the ID of our Azure subscription)
Our aim is to have 1 publishing site collection (https://sp16.westcentralus.cloudapp.azure.com) and 1 My Site host site collection (https://myfogo.westcentralus.cloudapp.azure.com) accesible from Internet following Host-Named Site Collection patterns.
We will start by setting up our SharePoint Farm, which will look like picture below, using a Powershell script.

Creating AD server (adVM)
Login-AzureRMAccountGet-AzureRMSubscription | Sort SubscriptionName | Select SubscriptionName$subscr="Visual Studio Enterprise with MSDN" #name of our subscriptionGet-AzureRmSubscription -SubscriptionName $subscr | Select-AzureRmSubscriptionGet-AzureRMResourceGroup | Sort ResourceGroupName | Select ResourceGroupName$rgName="sp16" #name of the resource group$locName="West Central US" #we need to set it up on West Central US for using the multiple address feature$saName="sp16newstrgaccnt"$locName="West Central US"
$locShortName="westcentralus" New-AzureRMResourceGroup -Name $rgName -Location $locNameGet-AzureRMStorageAccount | Sort StorageAccountName | Select StorageAccountNameNew-AzureRMStorageAccount -Name $saName -ResourceGroupName $rgName -Type Standard_LRS -Location $locName$spSubnet=New-AzureRMVirtualNetworkSubnetConfig -Name SP2016Subnet -AddressPrefix 10.0.0.0/24New-AzureRMVirtualNetwork -Name SP2016Vnet -ResourceGroupName $rgName -Location $locName -AddressPrefix 10.0.0.0/16 -Subnet $spSubnet -DNSServer 10.0.0.4$rule1=New-AzureRMNetworkSecurityRuleConfig -Name "RDPTraffic" -Description "Allow RDP to all VMs on the subnet" -Access Allow -Protocol Tcp -Direction Inbound -Priority 100 -SourceAddressPrefix Internet -SourcePortRange * -DestinationAddressPrefix * -DestinationPortRange 3389$rule2 = New-AzureRMNetworkSecurityRuleConfig -Name "WebTraffic" -Description "Allow HTTP to the SharePoint server" -Access Allow -Protocol Tcp -Direction Inbound -Priority 101 -SourceAddressPrefix Internet -SourcePortRange * -DestinationAddressPrefix "10.0.0.6/32" -DestinationPortRange 80New-AzureRMNetworkSecurityGroup -Name SP2016Subnet -ResourceGroupName $rgName -Location $locShortName -SecurityRules $rule1, $rule2$vnet=Get-AzureRMVirtualNetwork -ResourceGroupName $rgName -Name SP2016Vnet$nsg=Get-AzureRMNetworkSecurityGroup -Name SP2016Subnet -ResourceGroupName $rgNameSet-AzureRMVirtualNetworkSubnetConfig -VirtualNetwork $vnet -Name SP2016Subnet -AddressPrefix "10.0.0.0/24" -NetworkSecurityGroup $nsg
# Get the Azure storage account name$sa=Get-AzureRMStorageaccount | where {$_.ResourceGroupName -eq $rgName}$saName=$sa.StorageAccountName
# Create an availability set for domain controller virtual machinesNew-AzureRMAvailabilitySet -Name dcAvailabilitySet -ResourceGroupName $rgName -Location $locName
# Create the domain controller virtual machine$vnet=Get-AzureRMVirtualNetwork -Name SP2016Vnet -ResourceGroupName $rgName$pip = New-AzureRMPublicIpAddress -Name adVM-NIC -ResourceGroupName $rgName -Location $locName -AllocationMethod Dynamic$nic = New-AzureRMNetworkInterface -Name adVM-NIC -ResourceGroupName $rgName -Location $locName -SubnetId $vnet.Subnets[0].Id -PublicIpAddressId $pip.Id -PrivateIpAddress 10.0.0.4
$avSet=Get-AzureRMAvailabilitySet -Name dcAvailabilitySet -ResourceGroupName $rgName$vm=New-AzureRMVMConfig -VMName adVM -VMSize Standard_D1_v2 -AvailabilitySetId $avSet.Id
$storageAcc=Get-AzureRMStorageAccount -ResourceGroupName $rgName -Name $saName$vhdURI=$storageAcc.PrimaryEndpoints.Blob.ToString() + "vhds/adVM-SP2016Vnet-ADDSDisk.vhd"Add-AzureRMVMDataDisk -VM $vm -Name ADDS-Data -DiskSizeInGB 20 -VhdUri $vhdURI -CreateOption empty$cred=Get-Credential -Message "Type the name and password of the local administrator account for adVM."
$vm=Set-AzureRMVMOperatingSystem -VM $vm -Windows -ComputerName adVM -Credential $cred -ProvisionVMAgent -EnableAutoUpdate$vm=Set-AzureRMVMSourceImage -VM $vm -PublisherName MicrosoftWindowsServer -Offer WindowsServer -Skus 2012-R2-Datacenter -Version "latest"$vm=Add-AzureRMVMNetworkInterface -VM $vm -Id $nic.Id$osDiskUri=$storageAcc.PrimaryEndpoints.Blob.ToString() + "vhds/adVM-SP2016Vnet-OSDisk.vhd"$vm=Set-AzureRMVMOSDisk -VM $vm -Name adVM-SP2016Vnet-OSDisk -VhdUri $osDiskUri -CreateOption fromImageNew-AzureRMVM -ResourceGroupName $rgName -Location $locName -VM $vm
Install-WindowsFeature AD-Domain-Services -IncludeManagementToolsInstall-ADDSForest -DomainName malaga.local -DatabasePath "C:\Windows\NTDS" -SysvolPath "C:\Windows\SYSVOL" -LogPath "C:\Windows\Logs"
Add-WindowsFeature RSAT-ADDS-ToolsNew-ADUser -SamAccountName sp_farm_db -AccountPassword (read-host "Set user password" -assecurestring) -name "sp_farm_db" -enabled $true -PasswordNeverExpires $true -ChangePasswordAtLogon $false
Creating SQL 2014 server (sqlVM)
# Log in to AzureLogin-AzureRmAccount# Set up key variables$subscrName="Visual Studio Enterprise with MSDN"$rgName="sp16"$locName="West Central US"$dnsName="sql14"# Set the Azure subscriptionGet-AzureRmSubscription -SubscriptionName $subscrName | Select-AzureRmSubscription# Get the Azure storage account name$sa=Get-AzureRMStorageaccount | where {$_.ResourceGroupName -eq $rgName}$saName=$sa.StorageAccountName
# Create an availability set for SQL Server virtual machinesNew-AzureRMAvailabilitySet -Name sqlAvailabilitySet -ResourceGroupName $rgName -Location $locName
# Create the SQL Server virtual machine$vmName="sqlVM"$vmSize="Standard_D3_V2"$vnet=Get-AzureRMVirtualNetwork -Name "SP2016Vnet" -ResourceGroupName $rgName
$nicName=$vmName + "-NIC"$pipName=$vmName + "-PublicIP"$pip=New-AzureRMPublicIpAddress -Name $pipName -ResourceGroupName $rgName -DomainNameLabel $dnsName -Location $locName -AllocationMethod Dynamic$nic=New-AzureRMNetworkInterface -Name $nicName -ResourceGroupName $rgName -Location $locName -SubnetId $vnet.Subnets[0].Id -PublicIpAddressId $pip.Id -PrivateIpAddress "10.0.0.5"$avSet=Get-AzureRMAvailabilitySet -Name sqlAvailabilitySet -ResourceGroupName $rgName$vm=New-AzureRMVMConfig -VMName $vmName -VMSize $vmSize -AvailabilitySetId $avSet.Id
$diskSize=100$diskLabel="SQLData"$storageAcc=Get-AzureRMStorageAccount -ResourceGroupName $rgName -Name $saName$vhdURI=$storageAcc.PrimaryEndpoints.Blob.ToString() + "vhds/" + $vmName + "-SQLDataDisk.vhd"Add-AzureRMVMDataDisk -VM $vm -Name $diskLabel -DiskSizeInGB $diskSize -VhdUri $vhdURI -CreateOption empty
$cred=Get-Credential -Message "Type the name and password of the local administrator account of the SQL Server computer."$vm=Set-AzureRMVMOperatingSystem -VM $vm -Windows -ComputerName $vmName -Credential $cred -ProvisionVMAgent -EnableAutoUpdate$vm=Set-AzureRMVMSourceImage -VM $vm -PublisherName MicrosoftSQLServer -Offer SQL2014SP1-WS2012R2 -Skus Standard -Version "latest"$vm=Add-AzureRMVMNetworkInterface -VM $vm -Id $nic.Id$storageAcc=Get-AzureRMStorageAccount -ResourceGroupName $rgName -Name $saName$osDiskUri=$storageAcc.PrimaryEndpoints.Blob.ToString() + "vhds/" + $vmName + "-OSDisk.vhd"$vm=Set-AzureRMVMOSDisk -VM $vm -Name "OSDisk" -VhdUri $osDiskUri -CreateOption fromImageNew-AzureRMVM -ResourceGroupName $rgName -Location $locName -VM $vm
Add-Computer -DomainName "malaga.local"Restart-Computer
New-NetFirewallRule -DisplayName "SQL Server ports 1433, 1434, and 5022" -Direction Inbound -Protocol TCP -LocalPort 1433,1434,5022 -Action Allow
Creating SharePoint 2016 server (spVM)
# Set up key variables$subscrName="Visual Studio Enterprise with MSDN"$rgName="sp16"$locName="West Central US"$dnsName="sp16"
# Set the Azure subscriptionGet-AzureRmSubscription -SubscriptionName $subscrName | Select-AzureRmSubscription
# Get the Azure storage account name$sa=Get-AzureRMStorageaccount | where {$_.ResourceGroupName -eq $rgName}$saName=$sa.StorageAccountName
# Create an availability set for SharePoint virtual machinesNew-AzureRMAvailabilitySet -Name spAvailabilitySet -ResourceGroupName $rgName -Location $locName
# Specify the virtual machine name and size$vmName="spVM"$vmSize="Standard_D3_V2"$vm=New-AzureRMVMConfig -VMName $vmName -VMSize $vmSize
# Create the NIC for the virtual machine$nicName=$vmName + "-NIC"$pipName=$vmName + "-PublicIP"$pip=New-AzureRMPublicIpAddress -Name $pipName -ResourceGroupName $rgName -DomainNameLabel $dnsName -Location $locName -AllocationMethod Dynamic$vnet=Get-AzureRMVirtualNetwork -Name "SP2016Vnet" -ResourceGroupName $rgName$nic=New-AzureRMNetworkInterface -Name $nicName -ResourceGroupName $rgName -Location $locName -SubnetId $vnet.Subnets[0].Id -PublicIpAddressId $pip.Id -PrivateIpAddress "10.0.0.6"$avSet=Get-AzureRMAvailabilitySet -Name spAvailabilitySet -ResourceGroupName $rgName$vm=New-AzureRMVMConfig -VMName $vmName -VMSize $vmSize -AvailabilitySetId $avSet.Id
# Specify the image and local administrator account, and then add the NIC$pubName="MicrosoftSharePoint"$offerName="MicrosoftSharePointServer"$skuName="2016"$cred=Get-Credential -Message "Type the name and password of the local administrator account."$vm=Set-AzureRMVMOperatingSystem -VM $vm -Windows -ComputerName $vmName -Credential $cred -ProvisionVMAgent -EnableAutoUpdate$vm=Set-AzureRMVMSourceImage -VM $vm -PublisherName $pubName -Offer $offerName -Skus $skuName -Version "latest"$vm=Add-AzureRMVMNetworkInterface -VM $vm -Id $nic.Id
# Specify the OS disk name and create the VM$diskName="OSDisk"$storageAcc=Get-AzureRMStorageAccount -ResourceGroupName $rgName -Name $saName$osDiskUri=$storageAcc.PrimaryEndpoints.Blob.ToString() + "vhds/" + $vmName + $diskName + ".vhd"$vm=Set-AzureRMVMOSDisk -VM $vm -Name $diskName -VhdUri $osDiskUri -CreateOption fromImageNew-AzureRMVM -ResourceGroupName $rgName -Location $locName -VM $vm
Add-Computer -DomainName "malaga.local"Restart-Computer
$pip = Get-AzureRMPublicIpaddress -Name "spVM-PublicIP" -ResourceGroup $rgName$pip.DnsSettings.Fqdn
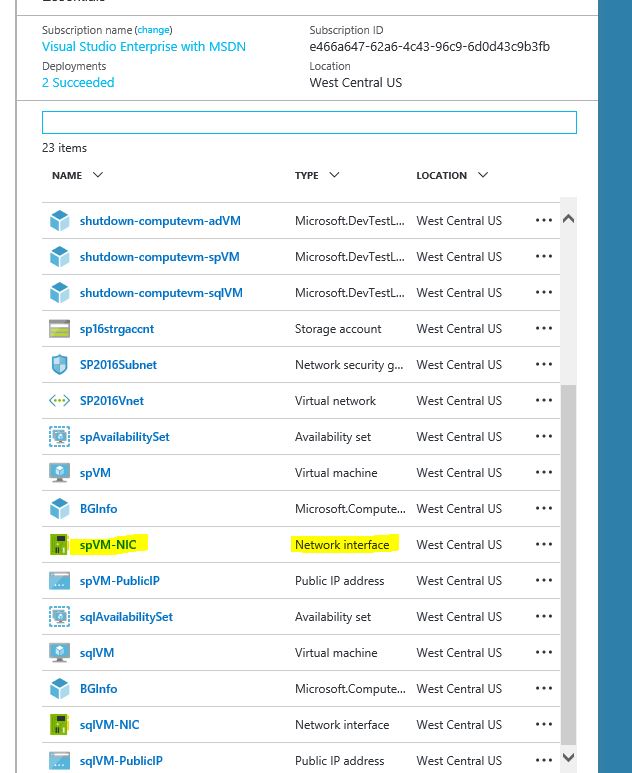
This will provision 3 virtual machines on our sp16 resource group:

We will add a new public-ip on the spVM network interface before setting up our servers.
To do that let's click o a new component in the Azure dashboard:
Now let's add the IPConfiguration to the spVM-NIC network interface:
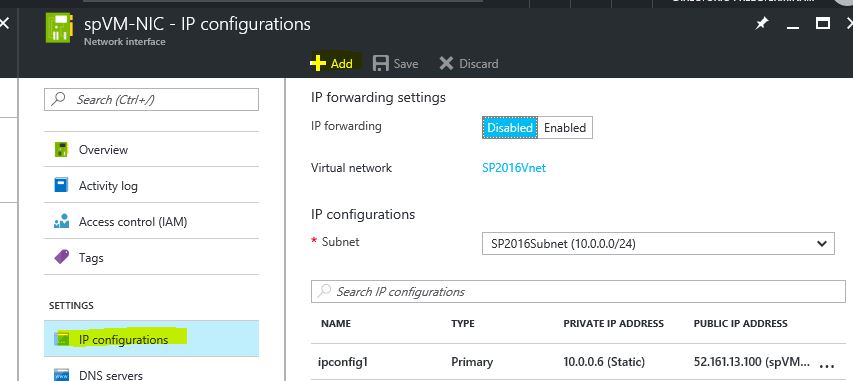
Select the IPConfiguration we just created:
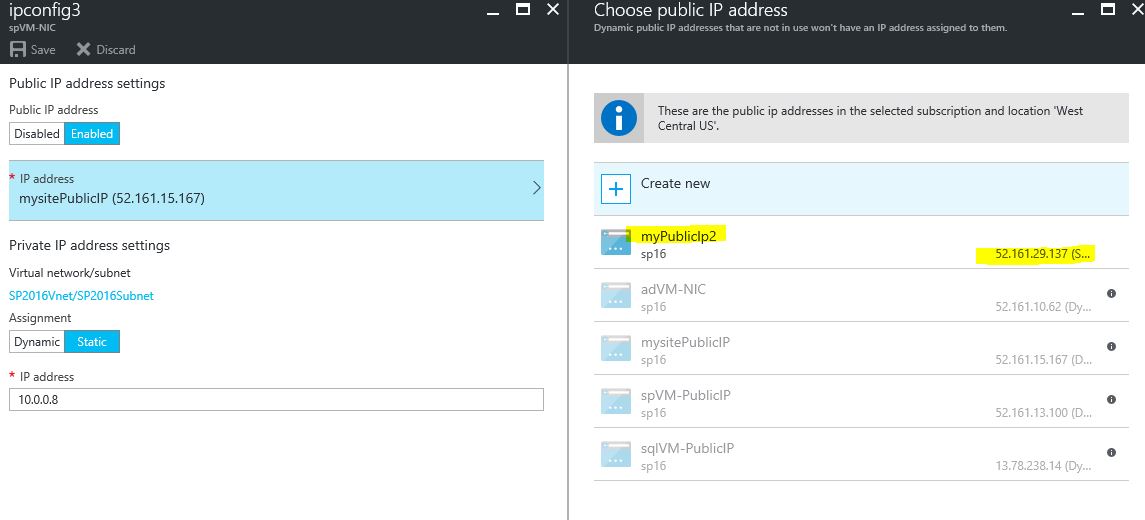
Now we need to add the private IP address 10.0.0.8 to our SharePoint 2016 Server.
Log-in to the SP Server and go to Control Panel > Network and Internet > Network and Sharing Center > TCP/IPv4 Properties:
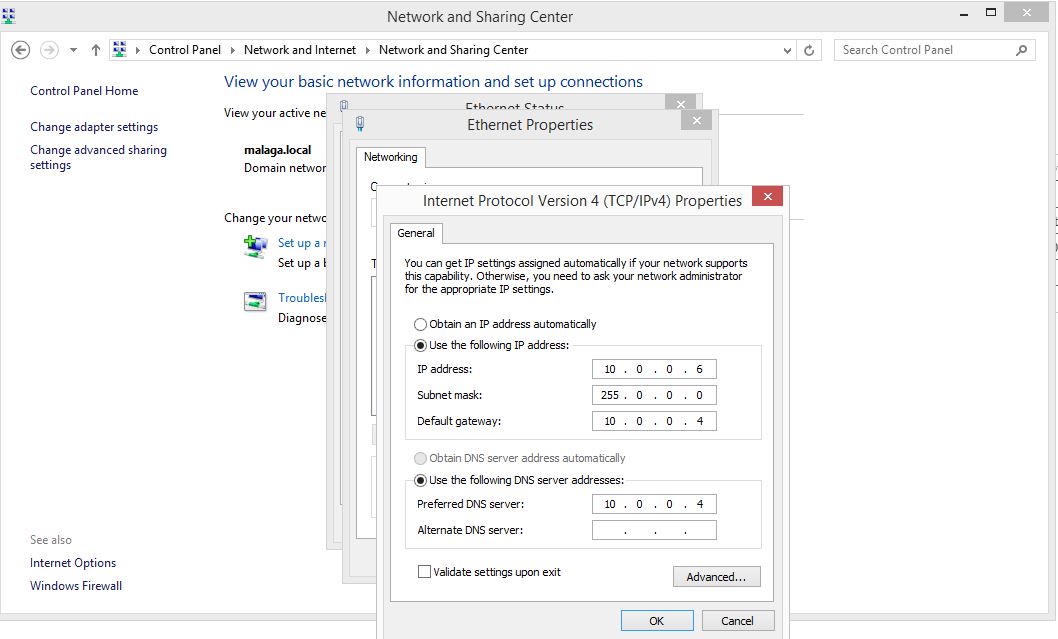
On the IP address textbox set the ip value of the server (it was 10.0.0.6 when we ran the Powershell script)
Default Gateway is the private IP of the Domain controller server.
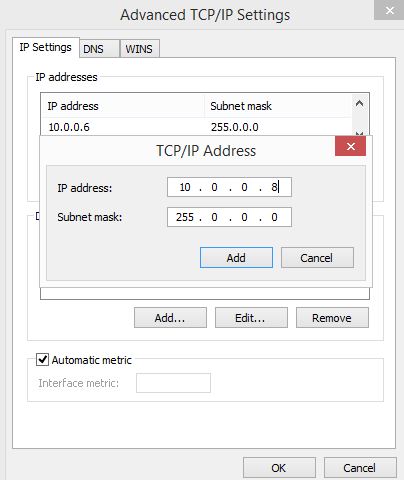
Now click on the Advanced button and add the 10.0.0.8 IP address:
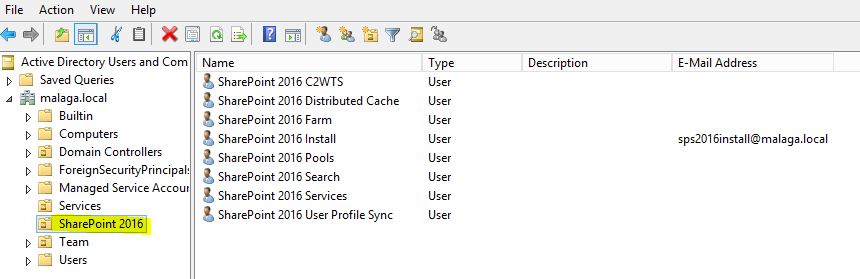
I have created some service Accounts on the AD Server in order to make every service on SharePoint run with the right account:
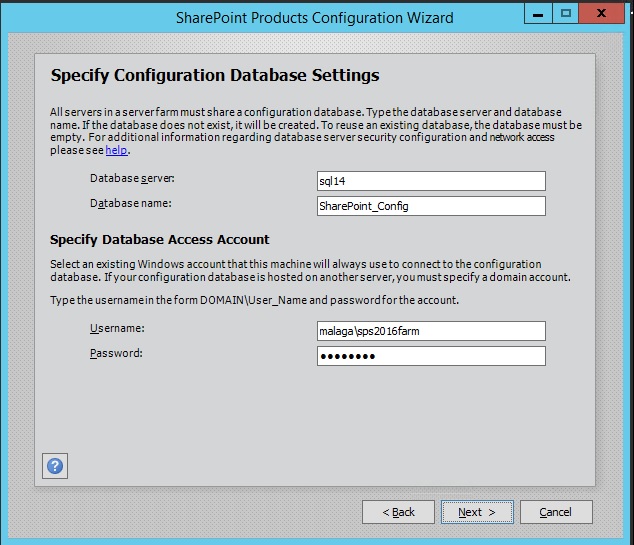
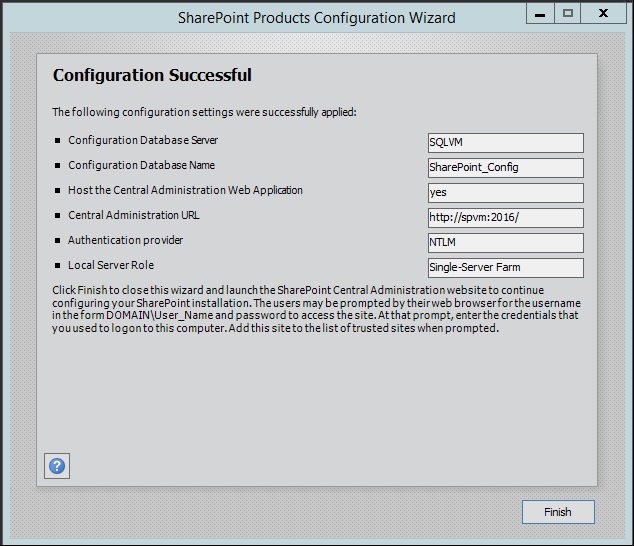
Going back to the SharePoint Server, let's first run the SharePoint 2016 Products Configuration Wizard:
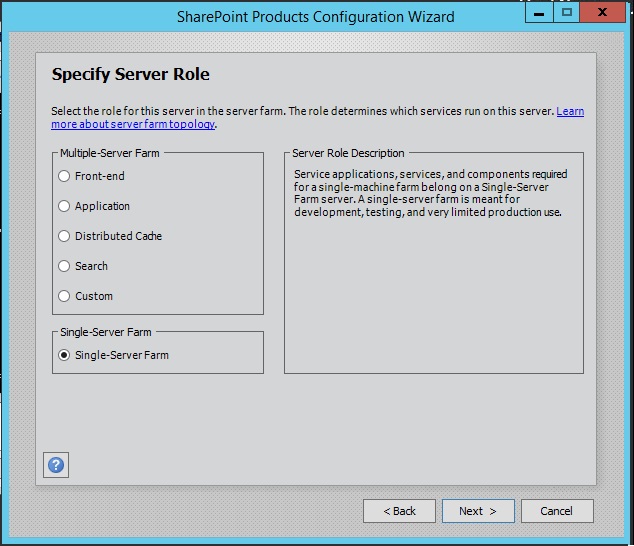
As we're going to user Host-Named site collections we will create a new web application on port 80 and 2 HNSC (I won't go into many details about HNSC but you can get more information on this article):
Creating Web App Port 80
New-SPWebApplication -Name 'Alfogo Sites Default' -port 80 -ApplicationPool "SharePoint - Web Apps" -ApplicationPoolAccount (Get-SPManagedAccount 'malaga\sps2016pools') -AuthenticationProvider (New-SPAuthenticationProvider -UseWindowsIntegratedAuthentication) -Path "C:\inetpub\wwwroot\wss\VirtualDirectories\AlfogoSitesDefault" -URL "https://alfortesdefault"
Creating Root Site Collection
New-SPSite 'https://alfortesdefault' -Name 'Portal' -Description 'Portal on root' -OwnerAlias 'malaga\sps2016install' -language 1033 -Template 'STS#0'
Creating Host-named Site Collections
New-SPSite 'https://intranet.alfogo.com' -HostHeaderWebApplication (Get-SPWebApplication 'Alfogo Sites') -Name 'Intranet' -Description 'Intranet Alfogo' -OwnerAlias 'malaga\sps2016install' -language 1033 -Template 'BLANKINTERNET#0'New-SPSite 'https://my.alfogo.com' -HostHeaderWebApplication (Get-SPWebApplication 'Alfogo Sites Default') -Name 'My' -Description 'My Sites Alfogo' -OwnerAlias 'malaga\sps2016install' -language 1033 -Template 'SPSMSITEHOST#0' -ContentDatabase "WSS_Content_My"New-SPManagedPath 'personal' -Hostheader
Extending Web Application to Internet Zone
Get-SPWebApplication "https://alfortesdefault" | New-SPWebApplicationExtension -Name "Alfogo Sites Internet" -Zone "Internet" -Port 80 -URL "https://alfortesinternet" -Path "C:\inetpub\wwwroot\wss\VirtualDirectories\AlfogoSitesInternet"
As you can see we have created 2 site collections: intranet.alfogo.com (using Publishing Site Template) and my.alfogo.com (My Site Host)
Both site collections are on the default zone and in order to access them from Internet we need to add an Internet zone pointing to the public address we created which were:
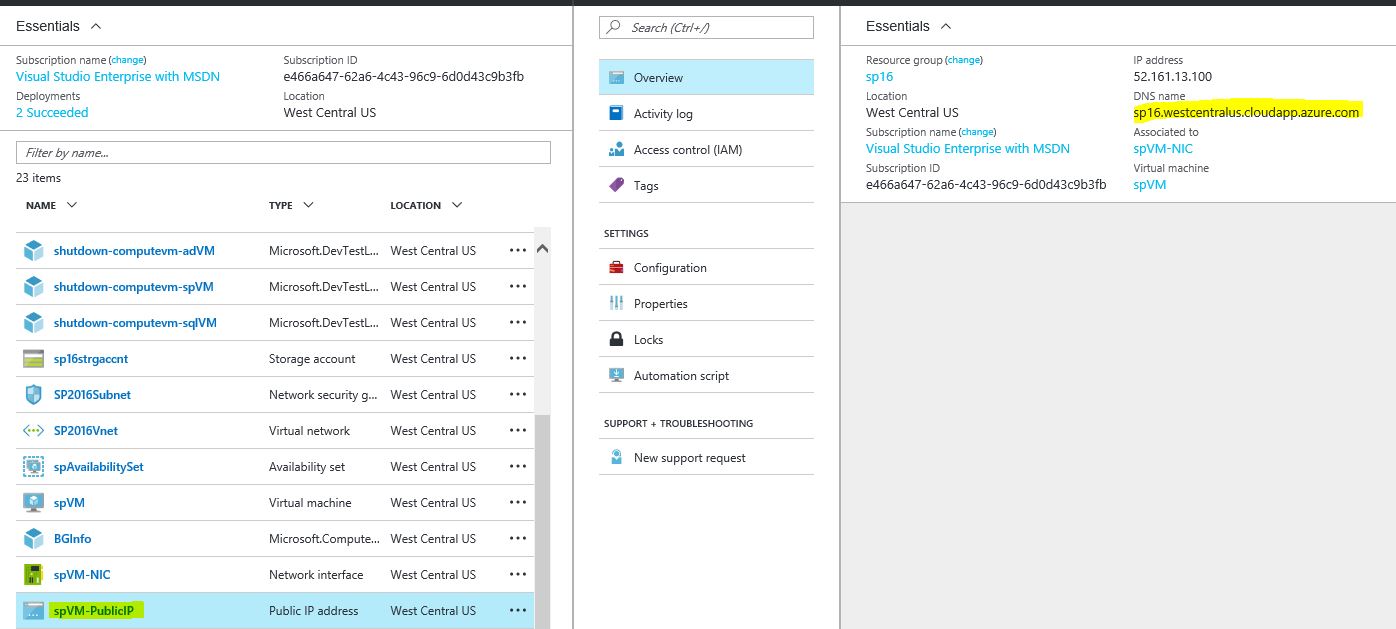
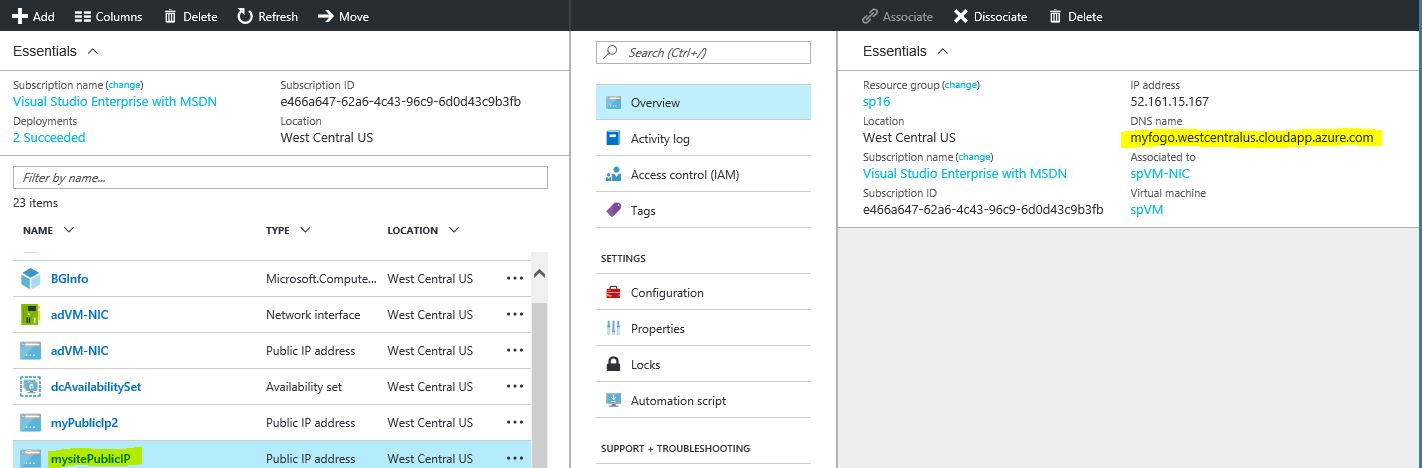
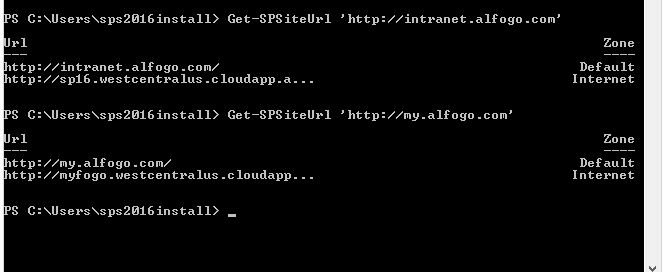
To add an internet zone for a HNSC we need following commands:
Set-SPSiteUrl (Get-SPSite 'https://intranet.alfogo.com') –Url 'https://sp16.westcentralus.cloudapp.azure.com/' –Zone InternetSet-SPSiteUrl (Get-SPSite 'https://my.alfogo.com') –Url 'https://myfogo.westcentralus.cloudapp.azure.com/' –Zone Internet
If we take a look at the zones we can see they have been properly set:
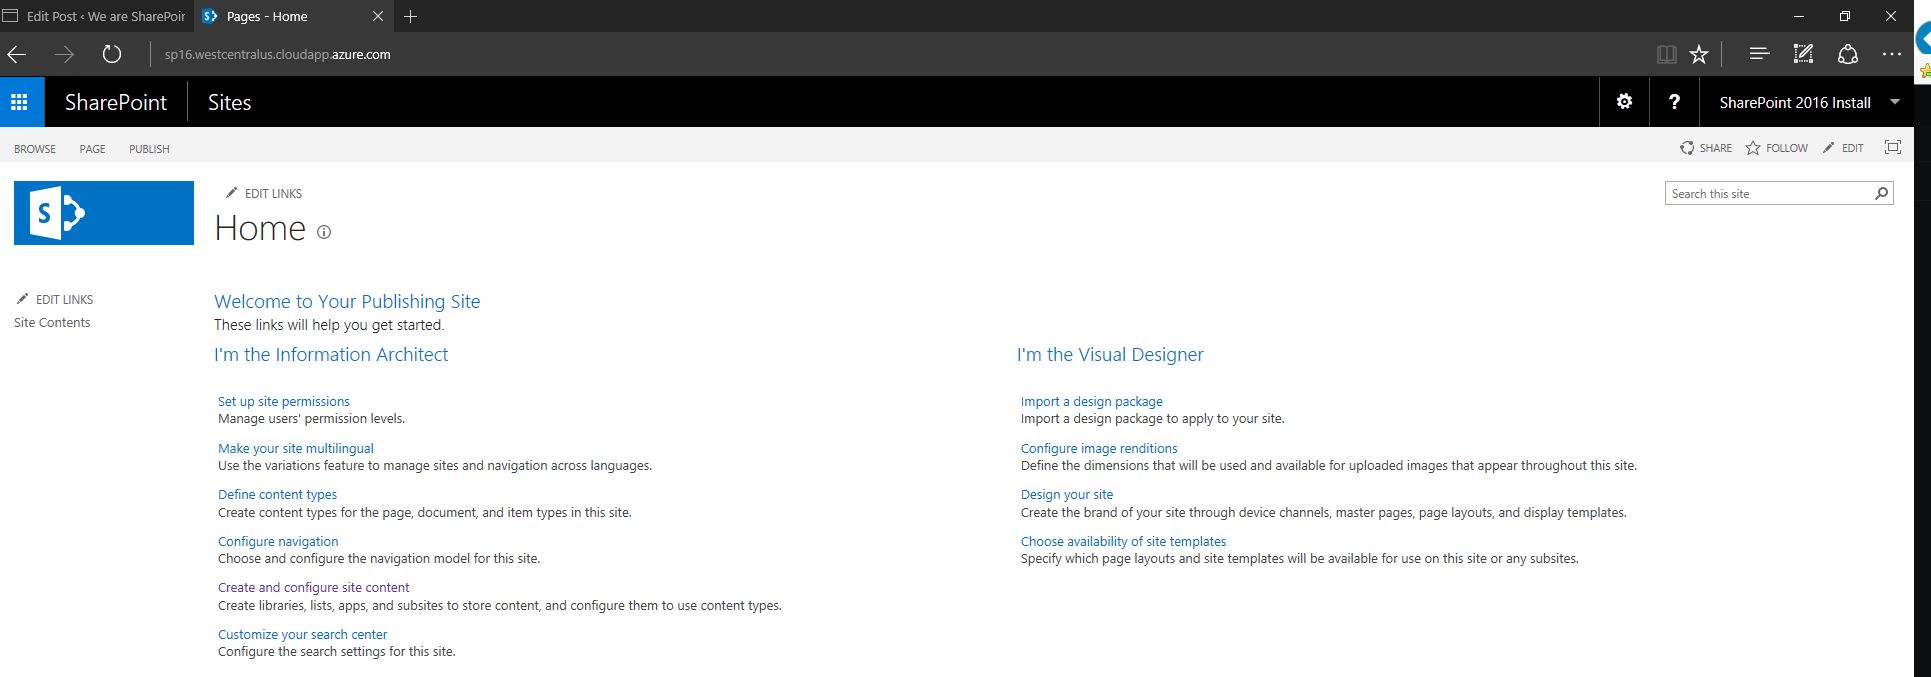
At this point we are able to access to https://sp16.westcentralus.cloudapp.azure.com from outside the SharePoint server:
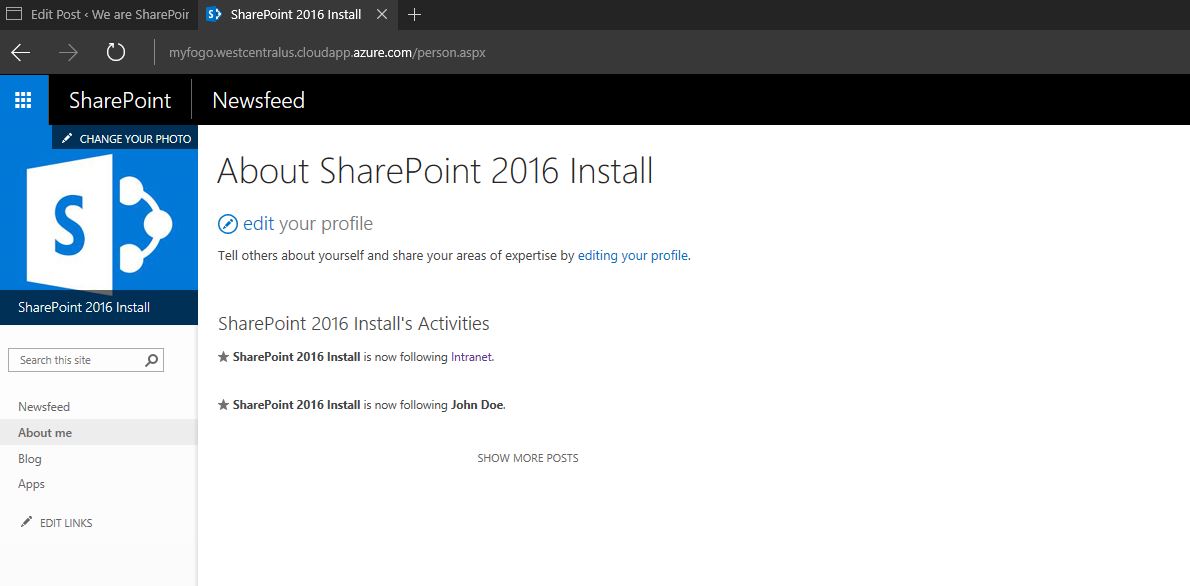
As we are on the internet zone for this Host-Named Site Collection, if we click on the user name and "About Me" button we will access to the internet zone of the My Site host named site collection which was previously added:
That's it so far. In following posts we will talk about how to set up ADFS with our HNSC.
Thanks for reading and do let us know any question/issue you may have during this process :)