Building Microservices with AKS and VSTS – Part 4
Our quest to build microservices in Azure with managed Kubernetes (AKS) and Visual Studio Team Services (VSTS) is almost at the end destination.
Previous posts:
https://blogs.msdn.microsoft.com/azuredev/2018/03/27/building-microservices-with-aks-and-vsts-part-1/ https://blogs.msdn.microsoft.com/azuredev/2018/04/03/building-microservices-with-aks-and-vsts-part-2/ https://blogs.msdn.microsoft.com/azuredev/2018/04/10/building-microservices-with-aks-and-vsts-part-3/
Leaving things last time we actually had most of what you would call a working cluster. Actually, we had something reachable over the Internet, with proper certificates courtesy of Let's Encrypt integration. What more could we want?
The AKS part and the VSTS part takes turns in this game. First we built Continuous Integration (CI) on VSTS, then we built a Kubernetes cluster (AKS), and now the table is turned towards VSTS again for Continuous Deployment (CD). While we have built and pushed images to Azure Container Registry (ACR) already our deployment mechanism has been fairly manual by using kubectl on the command line along with crafting yaml files. Which is potentially an error-prone process in addition to being less than entertaining to do every day.
I'm not expecting you to have eidetic memory, but we initially built a CI pipeline in part 2, and back then I said there were two approaches that we would be configuring:
You can either push the code into the repo, build the code "directly", pack it into a Docker image, and push the result to ACR.
The other approach is to push the code to the repo, "inject" the code into a Docker image for the build, have the output in a new Docker image, and then push the result to ACR. This would for instance allow you to build things that aren't supported natively by VSTS.
So, before building the CD pipeline let's set up a second CI pipeline.
We defined a yaml file for our service called api-playground.yaml, but we didn't check in this file to VSTS. We referred to ACR with the image key where we speficied this as myFiddleregistry.azurecr.io/apiplayground:latest. The thing about using the latest tag is that it "confuses" VSTS, and k8s. Well technically they can both handle it, but it means that k8s will not necessarily understand, unless you force a full redeploy, that you have a new image when they are both called "latest". It is also debatable if using latest tags are a good idea in general, or whether you should use specific version numbers to have more control over what you are actually running. Either way, we want to support tagging the images in some other way.
Adding CI definitions to Visual Studio
Change the image key to this instead:
image: myFiddleregistry.azurecr.io/apiplayground:#{Version}#
Now you can add the following yaml to your Visual Studio project:
 apiVersion: apps/v1beta1
kind: Deployment
metadata:
  name: api-playground
spec:
  template:
    metadata:
      labels:
        app: api-playground
    spec:
      containers:
      - name: api-playground
        image: myFiddleregistry.azurecr.io/apiplayground:#{Version}#
        ports:
        - containerPort: 80
---
apiVersion: v1
kind: Service
metadata:
  name: api-playground
spec:
  ports:
  - port: 80
  selector:
    app: api-playground
We also need a slightly different Dockerfile for this so add one called Dockerfile.CI with the following contents:
FROM microsoft/aspnetcore-build:2.0 AS build-env
WORKDIR /app

# Copy csproj and restore as distinct layers
COPY *.csproj ./
RUN dotnet restore

# Copy everything else and build
COPY . ./
RUN dotnet publish -c Release -o out

# Build runtime image
FROM microsoft/aspnetcore:2.0
WORKDIR /app
COPY --from=build-env /app/out .
ENTRYPOINT ["dotnet", "API-Playground.dll"]
Commit and check-in, and switch your view to VSTS in your browser.
Building a second CI pipeline
Open the "Build and Release" tab to the Build Definitions. Create a new definition.
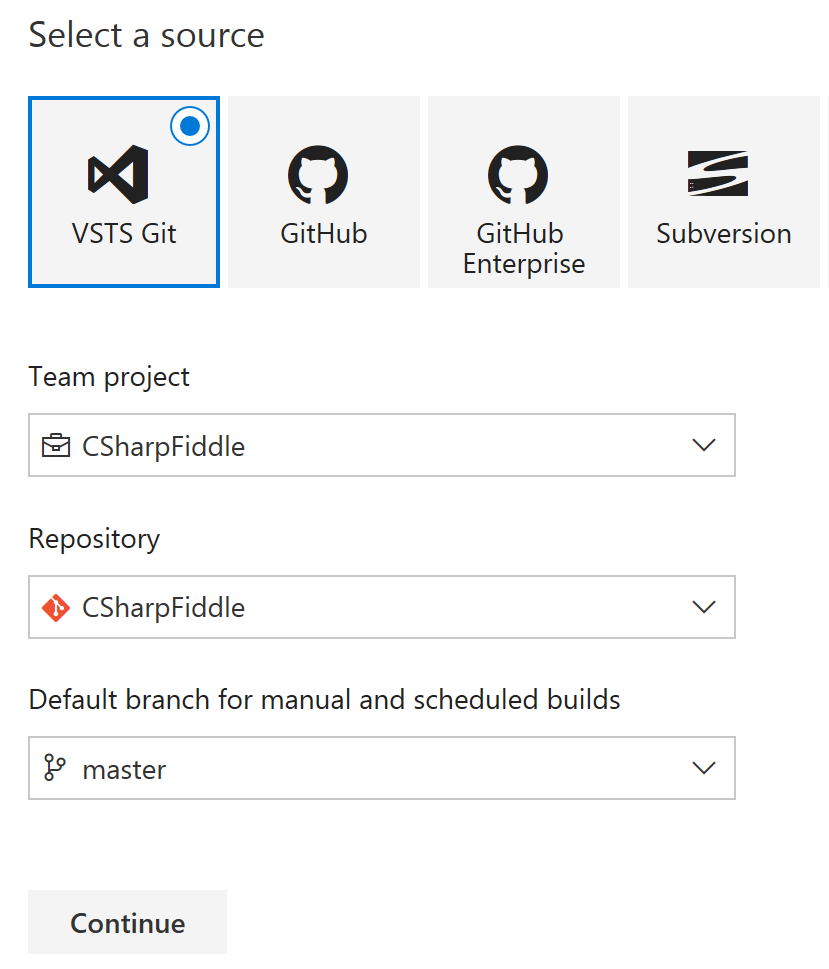
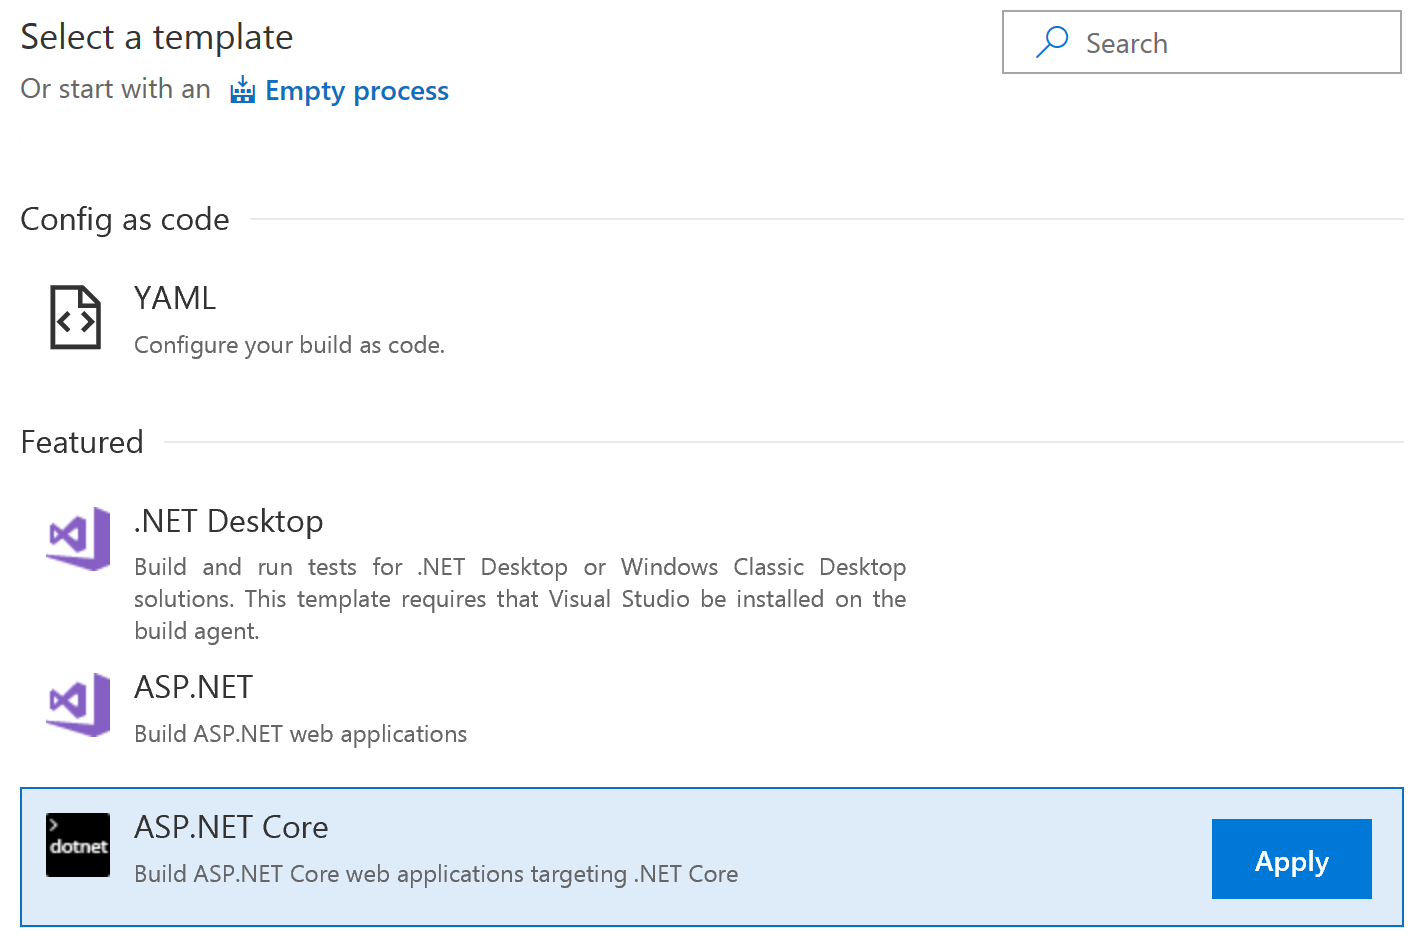
Choose ASP.NET Core.
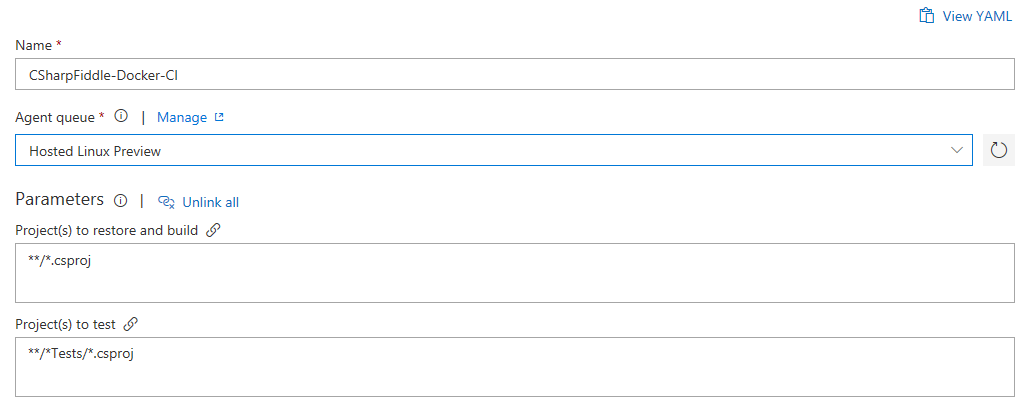
Rename to CSharpFiddle-Docker-CI.
Change Agent Queue to Hosted Linux Preview.
You can remove the Test task. I mean; if it builds that counts as testing right? :)
But why do we need to other .NET Core tasks, and why did I choose this template when I said we were going to base ourselves on Docker?
I actually ran both the .NET Core and Docker steps as a "debug" setup initially. You don't need to do this though. So technically you can remove Restore and Build as well.
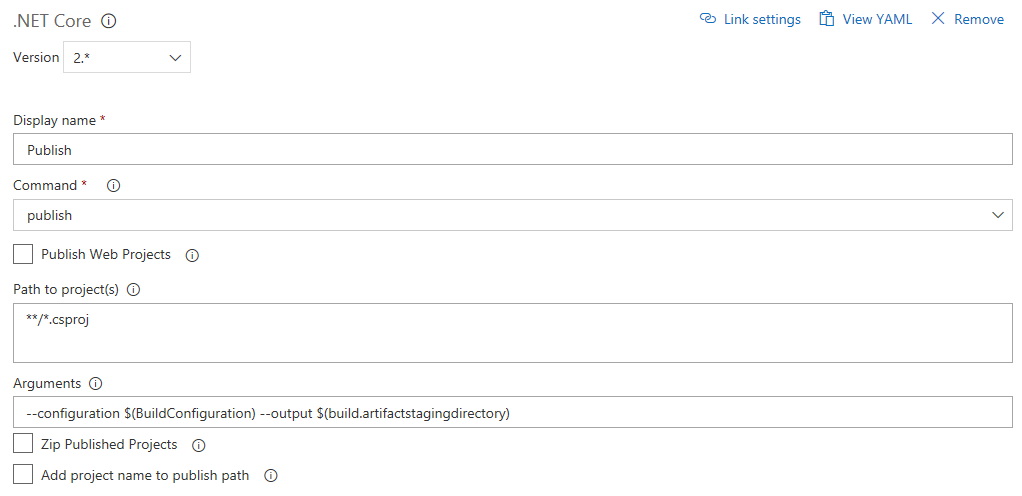
If you want to keep them you need to modify the Publish task like this:
- Uncheck "Publish Web Projects".
- Uncheck "Zip Published Projects".
- Uncheck "Add project name to publish path".
- Make sure "Path to projects" equals **/*.csproj.
The rest is independent of the .NET tasks, though it makes sense to remove them if you properly want to test the Docker experience. Next you need to add two Docker tasks (not Docker Compose).
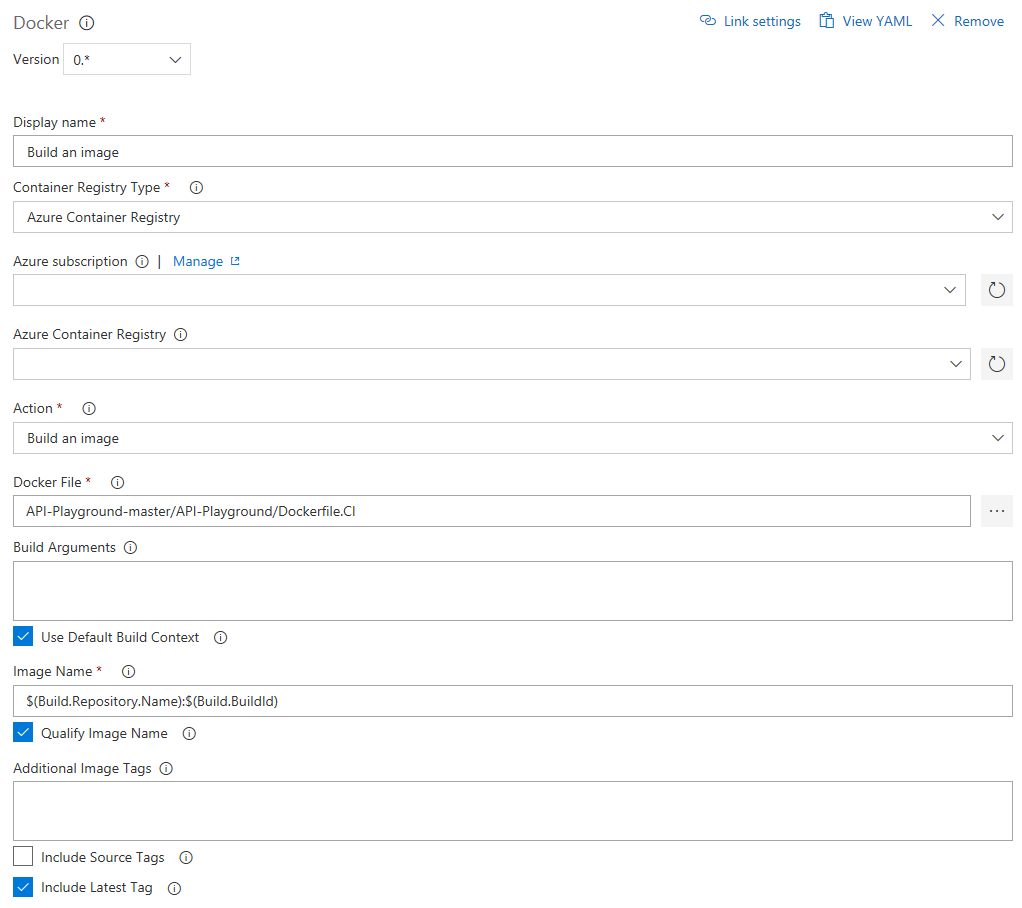
The first Docker task is building:
- Select your Azure subscription and registry
- Select the Dockerfile you just checked in by clicking the three dots and browsing to API-Playground-master/API-Playground/Dockerfile.CI.
- Check "Include Latest Tag". (While we're not actively using it we still want to have it available just in case.)
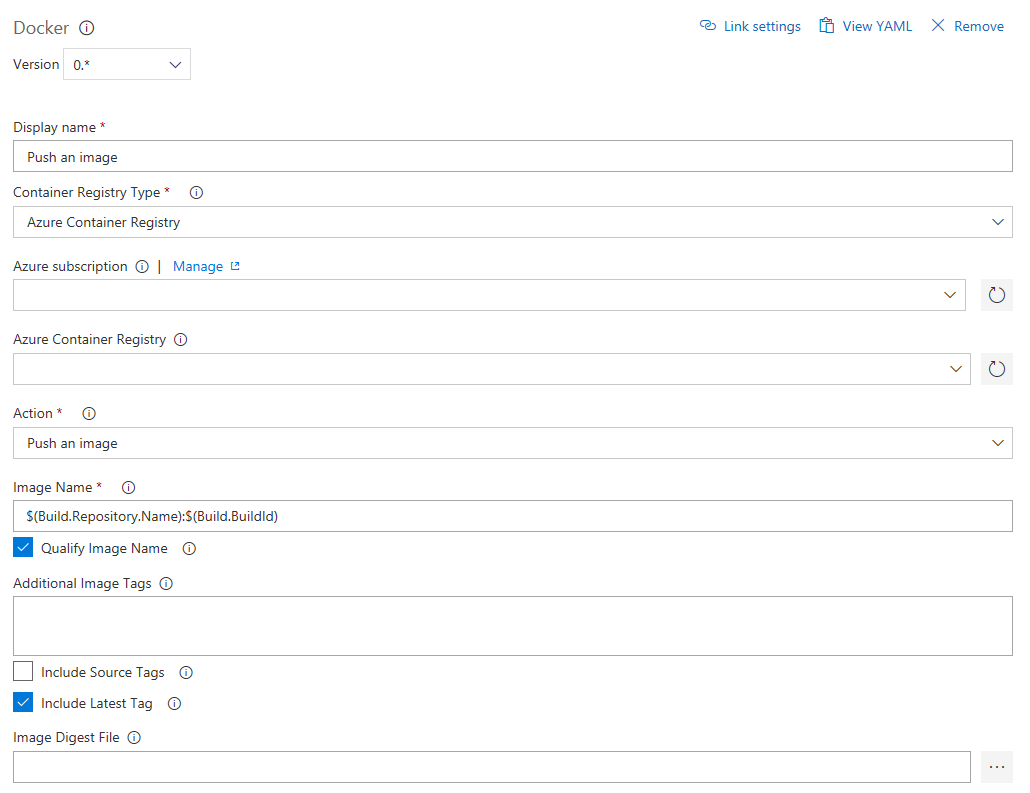
The second Docker task is pushing the image.
- Check "Include Latest Tag"
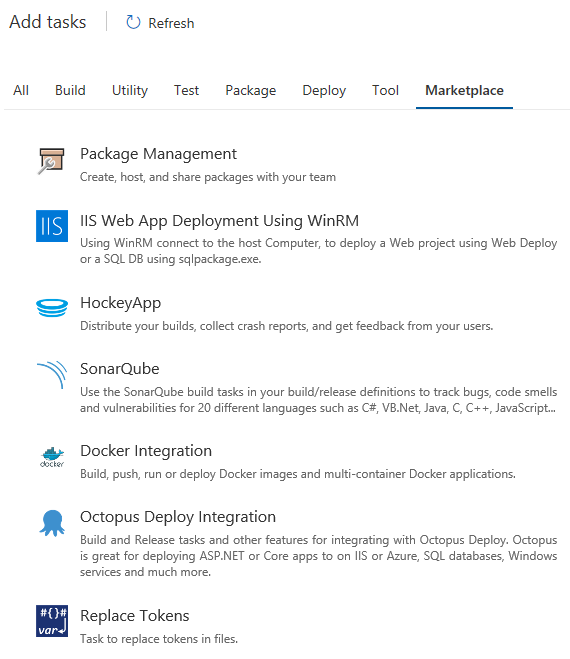
We used a variable in api-playground.yaml for the image tag, but it doesn't automatically get translated so we need a separate task for this. Since it's currently not in VSTS itself, (disclaimer: I don't know every nook and cranny of VSTS), so add a task, and select the "Marketplace" tab to select a third-party task for doing so.
I'm using the plug-in called "Replace Tokens" which is visible high up in the list by default for me; if not just search for it and install it.
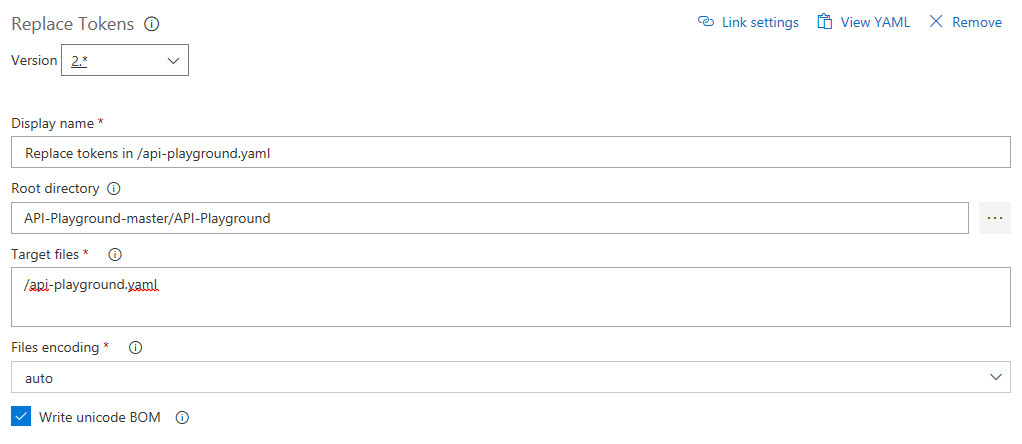
After installing it, you can add it like any other task.
- Select the root directory - API-Playground-master/API-Playground.
- Select Target files - /api-playground.yaml.
If you do slashes differently it's not going to work.
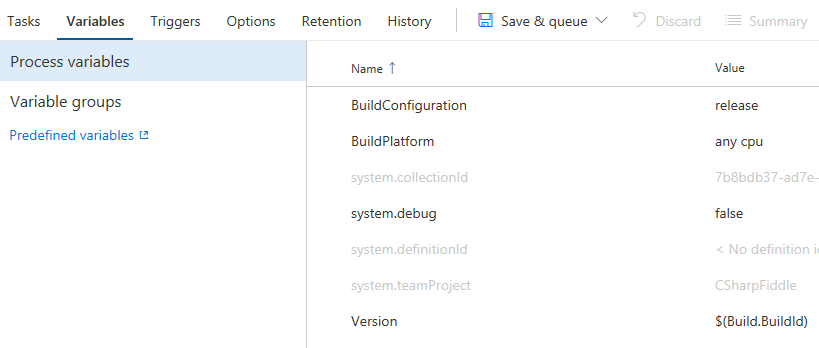
To define which variable to replace head to the Variables tab and add the name "Version" and value "$(Build.BuildId)".
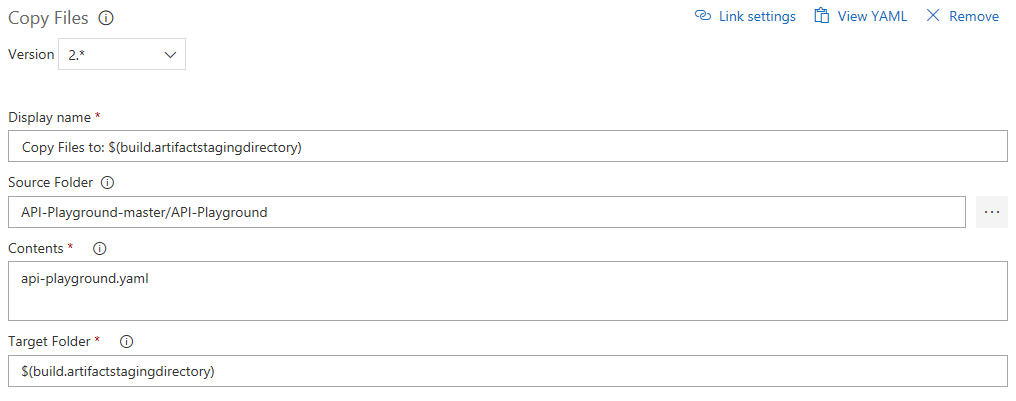
Step back to the Tasks tab, and add a "Copy Files" task:

Select your api-playground.yaml file, and specify the target folder as $(build.artifactstagingdirectory) .
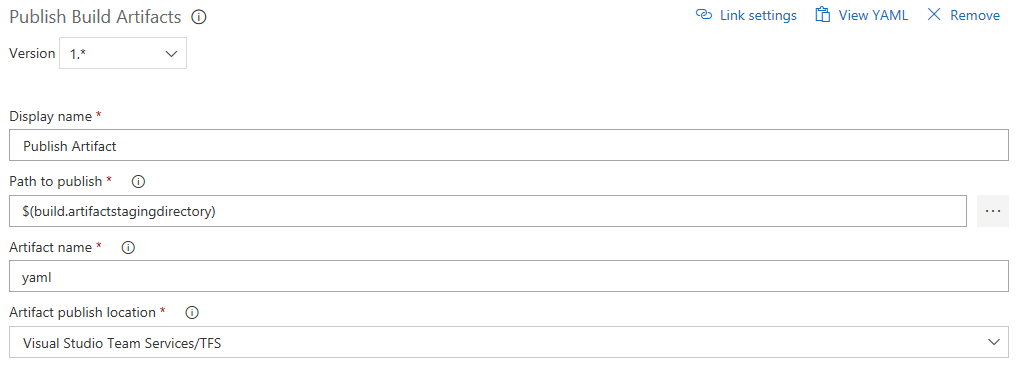
Finishing the pipeline we configure the Publish Artifact task:
- Change the name (or leave as is).
Your completed pipeline should now look like this:
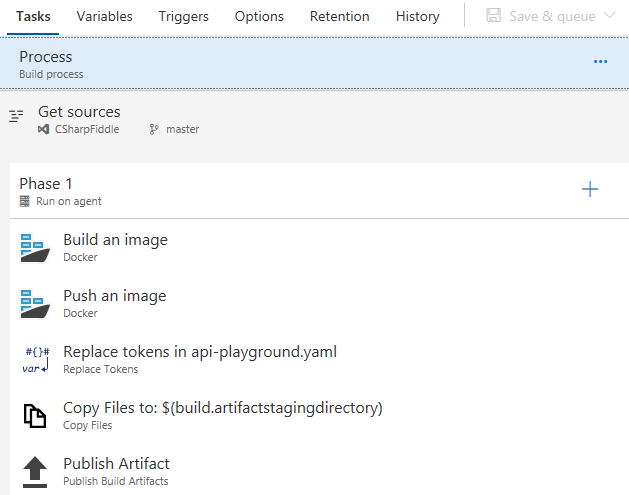
Hit Save & queue to round things off, and verify that it actually builds.
More complex than the previous one? Probably, but we want the extra flexibility. I'm not saying it's the optimal pipeline for you though - feel free to play around.
Building a CD pipeline
Provided the build worked we can define our CD pipeline. Remember; CI is about building and testing the code as often as possible, and CD is about taking the (successful) results of these builds (artifacts) and roll into a cluster as often as possible. This could be test/stage environments or production as long as you go through the entire cycle.
If your new pipeline finishes in style you can click the Release button to take you to defining a CD pipeline.

And what do you know - there is a template for Kubernetes deployment.

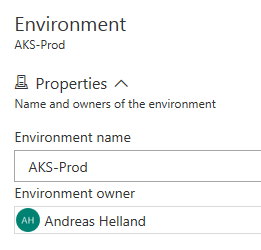
I will name my environment "AKS-Prod"
Head over to the Tasks tab.
For the Agent phase:
Change Agent queue to Hosted Linux Preview.

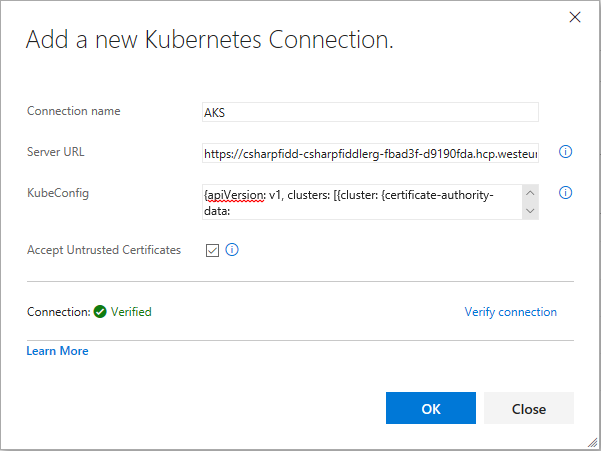
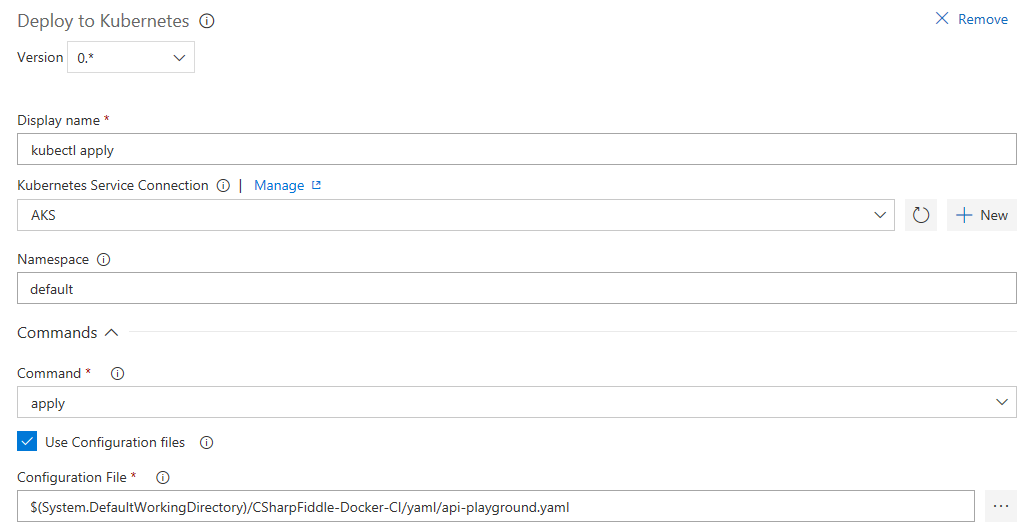
There's just the one task - kubectl apply. The same way you can do your apply mojo on the command line VSTS can do in the cloud. There's a few steps involved in this as it means that VSTS needs to be able to access your cluster directly. To the right of Kubernetes Service Connection there is a "+New" link to click. This brings up a window where you need some parameters for the connection to work.
I'll set Connection name to AKS.
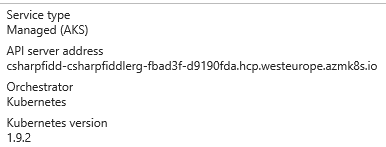
The Server URL can be found in the Azure Portal on the AKS cluster properties blade (you must add https:// as a prefix)
Then there's two approaches to get the KubeConfig. Navigate to c:\users\%username%\.kube and open the config file. This will contain all Kubernetes connections you have configured on your computer though so it isn't the recommended way if you have a bunch of them.
The other is to get a config specific to this connection by running the following CLI cmd:
az aks get-credentials --resource-group csharpFiddleRG --name csharpFiddleAKS --file c:\code\pocs\k8s\kubeconfig 
Open the file that was created in notepad or VS Code, and copy paste the contents into the corresponding field in the browser.
Depending on your TLS setup you might need to check Accept Untrusted Certificates to be able to verify the connection. Hit OK if things check out.
When back in the task:
- Set Namespace to default.
- Check Use Configuration files, and select the right one - $(System.DefaultWorkingDirectory)/CSharpFiddle-Docker-CI/yaml/api-playground.yaml.
In the Secrets section you need to select your subscription and registry. Uncheck "Force update secret".
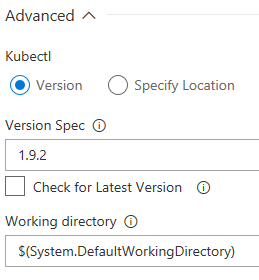
Under Advanced specify the Kubectl version to use.
Hit Save, followed by Release=>Create Release=>Create.

If the pipeline runs successfully maybe you'll get a nice list of green checkmarks here just like the build pipeline:
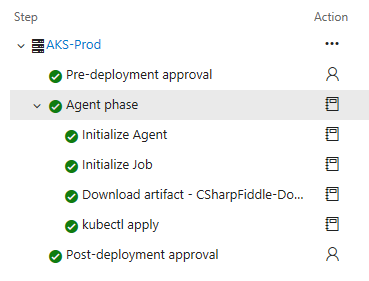
And there you have it. You can check in your code, and VSTS will both build and deploy a microservice for you. When you set it up initially like this you will probably want to trigger the steps manually. When everything looks good, and you can trust things to work you can set up automatic triggers so that you don't have to do this.
Should I let VSTS handle all the kubectl apply jobs for me?
No, you shouldn't. It is easy to get tempted to do this, but you need to apply some common sense to what you do. In an AKS cluster there will be a mix of microservices you build, and microservices supplied by other people. For instance installing the nginx-controller was way easier for us to do through Helm, and not only do you not continuously deploy the ingress controller; you also want to have full control of the upgrade process. If some auto-deploy feature broke ingress during the night you will not be happy when you get into the office in the morning. (You should still let VSTS store the yaml definitions in source control mind you.)
This serves nicely as a lead in for another thing we might want in our AKS cluster while we're at it :)
Adding Storage to an AKS cluster
The simple web site we deployed doesn't really have that many external dependencies. But let's assume I wanted to load code samples from disk. The storage in the microservice lives and dies with the service, and is not shareable with other services either. For ephemeral/temporary data this is ok. For things you want to persist, and not necessarily put into a database, this approach doesn't work.
There are a number of ways, documented both from Kubernetes and Microsoft on how to do this. I went with using Azure Files: /en-us/azure/aks/azure-files-dynamic-pv
Short version.
Create a Storage Class
azure-file.sc.yaml:
kind: StorageClass
apiVersion: storage.k8s.io/v1
metadata:
  name: azurefile
provisioner: kubernetes.io/azure-file
parameters:
  storageAccount: k8sazurefiles
Create a persistent storage volume claim
azure-file-pvc.yaml
apiVersion: v1
kind: PersistentVolumeClaim
metadata:
  name: azurefile
spec:
  accessModes:
    - ReadWriteOnce
  storageClassName: azurefile
  resources:
    requests:
      storage: 5Gi
This should create an Azure File storage in the nodepool resource group. Unfortunately you can't create the storage account in a different resource group, which does remove some flexibility, but it's not necessarily a problem when you are aware of it. I hope that this restriction goes away as AKS gains new capabilities.
To mount this storage you could append the following in your api-playground.yaml file:
spec:
  containers:
    - name: myfrontend
      image: nginx
      volumeMounts:
      - mountPath: "/mnt/azure"
        name: volume
  volumes:
    - name: volume
      persistentVolumeClaim:
        claimName: azurefile
(Make sure it goes in the right place.)
The cool thing about using an Azure Files resource is that with setting up something like Azure File Sync, (which is a separate service independently of clusters and containers), you can have AKS work on files that are accessible on normal on-prem file shares: https://azure.microsoft.com/en-us/blog/announcing-the-public-preview-for-azure-file-sync/
DevOps
Much like microservices are a trending word, DevOps is also pretty hyped, and being thrown around as a term on all levels in an organization. I will not go into everything that entails; you can find better resources on the web than I can throw together in a few lines here.
Visual Studio Team Services is probably the main vehicle from Microsoft when it comes to the implementation of DevOps tasks. It supports Continual Integration and Continuous Deployment as we have shown here, and does a decent job at that. (DevOps obviously includes much more than setting up pipelines.)
We also saw that we had to handle DNS, certificates, IP addressing, and a lot more which is not usually not handled by developers. And on the other hand - Kubernetes runs on virtual machines which are traditionally the domain of operations, but at the same time it requires a deeper understanding than just installing an operating system and ship it to someone else.
So if you're looking for an excuse to actually test DevOps in your shop I think this is certainly something you can use as a proof-of-concept :)
Microservice patterns
This series is about how to implement microservices on a specific set of technologies, so I don't want to go into full-on theoretical mode here, but I still think we need to at least touch upon design patterns for microservices. If you go all in on deploying a bunch of containers, and you push new code into production several times a day, you cannot do this entirely ad-hoc.
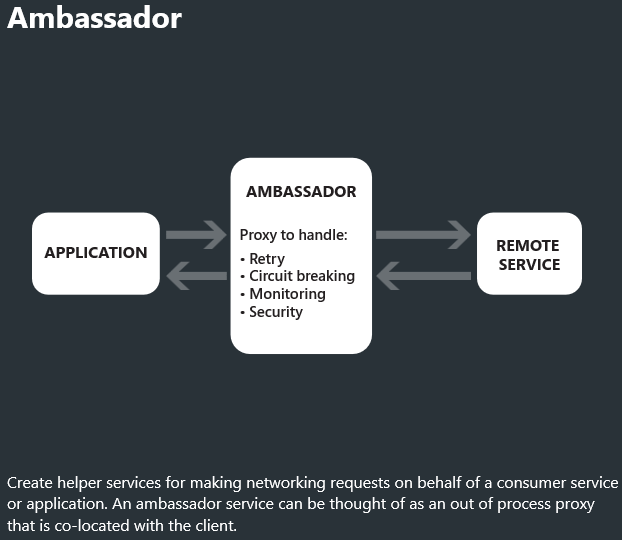
Microsoft has a good infographic on https://azureinteractives.azurewebsites.net/CloudDesignPatterns/default.html. What we implemented in this series is basically the Ambassador pattern. We have the nginx ingress controller as the ambassador proxying our requests and handling basic security.
Another pattern that is popular, that you should look further into for you AKS cluster, is the Sidecar pattern.
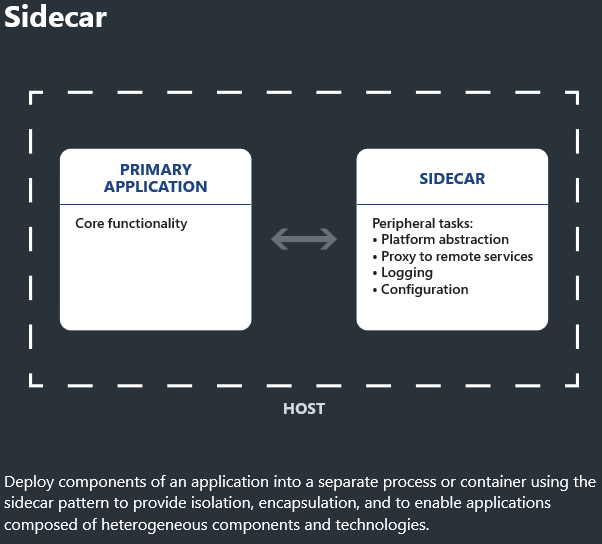
Instead of having one nginx service at the edge handling things you attach nginx (or other products) to each microservice. This means you can do things like mutual TLS-based authentication between microservices inside the cluster, and you get finer grained control than the setup we built.
Service Mesh
A term you will also hear when it comes to the sidecar pattern, or just searching for Kubernetes best practices in general, is the concept of a service mesh. I'm not saying the two are exactly the same thing, but they are related. If you have some spare time in between your coding I would recommend checking out Istio (https://istio.io) as that is a much used component. This can be combined with nginx by using ngninmesh (https://www.nginx.com/blog/nginmesh-nginx-as-a-proxy-in-an-istio-service-mesh/).
You will also see some people recommending replacing nginx with Envoy (https://www.envoyproxy.io). So there's even more to look into if you like.
The developer inner loop - Visual Studio Connected Environment (VSCE)
We have jumped through a number of hoops to bring the code from Visual Studio to a microservice running in a Kubernetes cluster. As an experience for testing and debugging before deployment it isn't entirely satisfactory. You can run simple apps like this in a local Docker environment, but once you need to build more services and you need to verify things will work with multiple instances, etc. it quickly gets a bit trickier.
You can run Kubernetes on your developer box through Minikube - https://github.com/kubernetes/minikube. But Microsoft has another way which is even simpler; a dev environment in the cloud that feels like it's local.
Currently in private preview is a new feature called Visual Studio Connected Environment for AKS (VSCE) which brings local debugging of containers in the cloud, and a more rapid feedback loop for you as a developer. Unfortunately I can't share demos or screenshots from this, but I recommend checking out Scott Hanselman's demo:
https://channel9.msdn.com/Events/Connect/2017/T256
As well as signing up for the preview: https://landinghub.visualstudio.com/vsce
I know, this can seem daunting, after all this is four lengthy blog posts all about "getting started". If what you want is just a simple website it might not be worth the effort other than the learnings gained. However I believe it adds value once you have put in the initial effort. It might lead you to think differently about other practices you should consider implementing if you're not doing so already.
Clearly there's plenty more to study if you want to become a microservice ninja, but this concludes the "getting your feet wet" stage of our journey.