Call Remote Assist from your HoloLens App
We annonced, in September 2018, new 1st party Mixed Reality business applications from Microsoft:
We recognize that many employees need information in context to apply their knowledge and craft. Not only on a 2-D screen — but information and data in context, at the right place, and at the right time, so employees can produce even greater impact for their organizations. Mixed reality is a technology uniquely suited to do exactly that.
Here is Dynamics 365 Remote Assist ⬇
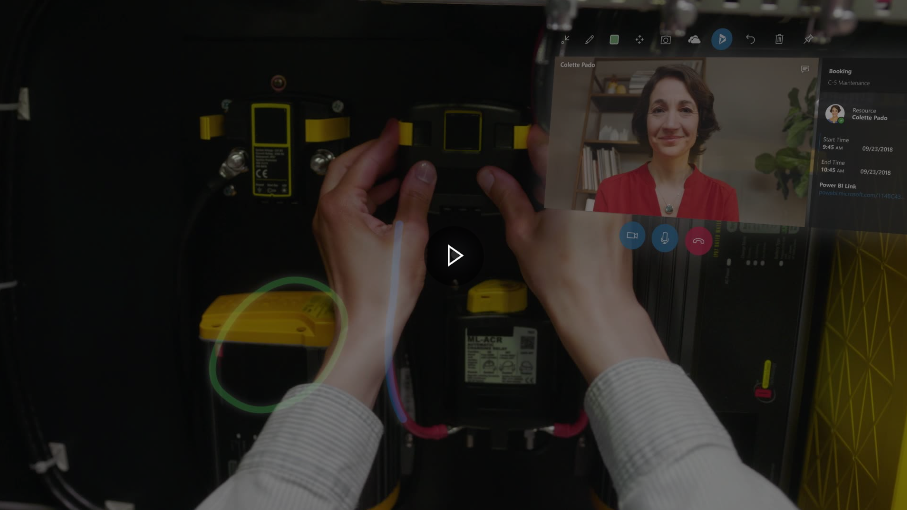
Let's explicit how you can leverage on Remote Assist calls directly within you HoloLens Mixed Reality apps!
Step 1. The Unity project has to be set up 📐 for Windows Mixed Reality
Note: You can skip this part if you are familiar with Unity and Mixed Reality.
If not, please refer to Create a Windows Mixed Reality App from 0 – The Unity project.
For the pre-requisites, here are the details: Create a Windows Mixed Reality App from 0 – The technology and the tools
As usual, you should have an Unity project configured for Windows Mixed Reality:
- File menu / Build Settings ➡ Universal Windows Platform selected as the Build platform
- Edit menu / Project Settings / Player ➡ Virtual Reality Supported checked
- Edit menu / Project Settings / Player ➡ Other Settings / .NET as Scripting Backend. Please also use the Experimental (.NET 4.6 Equivalent) for the Scripting Runtime Version.
Step 2. Call the Remote Assist 🎥 protocol from the Unity App 🕹
As you know, in a Mixed Reality Application, we can call UWP APIs. We just have to decorate the calls with a Platform dependent compilation directive:
 #if ENABLE_WINMD_SUPPORT
// Blablabla in C# for UWP
#endif
We use the LaunchUriAsync method with the new Remote Assist protocol which is
ms-voip-video:?contactids=<ObjectID_From_AAD>
I will introduce what is the Object ID from Azure Active Directory in the next paragraph.
The helper function you can create would look like this:
 private async Task LaunchURI(System.Uri uri)
{
#if ENABLE_WINMD_SUPPORT
    // Launch the URI
    try
    {
        var success = await Windows.System.Launcher.LaunchUriAsync(uri);

        if (success)
        {
            Debug.Log("URI launched");
        }
        else
        {
            Debug.Log("URI launch failed");
        }
    }
    catch (Exception ex)
    {
        Debug.Log(ex.Message);
    }
#endif
}
In your app, to call the Remote Assist protocol, just use:
 string uriToLaunch
    = @"ms-voip-video:?contactids=bf538576-xxxx-yyyy-zzzz-1d548b9e7010";
Debug.Log("LaunchUriAsync: " + uriToLaunch);

var uri = new Uri(uriToLaunch);
await LaunchURI(uri);
// If we hit an UI Thread issue, the sample code below gives a workaround
A sample code 📄 ready to use
If you look for a minimal code for HoloLens, you can just handle the AirTap to initiate the Remote Assist call. Here is the sample:
 using System;
using System;
using System.Threading.Tasks;
using UnityEngine;
using UnityEngine.XR.WSA.Input;

public class Tap : MonoBehaviour
{

    private GestureRecognizer recognizer;

    // Use this for initialization
    async void Start()
    {
        recognizer = new GestureRecognizer();
        recognizer.SetRecognizableGestures(GestureSettings.Tap);
        recognizer.Tapped += GestureRecognizer_Tapped;
        recognizer.StartCapturingGestures();
    }

    private async void GestureRecognizer_Tapped(TappedEventArgs obj)
    {
#if ENABLE_WINMD_SUPPORT
        string uriToLaunch = @"ms-voip-video:?contactids=bf538576-xxxx-yyyy-zzzz-1d548b9e7010";
        Debug.Log("LaunchUriAsync: " + uriToLaunch);

        Uri uri = new Uri(uriToLaunch);
        await Windows.ApplicationModel.Core.CoreApplication.MainView.CoreWindow.Dispatcher.RunAsync(Windows.UI.Core.CoreDispatcherPriority.Normal, () =>
        {
            // Work done on the UI thread
            LaunchURI(uri).ConfigureAwait(false).GetAwaiter().GetResult();
        });
#endif
    }


    private async Task LaunchURI(System.Uri uri)
    {
#if ENABLE_WINMD_SUPPORT
        // Launch the URI
        try
        {
            var success = await Windows.System.Launcher.LaunchUriAsync(uri);

            if (success)
            {
                Debug.Log("URI launched");
            }
            else
            {
                Debug.Log("URI launch failed");
            }
        }
        catch (Exception ex)
        {
            Debug.Log(ex.Message);
        }
#endif
    }
}
Note: Be sure to use the Experimental (.NET 4.6 Equivalent) for the Scripting Runtime Version in the Edit menu / Project Settings / Player / Other Settings section.
The explanations about the GestureRecognizer can be found here: Create a Windows Mixed Reality App from 0 – A simple example.
The entire Unity project with this sample code is on GitHub. If you want to test it, deploy the app on the HoloLens and just do an AirTap to initiate the Remote Assist call.
Step 3. Find the ObjectID 🆔 in Azure Active Directory (AAD) 📙
Note: The programmatic way to get this ObjectID within the app will be explained in an article that I will publish soon (here is the link - https://blogs.msdn.microsoft.com/appconsult/2018/12/06/23775/).
Right now, to get it 'manually', you have to connect to your Azure Active Directory of your Office 365 tenant (again I will explain all of this in a following article):
- Open the page https://aad.portal.azure.com/
- Click on Users in the left menu
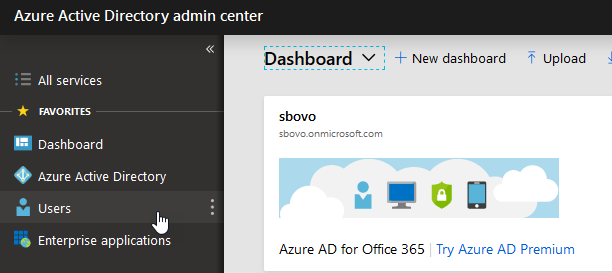
- Click on the user whom you want to call by using Remote Assist
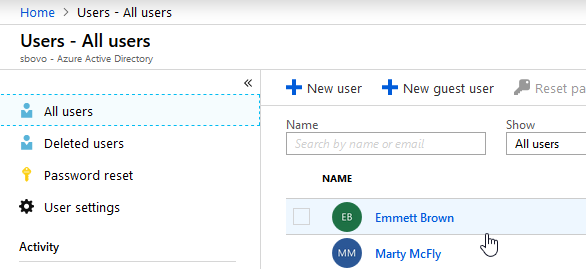
- The page displays the Objet ID of the user
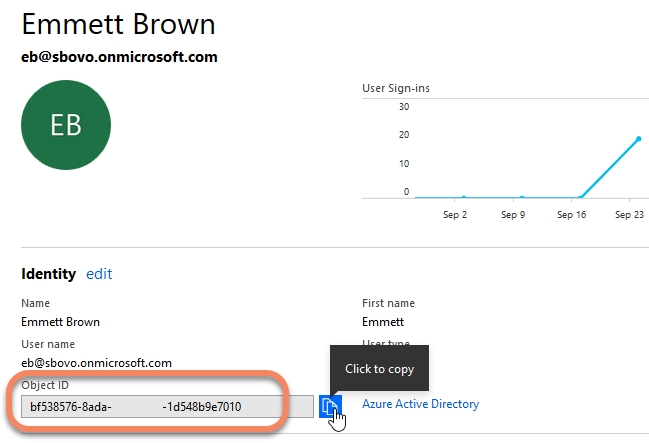
For testing, you just have to use it directly in your code in the url for the LaunchUriAsync call.
string uriToLaunch = @"ms-voip-video:?contactids=bf538576-xxxx-yyyy-zzzz-1d548b9e7010";
Do not worry if you are not able to perform this step; Remote Assist is smart enough to propose you an user interface to choose the person to call if you launch it with an object ID that does not exist.
Step 4. Test 🧪 the code
To test the code, we have to run the code on the HoloLens device; It is because we use UWP APIs and we have to launch the Remote Assist app which is only on the HoloLens device.
Here are the steps to deploy the app on the HoloLens with Visual Studio:
- Build the Unity project (You choose a folder in which Unity generates a Visual Studio solution ; Usually, we create a new subfolder of the Unity project named App).
- Open the resulting Visual Studio solution and choose x86 on Device
 (if USB connected) or Remote Machine
  (if the PC and HoloLens are on the same Wifi).
To get the IP address of your HoloLens, take a look at this video
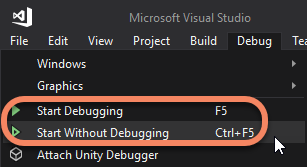
- Debug or Start without debugging in Visual Studio: The apps will be deployed and launch on HoloLens.
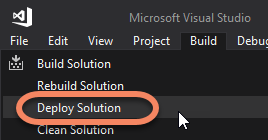
Note: You can also Deploy the app on the HoloLens by using the Build menu / Deploy Solution. Then, on the device, just locate and launch the app from the Start menu.
How does the app work 🔎?
- In your app, you run the LaunchUriAsync method with the Remote Assist protocol. This protocol is registered for the Remote Assist app and Windows opens the app.
- The Remote Assist App has the Object ID of the person to call in the url and initiate the call immediately to this person (if the object ID is not found, Remote Assist allows the user to select a person to call).
- The user can then switch back to the HoloLens App using the Bloom gesture and by finding the app in the Start menu.
- Your HoloLens app runs and Remote Assist continues streaming the video/audio to the remote user.
- Do not forget to get back to the Remote Assist app when finished in order to stop the call.
A more interesting sample 📦 with a tagalong billboard following the user gaze
The entire source code is available on GitHub. The sample provide you a Holographic button that is always
- Following you (the camera).
- Oriented in front of you.
- At a fixed distance from you.
- Visible and not directly in the center of the field of view: it seeks to have a part of itself in the view frustum of the camera
The purpose of this sample is to provide you an out of the box tagalong billboard for you apps 📦🎁!
Here is below, in action, this sample and the Remote Assist call done.
Conclusion
Remote Assist is a great tool you could leverage on for assistance and collaboration directly from your applications. We are just at the beginning of the journey: we will have further improvements on the way to use all Remote Assist functionalities.
Feel free to take a look and run the minimal sample code explained in this article or the tagalong billboard sample. You can find it on GitHub - https://github.com/Microsoft/Windows-AppConsult-Samples-MixedReality/tree/master/RemoteAssistSamples.
I hope you could reuse or be inspired by with the Tagalong billboard sample. Your feedback is welcome!
Bye,
@sbovo for the 💻 🎮 Windows AppConsult team.
--
References
- Announcing new AI and mixed reality business applications for Microsoft Dynamics - https://blogs.microsoft.com/blog/2018/09/18/announcing-new-ai-and-mixed-reality-business-applications-for-microsoft-dynamics/
- Launch Dynamics 365 Remote Assist from another app (protocol activation) - /en-us/dynamics365/mixed-reality/remote-assist/protocol-activation
- Calling Remote Assist from HoloLens - Minimal sample code - https://github.com/Microsoft/Windows-AppConsult-Samples-MixedReality/tree/master/RemoteAssistSamples/CallRemoteAssistMinimal
- Calling Remote Assist from HoloLens - Full Tagalong billboard sample code - https://github.com/Microsoft/Windows-AppConsult-Samples-MixedReality/tree/master/RemoteAssistSamples/CallRemoteAssistFromYourHoloLensApp