Add a bit of machine learning to your Windows application thanks to WinML
[Updated on 11/07/2018] WinML APIs are now out from the preview and, as such, many things in this post aren't valid anymore. You can read an updated version here: https://blogs.msdn.microsoft.com/appconsult/2018/11/06/upgrade-your-winml-application-to-the-latest-bits/
Disclaimer! I’m a complete rookie in the Machine Learning space ![]() But the purpose of this post is exactly to show how also an amateur like me can integrate Machine Learning inside a Windows app thanks to WinML and Azure!
But the purpose of this post is exactly to show how also an amateur like me can integrate Machine Learning inside a Windows app thanks to WinML and Azure!
But let’s take a step back ad talk a bit about WinML. Machine Learning and AI are two of the hottest topics nowadays in the tech space, since they are opening a broad range of opportunities that weren't simply possible before. However, until a while ago, the power of machine learning was available mainly through the cloud. All the major cloud providers, including Azure, provide a set of services to leverage predictive analysis in your applications. They can be generic purposes services, like Machine Learning Studio, which allows to create and train custom machine learning models. Alternatively, you can find many services already tailored for a specific scenario, which have already been trained for a specific purpose and they’re really easy to consume (typically, it's just a REST API to hit). Think, for example, to the Cognitive Services, which you can use to recognize images, speeches, languages, etc.
However, all these services have a downside. They require an Internet connection to work properly and, based on the speed of your connection, you may hit some latency before getting back a result.
Say hello to the Intelligent Edge! With this term, we describe the capacity of devices to perform data analysis without having to go back and forth to the cloud each time. The Intelligent Edge can be represented by any kind of device, from the most powerful desktop PC to a tiny chip which is part of an IoT solution. The Intelligent Edge isn't the opposite of cloud, but actually they work best together. Think, for example, to a camera powered by an IoT chip and used to recognize a specific object in a scene. The recognizing process can be done directly by the chip (in order to get immediate results) but, in case of failure, it could send the captured image to the cloud to take advantage of the additional computing power.
WinML is a new platform created exactly to fulfill this scenario in order to bring offline machine learning capabilities directly to Windows applications. Every device capable of running a Windows application can become part of the Intelligent Edge ecosystem.
In this blog post we're going to see how, thanks to a set of new APIs currently in preview included in Windows 10 April 2018 Update, we can perform object recognition in a Windows app even when we are in offline mode. The APIs are part of the Universal Windows Platform but we can leverage them also in a Windows Forms or WPF application.
Let's start!
Create the model
The most complex part of machine learning is creating a model that describes the kind of analysis we want to implement. Understanding how to create a machine learning model is out of scope for this post and, likely, also for your skills. Creating and understanding machine learning models, in fact, requires skills which go far beyond being a good developer. Mastering data science, math and statistics is the key to create a good model. As such, as a developer, most of the times your main job will be to consume machine learning models that have been delivered to you by a data scientist or a similar role figure.
In my case, I'm not a data scientist and unfortunately I can't even count one of them among my friends or colleagues. Should I give up? Absolutely not! Let's call Custom Vision to the rescue!
Custom Vision is part of the Cognitive Services family and you can use it to create and train a computer vision model which perfectly fits your needs. You just need to upload a set of images with the content you would like to recognize, tag them and then start the training. By default, the output of the process is exposed using a REST API, which you can call from any kind of application (desktop, web, mobile, etc.): you pass as input the image and you get as output a numeric value, which tells you how much the service is confident that the image contains one of the objects you have tagged. However, being a REST service, it works only online, which kind of defeats our purpose of building an app for the Intelligent Edge ecosystem.
Custom Vision, however, offers also the option to export the trained model in various formats, so that you can include it in your applications. One of the supported formats is ONNX, an open ecosystem for interchangeable AI models, which has been embraced by WinML and it’s supported by the biggest players in the market like, other than Microsoft, Amazon, Facebook, AMD, Intel, Nvidia, etc. Starting from the latest version of Visual Studio and the Windows 10 SDK, you can just include an ONNX file in your project and the tool will take care of generating a proxy class to interact with the model in a declarative way.
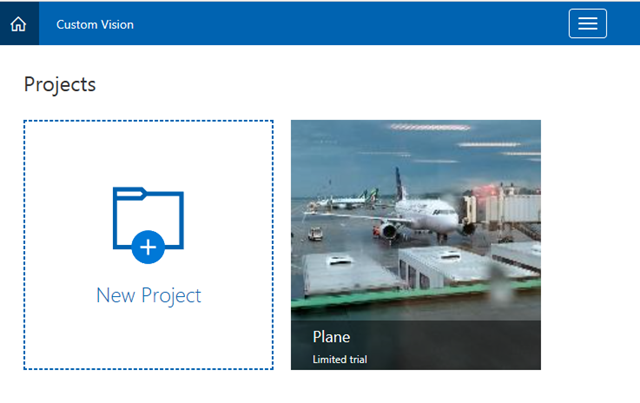
Let's see how to create a model using the Custom Vision service and export it. In this sample, we're going to train a model to recognize planes in a photo, since my daughter loves planes and recently I’m flying a lot ![]() . First login to https://customvision.ai with your Azure account. You will have the option to create, for free, a trial project, which has some limitations in terms of images that you can upload, REST API calls you can make, etc. However, for our testing purposes it's perfectly suitable.
. First login to https://customvision.ai with your Azure account. You will have the option to create, for free, a trial project, which has some limitations in terms of images that you can upload, REST API calls you can make, etc. However, for our testing purposes it's perfectly suitable.
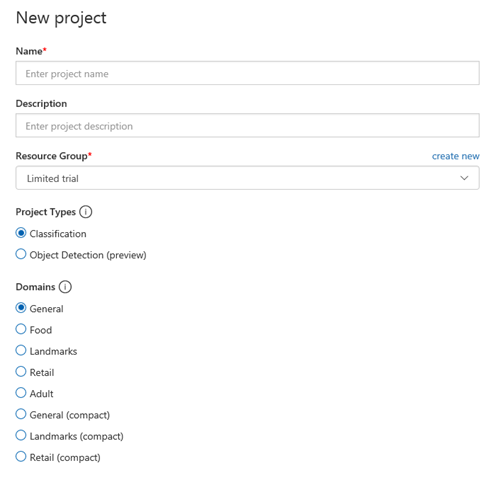
Click on the New Project button and you’ll be asked some information:
Name and description are up to you. What’s important is that you keep Project Types to Classification and, under Domains, you choose one of the options described as compact. They’re the ones, in fact, that support ONNX exporting. In my case, I simply went with General (compact).
Now it’s time to train the model! The main dashboard is made by three different sections: Training Images, Performance and Predictions.
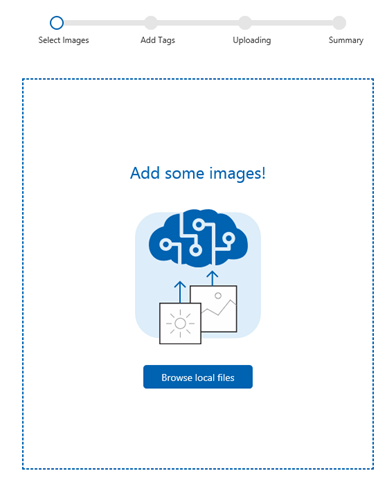
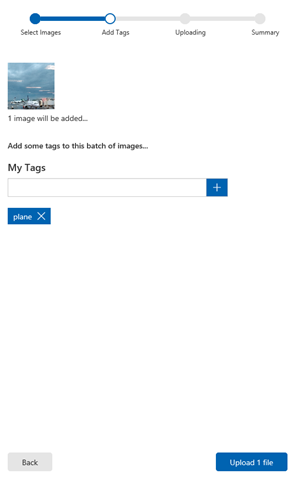
Let’s start with the Training Images one. At first the section will be empty and you will have the option to start uploading some images, thanks to a wizard triggered by pressing on the Add images option. In the first step, you can look for some images on your computer that contain the object you want to recognize. In my case, I uploaded 4-5 photos of planes. In the second step you’re asked to tag the images with one of more keywords that describe the object you want to recognize. In my case, I set plane as a keyword.
 |
 |
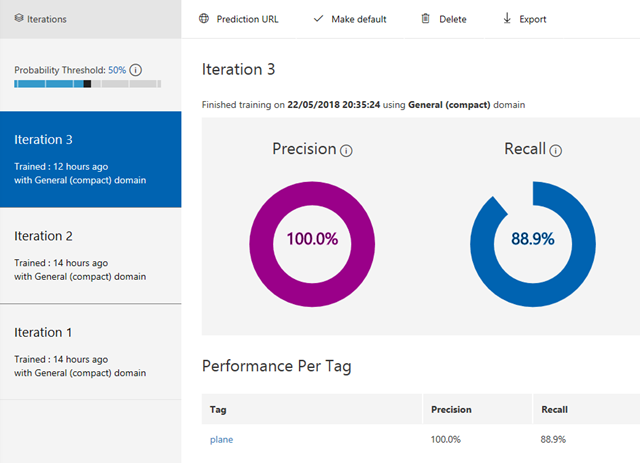
Complete the wizard and you’re all set! Now you can press the Train button at the top to start the training, given the images you have uploaded. After a while, you will see the result in the Performance section, which will tell you for each tag its Precision (how likely the prediction of the tag in the photo is right) and Recall (out of the tags which should be predicted correctly, what percentage did your model find?).
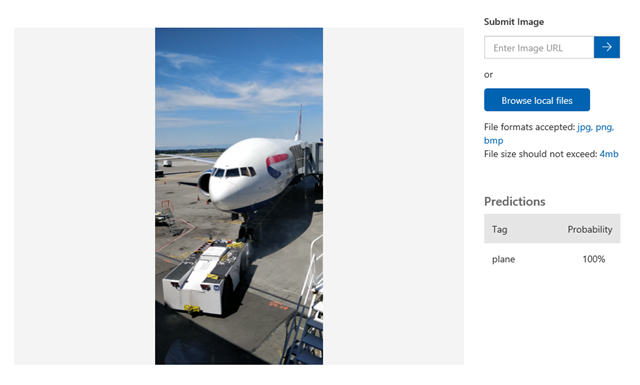
Now that the model has been trained, you can put it to test thanks to the Predictions section. You will be provided with a prediction endpoint which supports REST calls, but the easiest way is to use the Quick test option.
Here you can upload a local image or specify the URL of an online image. The tool will process the image using your model and will give you a probability score for each tag you have created. In case the result isn’t satisfying, you can use the image to further train the model. The image, in fact, will be stored in the Predictions section and you’ll be able to click on it and tag it, like you did during the training. After you have saved the result, you can click again on the Train button to generate an improved model.
Import the model in Visual Studio
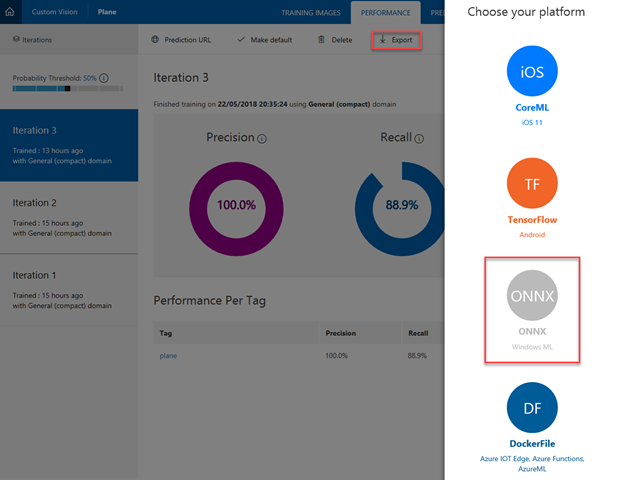
When you are satisfied by your model, we can move to the second phase: importing it inside a Windows application. In the Performance section you will find, at the top, an option called Export.
Click on it and choose ONNX (Windows ML). Then press the Download button and save the .onnx file on your machine. The name of the file won’t be very meaningful (it will be something like 9b0c0651fb87440bb67ee2aa20fc1fef.onnx), so before adding it to Visual Studio rename it with something better (in my case, I renamed it PlanesModel.onnx).
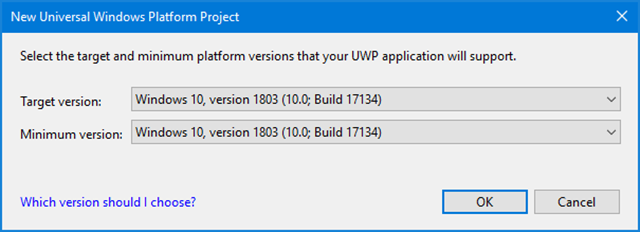
Now create a new UWP project in Visual Studio 2017 and, in the Platform Version dialog, make sure to choose as Target Version and Minimum Version Windows 10 version 1803. As already mentioned, in fact, the WinML APIs are available in preview starting from the last Windows version.
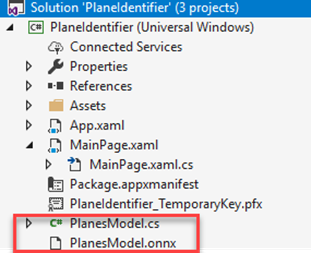
Copy and paste the .onnx file inside your Visual Studio project. Under the hood, Visual Studio will leverage a command line tool called mlgen to generate the proxy class for you. As a result, you will automatically find inside your project, other than the .onnx file, a .cs file with the same name:
The generated class contains:
- An input class, to handle the information required by the model to work properly (in our case, a photo)
- An output class, with the list of tags that have been identified and the probability percentage
- A model class, which exposes the methods to load the ONNX file and to start the evaluation
However, by default, the ONNX model generated by the Custom Vision service will be based on the Project Id, which is a GUID value automatically generated when you create the project. As such, your class will contain lot of weird and hard to understand names for your classes and methods, like:
 public sealed class Bdbea542_x002D_afd3_x002D_4469_x002D_8652_x002D_b76d6442d9be_9b0c0651_x002D_fb87_x002D_440b_x002D_b67e_x002D_e2aa20fc1fefModelInput
{
    public VideoFrame data { get; set; }
}
I suggest to rename them, otherwise the code you’re going to write will be quite awkward. As a general rule:
- Look for the class with suffix ModelInput, which represents the input data for the model. In my case, I renamed it to PlanesModelInput.
- Look for the class with suffix ModelOutput, which represents the output data of the model. In my case, I renamed it to PlanesModelOutput.
- Look for the class with suffix Model, which represents the model itself. In my case, I renamed it to PlanesModel.
- Look, inside the Model class, for a method called Create<random string>Model() . In my case, I renamed it to CreatePlanesModel() .
This is how my final proxy class looks like:
 using System;
using System.Collections.Generic;
using System.Threading.Tasks;
using Windows.Media;
using Windows.Storage;
using Windows.AI.MachineLearning.Preview;

namespace PlaneIdentifier
{
    public sealed class PlanesModelInput
    {
        public VideoFrame data { get; set; }
    }

    public sealed class PlanesModelOutput
    {
        public IList<string> classLabel { get; set; }
        public IDictionary<string, float> loss { get; set; }
        public PlanesModelOutput()
        {
            this.classLabel = new List<string>();
            this.loss = new Dictionary<string, float>()
            {
                { "plane", float.NaN },
            };
        }
    }

    public sealed class PlanesModel
    {
        private LearningModelPreview learningModel;
        public static async Task<PlanesModel> CreatePlanesModel(StorageFile file)
        {
            LearningModelPreview learningModel = await LearningModelPreview.LoadModelFromStorageFileAsync(file);
            PlanesModel model = new PlanesModel();
            model.learningModel = learningModel;
            return model;
        }
        public async Task<PlanesModelOutput> EvaluateAsync(PlanesModelInput input) {
            PlanesModelOutput output = new PlanesModelOutput();
            LearningModelBindingPreview binding = new LearningModelBindingPreview(learningModel);
            binding.Bind("data", input.data);
            binding.Bind("classLabel", output.classLabel);
            binding.Bind("loss", output.loss);
            LearningModelEvaluationResultPreview evalResult = await learningModel.EvaluateAsync(binding, string.Empty);
            return output;
        }
    }
}
As you can notice, all the APIs are under the namespace Windows.AI.MachineLearning.Preview.
Use the model in your application
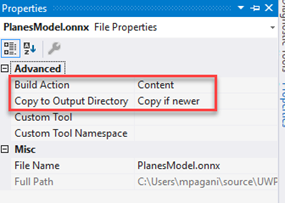
Now that we have the proxy class, it’s time to use the model. The first step is to load the ONNX file inside the application. First make sure, by right clicking on the .onnx file in Solution Explorer and choosing Properties, that Build Action is set to Content and the Copy to Output Directory to Copy if newer.
Now let’s write some code to consume the model, inspired by the official sample provided by the Azure team, that you can find on GitHub. We can load the model by using one of the methods exposed by the proxy class. We do this in the OnNavigatedTo() event of the main page and we store the model reference at class level, so that we can reuse it later:
 public sealed partial class MainPage : Page
{
    private PlanesModel planeModel;

    public MainPage()
    {
        this.InitializeComponent();
    }

    protected async override void OnNavigatedTo(NavigationEventArgs e)
    {
        var modelFile = await StorageFile.GetFileFromApplicationUriAsync(new Uri("ms-appx:///PlanesModel.onnx"));
        planeModel = await PlanesModel.CreatePlanesModel(modelFile);
    }
}
The first step is to load into a StorageFile object the .onnx file. We can leverage the GetFileFromApplicationUriAsync() method and the ms-appx: prefix, which gives you access to the files that are included inside the package. Then we leverage the static method CreatePlanesModel() offered by the proxy class, passing as parameter the StorageFile reference we just retrieved. That’s it. Now we have a PlanesModel object that we can start to use in our application.
To leverage the model, however, we need to provide an input for it, in our case a picture. We can use the FileOpenPicker APIs to allow the user to select one from his computer. Then we need to encapsulate the image into a VideoFrame object which, if you explore the proxy class, is the object type excepted as input. As an extra bonus, we render the image also inside a SoftwareBitmapSource object, so that we can display a preview of the selected image using an Image control placed in the XAML.
Here is the full code that is triggered when the user presses the Recognize button in the UI:
 private async void OnRecognize(object sender, RoutedEventArgs e)
{
    FileOpenPicker fileOpenPicker = new FileOpenPicker();
    fileOpenPicker.SuggestedStartLocation = PickerLocationId.PicturesLibrary;
    fileOpenPicker.FileTypeFilter.Add(".bmp");
    fileOpenPicker.FileTypeFilter.Add(".jpg");
    fileOpenPicker.FileTypeFilter.Add(".png");
    fileOpenPicker.ViewMode = PickerViewMode.Thumbnail;
    StorageFile selectedStorageFile = await fileOpenPicker.PickSingleFileAsync();

    SoftwareBitmap softwareBitmap;

    using (IRandomAccessStream stream = await selectedStorageFile.OpenAsync(FileAccessMode.Read))
    {
        // Create the decoder from the stream
        BitmapDecoder decoder = await BitmapDecoder.CreateAsync(stream);

        // Get the SoftwareBitmap representation of the file in BGRA8 format
        softwareBitmap = await decoder.GetSoftwareBitmapAsync();
        softwareBitmap = SoftwareBitmap.Convert(softwareBitmap, BitmapPixelFormat.Bgra8, BitmapAlphaMode.Premultiplied);
    }

    // Display the image
    SoftwareBitmapSource imageSource = new SoftwareBitmapSource();
    await imageSource.SetBitmapAsync(softwareBitmap);

    PreviewImage.Source = imageSource;

    // Encapsulate the image in the WinML image type (VideoFrame) to be bound and evaluated
    VideoFrame inputImage = VideoFrame.CreateWithSoftwareBitmap(softwareBitmap);
    await EvaluateVideoFrameAsync(inputImage);
}
First we use the FileOpenPicker to allow the user to select a picture. By default, we filter only image files (bmp, jpg and png) and we open, as default location, the Pictures library. Then, using the storage APIs, we read the content of the file using an IRandomAccessStream interface and we use encapsulate it inside a SoftwareBitmap object. We’re doing this because the APIs to render an image as a VideoFrame object requires a SoftwareBitmap object as input, as you can see in the last two lines of code when we invoke the static CreateWithSoftwareBitmap() method exposed by the VideoFrame class.
As mentioned, we encapsulate the SoftwareBitmap object also inside a SoftwareBitmapSource, thanks to the SetBitmapAsync() method. This way, we can set the image as Source of the Image control (called PreviewImage) placed in the XAML, so that the user can also see the actual image, other than the output of the machine learning recognition process.
Now that we have our image exposed as a VideoFrame object, we can use again our proxy class to do the actual evaluation and get a feedback if our object has been recognized inside the image or not. Here is the full definition of the Evaluate VideoFrameAsync() method:
 private async Task EvaluateVideoFrameAsync(VideoFrame frame)
{
    if (frame != null)
    {
        try
        {
            PlanesModelInput inputData = new PlanesModelInput();
            inputData.data = frame;
            var results = await planeModel.EvaluateAsync(inputData);
            var loss = results.loss.ToList().OrderBy(x => -(x.Value));
            var labels = results.classLabel;

            var lossStr = string.Join(",  ", loss.Select(l => l.Key + " " + (l.Value * 100.0f).ToString("#0.00") + "%"));
            float value = results.loss["plane"];
            bool isPlane = false;
            if (value > 0.75)
            {
                isPlane = true;
            }

            string message = $"Predictions: {lossStr} - Is it a plane? {isPlane}";
            Status.Text = message;
        }
        catch (Exception ex)
        {
            Debug.WriteLine($"error: {ex.Message}");
            Status.Text = $"error: {ex.Message}";
        }
    }
}
We create a new PlanesModelInput object and we pass, using the data property, the image selected by the user. Then we call the EvaluateAsync() method exposed by the model, passing as parameter the input object we have just created. We’ll get back a PlanesModelOutput object, with a couple of properties that can help you to understand the outcome of the recognition.
The most important one is loss, which is a dictionary that contains an entry for each tag defined in the model. Each entry is identified by a key (the name of the tag) and a value, which is a float that represents the probability that the tagged object is indeed present in the picture. In our case, we check the value of the entry identified by the plane key and, if the percentage is higher than 75%, we consider it a positive result. A plane is indeed present in the image selected by the user.
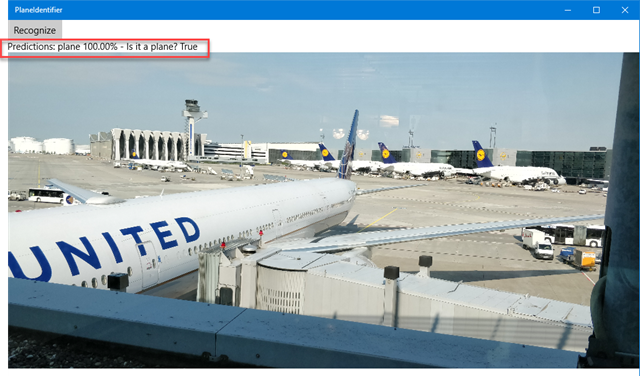
By using LINQ and string formatting, we also display to the user a more detailed output, by sharing exactly the calculated probability for each tag. Now run the application and load any image from your computer. If the model has been trained well, you should see the expected result in the UI. Here is, for example, what happens when I load a photo I’ve taken in Frankfurt while waiting for my connection to Seattle for BUILD:
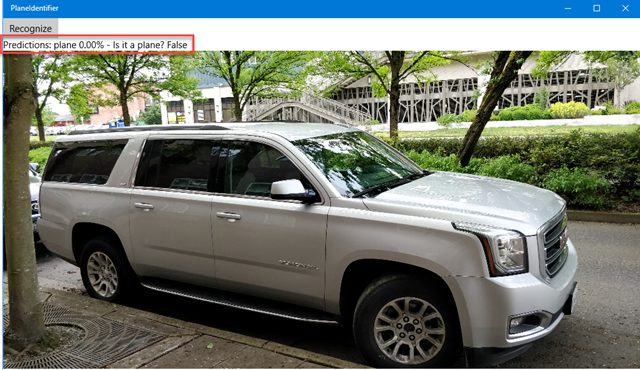
As you can see, for the plane tag the calculated probability is 100%. And, since the value is higher than 75%, we can safely claim that the photo contains indeed a plane. Now let’s try again by uploading a different photo:
As you can see, this time the plane tag has a probability of 0% and, indeed, we can safely claim that the photo doesn’t contain a plane.
The best part of this application is that you can also put your PC in Airplane mode and the object recognition will still work! The Machine Learning APIs, in fact, aren’t hosted in the cloud, but are built-in inside Windows, so the whole recognition process is done directly by your computer.
What about a Win32 application?
The sample we have built is a UWP app, but what if I want to leverage the same capabilities inside a Win32 application built with Windows Forms or WPF? Good news, the WinML APIs are supported also by the Win32 ecosystem! You can use the (almost) same exact code we’ve seen so far also in a Win32 application. The only caveat is that the WinML APIs leverage the StorageFile class in order to manipulate the ONNX format, which requires the application to have an identity in order to be used. The easiest way to achieve this goal is to package your application with the Desktop Bridge. This way, your Win32 app will get an identity and you will be able to leverage the UWP code almost without doing any changes. If you want, instead, to leverage the WinML APIs without packaging your app with the Desktop Bridge, you will need to provide your own implementation of the IStorageFile class using the standard .NET APIs, as suggested by my friend Alexandre Chohfi on Twitter.
UPDATE: as Alexander has suggested on Twitter, you aren’t required to fully implement the IStorageFile interface, which would be a huge amount of work. The proxy class leverages this interface only to load the model file, so it’s enough to implement the Path property in a way that it returns the full path of the .onnx file.
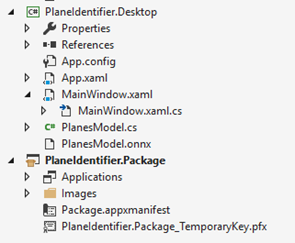
If you read this blog, well, you’ll know that I’m a bit biased and I’m a big fan of the Desktop Bridge, so let’s take the easy way ![]() and see how we can leverage WinML inside a WPF app. The first step, other then creating a new WPF project, is to add a Windows Application Packaging Project to your solution in Visual Studio, which we’re going to use to package the WPF application with the Desktop Bridge. In my sample, I’ve called the WPF project PlaneIdentifier.Desktop and the Packaging Project PlaneIdentifier.Package.
and see how we can leverage WinML inside a WPF app. The first step, other then creating a new WPF project, is to add a Windows Application Packaging Project to your solution in Visual Studio, which we’re going to use to package the WPF application with the Desktop Bridge. In my sample, I’ve called the WPF project PlaneIdentifier.Desktop and the Packaging Project PlaneIdentifier.Package.
Before starting using the WinML APIs we need to add a reference to the UWP ecosystem. This isn’t really a news, since it’s the standard approach when you want to enhance a Win32 application with UWP APIs. You will need to add to the WPF project the following libraries, by right clicking on it and choosing Add reference:
- The Windows.md file. Make sure to add the one in the folder C:\Program Files (x86)\Windows Kits\10\UnionMetadata\10.0.17134.0, since only the latest SDK contains the WinML APIs.
- The System.Runtime.WindowsRuntime.dll file, which is stored in C:\Program Files (x86)\Reference Assemblies\Microsoft\Framework\.NETCore\v4.5\
Then you can copy inside the WPF application the same .onnx and proxy class file from the UWP application. After that, you can start copying and pasting the code from the previous sample, but make sure to make the following changes:
Since in WPF we don’t have the OnNavigatedTo() event, we’re going to use the Loaded one exposed by the Window class to load the model
In the path to the .onnx file we need to add, as folder name, the full name of the WPF project. The reason is that the Windows Application Packaging Project doesn’t include the desktop application files in the root of the package, but inside a folder with the same name of the Win32 application. In our case, the .onnx file will be inside the /PlaneIdentifier.Desktop/ folder.
 public partial class MainWindow : Window
{
    private PlanesModel planeModel;
    public MainWindow()
    {
        InitializeComponent();
        this.Loaded += MainWindow_Loaded;
    }

    private async void MainWindow_Loaded(object sender, RoutedEventArgs e)
    {
        var modelFile = await StorageFile.GetFileFromApplicationUriAsync(new Uri("ms-appx:///PlaneIdentifier.Desktop/PlanesModel.onnx"));
        planeModel = await PlanesModel.CreatePlanesModel(modelFile);
    }
}
The code associated to the Recognize button to encapsulate the selected file into a SoftwareBitmap object is the same. However, we need to replace the FileOpenPicker class with the OpenFileDialog one, since WPF uses a different approach to handle file selection. We need to change also the way we populate the Image control, since the BitmapImage class leveraged by .NET is different than than the one exposed by the Windows Runtime.
 private async void OnRecognize(object sender, RoutedEventArgs e)
{
    OpenFileDialog dialog = new OpenFileDialog();
    if (dialog.ShowDialog() == true)
    {
        string fileName = dialog.FileName;
        var selectedStorageFile = await StorageFile.GetFileFromPathAsync(dialog.FileName);

        SoftwareBitmap softwareBitmap;

        using (IRandomAccessStream stream = await selectedStorageFile.OpenAsync(FileAccessMode.Read))
        {
            // Create the decoder from the stream
            Windows.Graphics.Imaging.BitmapDecoder decoder = await Windows.Graphics.Imaging.BitmapDecoder.CreateAsync(stream);

            // Get the SoftwareBitmap representation of the file in BGRA8 format
            softwareBitmap = await decoder.GetSoftwareBitmapAsync();
            softwareBitmap = SoftwareBitmap.Convert(softwareBitmap, BitmapPixelFormat.Bgra8, BitmapAlphaMode.Premultiplied);
        }

        PreviewImage.Source = new System.Windows.Media.Imaging.BitmapImage(new Uri(fileName));

        // Encapsulate the image in the WinML image type (VideoFrame) to be bound and evaluated
        VideoFrame inputImage = VideoFrame.CreateWithSoftwareBitmap(softwareBitmap);
        await EvaluateVideoFrameAsync(inputImage);
    }
}
The EvaluateVideoFromAsync() method is exactly the same as the UWP app, since it leverages only the proxy class and not any specific UWP APIs which is mapped in a different way in WPF.
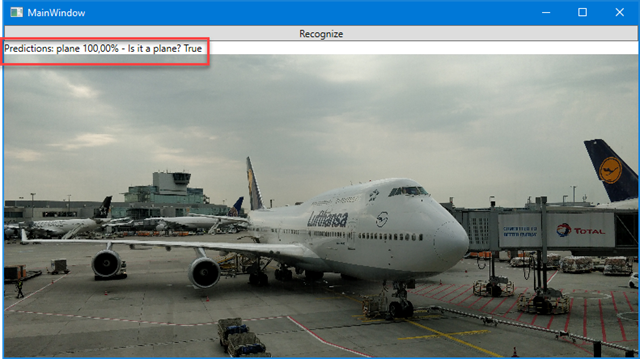
And now we have our Machine Learning model perfectly working in offline mode also in our WPF application!
Wrapping up
If you were expecting a deep dive on machine learning, well, I hope I didn’t disappoint you! There are tons of materials out there to start learning more about machine learning and AI, like the official documentation. The goal of this post was to show you how it’s easy to consume Machine Learning models in a Windows application thanks to the new WinML platform, no matter how complex is the model that your data scientist colleague has created for you. And everything is working offline, which means quicker turnaround and support also for scenarios where you don’t have connectivity.
Another big advantage of the WinML APIs is that they’re part of the UWP platform, which means that the work we’ve done in this post isn’t tight only to desktop devices, but we can leverage it also on other platforms like HoloLens, which opens up a wide range of huge opportunities. You can take a look at some experiments made by Renè Schulte (Microsoft MVP) and by my colleague Mike Taulty, which have added the capability to do real-time detection of objects using the HoloLens camera stream.
You can download the sample project leveraged in this blog post on GitHub at https://github.com/Microsoft/Windows-AppConsult-Samples-UWP
Happy coding!
