异步编程,在Unity中使用Coroutine 与TAP
几个星期前,Unity 发布了新版本2017.1。在这个版本中,社区翘首以盼的TAP 与 async await支持终于随着.net 4.6兼容以beta feature的方式与用户正式见面了。
这并不是偶然,随着微软HoloLens 与Windows MR平台战略布局逐渐成熟,大量Unity开发者开始研究如何与UWP API进行交互以获得需要的底层支持。而作为逻辑脚本引擎,过去的Unity(5-) 只提供了有限的.net 2.0-4.x, c# 4以下的兼容,在访问全面异步化的 UWP API时仍需要进行大量的适配工作。如果不熟悉TAP和UWP底层的实现,开发者很难正确的进行封装,转化为Unity 已有的 Update Check/Coroutine 模式,开发过程事倍功半。从另一个方向,一些有经验的UWP开发者也对XR 这片新大陆跃跃欲试,但苦于async await /TAP 没有实装,难以理解Unity3D的Corotine异步模型而走不少弯路(我就是其中挣扎过的一员)。
现在,随着尝试抹平一切平台差异的 .net standard 类库的不断成熟,加上Unity与微软,以及社区极客们的不断努力,我们终于能够在Unity 同时使用 Coroutine 和TAP,让Unity开发与UWP开发两支队伍胜利会师,真是做梦也会笑醒。
在欢庆的同时,我们还是要意识到,这带来了新的挑战。 我们更新功能并不是要所有人推倒一切重新开始,无论你是有Unity经验,已经有项目需要porting到 UWP平台的游戏大师,还是想将你的2D Xaml应用升级到 Windows MR 平台的Unity新手,或者你是完全的新新人类,想要通过大量的Unity与UWP的例子找到属于自己的App技术可行性,你都会遇到这样的问题:怎么样正确的让 Unity 的 Coroutine 和 .Net 的 TAP 正确的交互。
本文旨在为大家面对这一挑战时,能够有清晰的参照可以参考,又或者能够从本文提供的工具中得到启发,为后面的工作学习提供更好的生产力。
准备环境
软件安装
本文撰写时使用的环境为
o Windows 10 Creator Update 15063
o Unity 2017.1
o Visual Studio 2017.2
由于大部分Demo代码仅在Unity Editor 的 Console 打印结果,您可以在仅有 Unity 2017.1 的开发机上进行演练。
工程设置
示例工程需要配置您的Unity工程以便启动 .net 4.6 和async 支持。 如果您对此不太熟悉,建议您遵照下面的步骤设置你的全新工程。
创建与设置工程
1. 启动Unity
2. 点击"New" 图标,输入工程名 "AsyncExample"
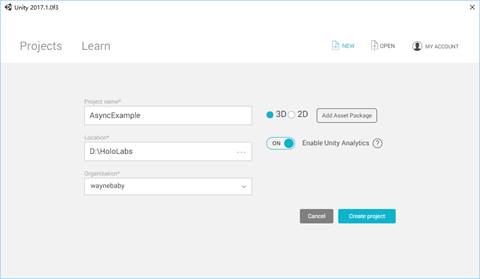
3. 点击"Create Project" 按钮
4. 在菜单点击 "File->Build Settings"

5. 点击下方的 "Player Settings"
这时候你的 "Inspector" 会有若干属性选项卡。 展开其中的"Other Settings"选项卡 ![计算机生成了可选文字: 0 Inspector PlayerSettings Company N m e p rO d 凵 Ct N m e Default I CO n Default C 凵 rS 0 r C 凵 rs 0 r Hotspot DefaultCompany AsyncExample Settings for PC, M C & Li n 凵 X Sta n d 引 0 n e Re 、 0 《 uti 0 n a n d P re 、 e ntati 0 n Splash Image Other Settings Rendering C 引 0 r Space* Auto Graphics API for 喜 in 《 寻 Auto Graphics API for MacV Auto Graphics API for Static Batching Dynamic Batching G P 凵 Skinning Graphics ] 0 b S (Experimentn Vi 《 t 凵 引 Reality Suppofted 0 M a ( App Store Options 巳 凵 n 引 e I d e ntifi e r 巳 凵 i 尾 Category com Company . p ro d 凵 CtN m e public.app-category m e S M C App Store Val i d ati 0 n 0 Configuration Scrlptlng R 凵 ntl m e Ve rSl 0 n Scripting 巳 Ck e n d Api Compatibility Le V 引 D i S b H 喜 Statistics* Scripting D efi n e Symbols* Asset La b e IS 。 国 ET 2.0 S u](https://msdntnarchive.blob.core.windows.net/media/2017/08/UCTge003.jpg)
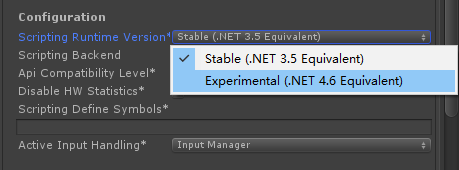
6. 找到"Other Settings"选项卡下方的 "Configuration" 二级属性组,将其中的"Scripting Runtime Version*" 属性的值"Stable(.NET 3.5 Equivalent)" 修改为 "Experinmental (.NET 4.6 Equivalent)"
7. 这时Unity Editor会需要一次完全的重启,你会看到如下提示。
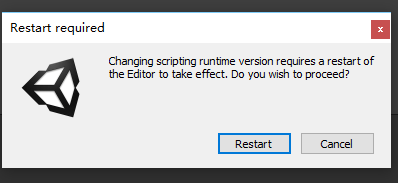
选择 “Restart”令Unity 重启。
此后同样位置的属性应为
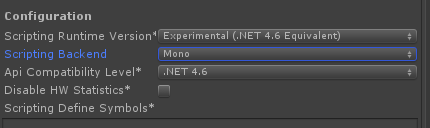
至此,我们的Unity Editor 具有执行c# 6.0的能力,一些以前不能识别的类库和语法将可以在Editor Player得到测试与调试,而不需要用条件编译延迟到其他平台参与运行。
8. 在"Project" 窗口中的"Assets" 路径创建新的子文件夹 "Scripts" 并在其中创建一个新的cs脚本“AsyncExample.cs”
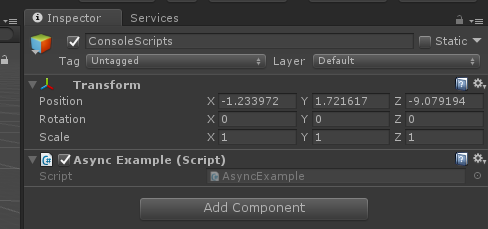
9. 在“Hierarchy”创建一个新的空对象,起名为"ConsoleScripts"

10. 将刚才创建的cs脚本拖入"ConsoleScripts"
基本代码
接下来我们要准备一些基础设施,让我们能够创建一些简单的行为供我们测试。
记录日志
记录日志输出的代码非常简单,它会帮我们格式化地向Unity Console输出信息。首先我们在脚本中加入下面的代码:
 using System.Collections;
using System.Diagnostics;
using System.Runtime.CompilerServices;
using System.Threading;
using System.Threading.Tasks;
using UnityEngine;

public class AsyncExample : MonoBehaviour
{

    Stopwatch stopwatch;
    void Start()
    {
        stopwatch = new System.Diagnostics.Stopwatch();
        stopwatch.Start();
    }

    void LogToTUnityConsole(object content, string flag, [CallerMemberName] string callerName = null)
    {
        UnityEngine.Debug.Log($"{callerName}:\t{flag} {content}\t at {stopwatch.ElapsedMilliseconds} \t in thread {Thread.CurrentThread.ManagedThreadId}");
    }

}
Stopwatch 对象可以帮助我们追踪日志调用的具体时间,当Unity场景进入运行状态时这个计时器就会启动,我们可以很清楚的看到某个线程在某个时间,在哪个函数中做了什么。
接下来,为了研究多个异步任务直接如何衔接与调用,我们往往需要预先设计一些任务。我们这里设计一种容易控制时长和输出序列的任务,倒数任务。 倒数: Coroutine版本 代码: CoroutineCountDown
     public IEnumerator CoroutineCountDown(int count, string flag = "")
    {
        for (int i = count; i >=0 ; i--)
        {
            LogToTUnityConsole(i, flag);
            yield return new WaitForSeconds(1);
        }
    }
如果你是一个Unity初学者,凭你的C#经验你可以看出这是一个返回枚举器的yield函数。 Unity 可以通过这个返回的IEnumerator 枚举出多个 YieldInstruction(WaitForSeconds的基类) 对象的序列,这些对象会被MonoBehavior基类中的调度器调用。在每个YieldInstruction操作异步完成后,根据内部的callback 回归Unity主线程,并且调用IEnumerator的MoveNext()方法,来进行下一个 YieldInstruction的获取。 运行: CoroutineCountDown
单独运行
下面在Start 方法内加入下面的代码,我们可以试着在Editor运行游戏得到Console输出
     void Start()
    {
        stopwatch = new System.Diagnostics.Stopwatch();
        stopwatch.Start();
        StartCoroutine(CoroutineCountDown(3, "BasicCoCall"));
    }
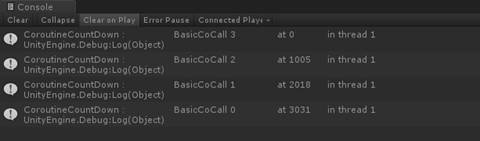
可以观察到,在Unity 游戏主线程也就是Thread 1, 在间隔大约1秒的时候函数会进行倒数。
并行运行
由于这是异步执行的代码,在这个过程并不会影响其他在Unity主线程的其他操作执行,同样他也不会阻碍多次执行的结果。
比如:
void Start()
{
stopwatch = new System.Diagnostics.Stopwatch();
stopwatch.Start();
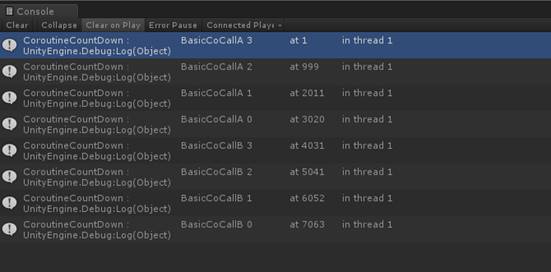
StartCoroutine(CoroutineCountDown(3, "BasicCoCallA"));<br> StartCoroutine(CoroutineCountDown(3, "BasicCoCallB"));
}
当我们连续调用两次倒数脚本时 我们会看到两个任务会将自身切成若干切片,前后穿插在主线程执行。 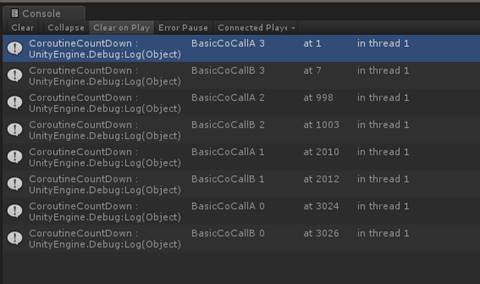
衔接运行
如果两个或者多个Coroutine 需要衔接运行(包括其他流程控制,如if/switch/loop),在Unity中就需要一个额外的父Coroutine来进行调度。 我们可以创建如下代码
     void Start()
    {
        stopwatch = new System.Diagnostics.Stopwatch();
        stopwatch.Start();
        StartCoroutine(CoroutineCountDownSeq(3, "BasicCoCallA", "BasicCoCallB"));
    }
     public IEnumerator CoroutineCountDownSeq(int countDown, params string[] flags)
    {
        foreach (var flag in flags)
        {
            yield return StartCoroutine(CoroutineCountDown(3, flag));
        }
    }
可以看到,父流程会将子流程的调度枚举作为一个可完成的YieldInstruction(这次是UnityEngine.Coroutine)反馈给上层调度器。
运行结果如如下:
结合上面的并行运行代码,我们还可以组合成若干复杂的模式,比如Timer,Event Recognizer, Fork-Join等等。在这里我们不再一一举例。
倒数: TaskAsync版本 代码 :TaskAsyncCountDown
     public async Task TaskAsyncCountDown(int count, string flag = "")
    {
        for (int i = count; i >= 0; i--)
        {
            LogToTUnityConsole(i, flag);
            await Task.Delay(1000);
        }
    }
这个版本的代码和刚才Coroutine版本的代码非常相似,同样是CPS变换写法的await 关键字,其作用与 yield return 的作用一模一样。只不过这里新的实现把Unity 支持的.net 2.0 subset专用类库 UnityEngine.Coroutine 替换成了支持await 的System.Threading.Tasks.Task.
另外一种写法是async void函数
     public async void VoidAsyncCountDown(int count, string flag = "")
    {
        for (int i = count; i >= 0; i--)
        {
            LogToTUnityConsole(i, flag);
            await Task.Delay(1000);
        }
    }
在多个版本的文档和社区文章中,我们都曾提到。除了作为事件处理器这样的必需使用void函数的琴况下,这种没有返回Task无法进行外部调度编排的写法是强烈不建议使用的。 在这里作为反面例子提出,供大家参考。 运行: TaskAsyncCountDown
本线程编排运行
在我们不需要对这个异步任务做任何操作而仅仅是启动它时候,async 方法所返回的Task对象相对来说就没有什么意义,我们可以在Start 函数中直接调用 一个async函数。虽然这会在Visual Studio中用绿色波浪线警告,但这其实是合法的用法。 ![计算机生成了可选文字: Solution stopwatch = new System .Diagnostics .Stopwatch( ), stopwatch 。 Start() ; "8asicAs ncCaII" . ] TaskAs ncCountDown 彐 . (awaitable) Task AsyncExample•TaskAsyncCountDown(int 〔 0 凵 n 《 [string flag public I Usage : await TaskAsyncCountDown(m); Because this 〔 引 《 is not awaited execution Of the current method continues before the 〔 引 《 is completed. Consider applying the w 引 t 《 0 巳 儲 tor to the result Of the 〔 引 上 Show potential fixes (Alt+Enter or Ctrl+.)](https://msdntnarchive.blob.core.windows.net/media/2017/08/UCTge013.jpg)
为了避免这样杂音的发生,我们可以使用一个临时变量将这个Task接收,但不做任何操作。比如:
void Start()
{
stopwatch = new System.Diagnostics.Stopwatch();
stopwatch.Start();
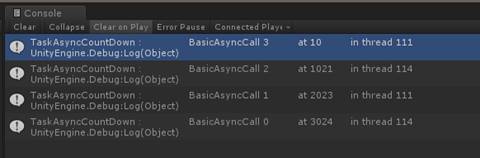
var _ = TaskAsyncCountDown(3, "BasicAsyncCall");
}
这时候的运行结果一如Coroutine 方式
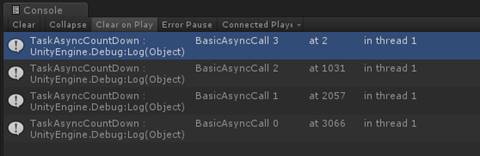
可以看到,async函数中await部分使用了默认的Task编排器,将每次Task执行完成后的线程上下文转换回到Unity的主线程。
如果我们想改变这一行为,我们可以修改TaskAsyncCountDown函数,修改为下面的代码
     public async Task TaskAsyncCountDown(int count, string flag = "")
    {
        for (int i = count; i >= 0; i--)
        {
            LogToTUnityConsole(i, flag);
            await Task.Delay(1000).ConfigureAwait(false);
        }
    }
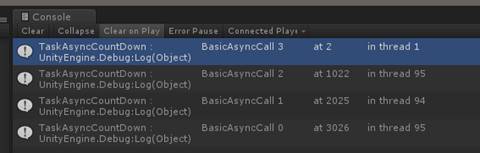
这时await 将使用线程池调度器,不再将每个步骤强行回归到Unity主线程。 这样也许会提高一部分执行速度,但是对主线程的一些对象的操作(比如Texture读写)将会失败。这里建议将CPU密集的计算操作放到线程池中,以免阻塞画面的更新,这样能起到类似减少Update() 内的CPU操作同样的效果。
本线程并行运行
使用Task,多个操作一样可以同时启动,分别执行,然后不断穿插返回主线程
     void Start()
    {
        stopwatch = new System.Diagnostics.Stopwatch();
        stopwatch.Start();
        var a = TaskAsyncCountDown(3, "BasicAsyncCallA");
        var b = TaskAsyncCountDown(3, "BasicAsyncCallB");
    }
本线程衔接运行
与Coroutine相似,async 方法也可以将多个任务首尾相接,通过线性代码首尾衔接:
void Start()
{
stopwatch = new System.Diagnostics.Stopwatch();
stopwatch.Start();
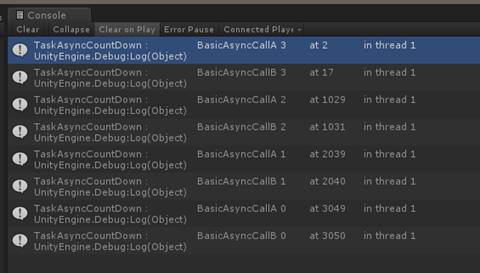
var t = TaskAsyncCountDownSeq(3, "BasicAsyncCallA", "BasicAsyncCallB");
}
     public async Task TaskAsyncCountDownSeq(int countDown, params string[] flags)
    {
        foreach (var flag in flags)
        {
            await TaskAsyncCountDown(3, flag);
        }
    }
执行结果 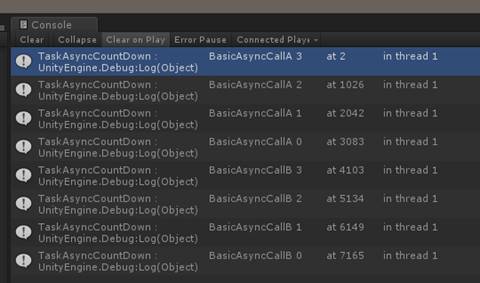
完全线程池编排运行
如果你足够细心,你会发现在前面 ConfigureAwait(false) 的例子中,第一行Log 的运行Thread Id仍然是 1.
async 方法在运行时,在第一次await 前逻辑会在调用者的线程上执行。在极端情况下,如果异步函数入口处就有CPU密集或者长时间运行的同步IO操作,Unity的主线程仍然会被不当的占用。对此我们可以用如下的方式进行优化:
     void Start()
    {
        stopwatch = new System.Diagnostics.Stopwatch();
        stopwatch.Start();
        var _ = Task.Run(()=>TaskAsyncCountDown(3, "BasicAsyncCall"));
    }
此时的函数入口就被线程池编排器调用。由于线程池中的线程并没有同步上下文,其后的所有调用都会随机使用线程池中的可用线程,就算您强制设置了.ConfigureAwait(true); 也无济于事 。请注意这种调用可能造成的影响:你会失去回到主线程上下文的能力。
那么有没有别的办法自由控制上下文,让调用开头在别的线程运行呢?
线程池混合编排
为了解决上一小节尾部提出的问题,我们尝试做出如下的用例设计:
我们假定需求有如下操作:
a. 计算n! (n=150)
b. 等待1秒
c. 输出结果
于是我们得到如下代码(为了扩大任务的执行负载,我在循环内部增加了多余的sleep时间):
     public void CPUBigHead(int n)
    {
        double result = 1;
        LogToTUnityConsole(result, $"n!(n={n}) start");
        for (int i = 1; i <= n; i++)
        {
            result = result * i;
            Thread.Sleep(10);
        }
        LogToTUnityConsole(result, $"n!(n={n}) stop");
        Thread.Sleep(1000);

        //Texture change logic puts here

        LogToTUnityConsole(result, $"n!(n={n}) output");
    }
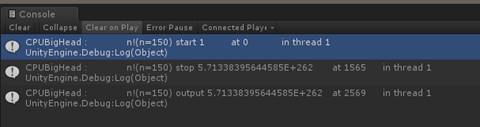
这里n!的计算是CPU密集操作,我们希望他在其他线程执行,而输出结果会在UI层调用texture变化,需要在 Id为1的主线程进行操作。
在这个基础上,我们对上面的同步代码做出如下修改:
     public async Task CPUBigHeadAsync(int n)
    {
        double result = 1;
        await Task.Run(() =>
        {
            LogToTUnityConsole(result, $"n!(n={n}) start");
            for (int i = 1; i <= n; i++)
            {
                result = result * i;
                Thread.Sleep(10);
            }
            LogToTUnityConsole(result, $"n!(n={n}) stop");
        });  //Scheduler will contiue execution in main thread here

        await Task.Delay(1000);
        //Texture change logic puts here
        LogToTUnityConsole(result, $"n!(n={n}) output");
    }
得到如下结果: 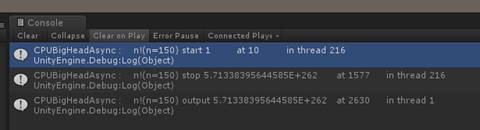
可以看到我们确保了CPU密集型操作不在Unity 主线程里运行,从而保证了画面的相对流畅。
初步比较总结
从上面的例子中我们可以看出,新的Task API/async语法为 Unity带来了新的优化可能性。旧有的Coroutine机制虽然可以讲逻辑拆分成为小的切片, 但是并不能自由控制每个部分运行的线程。Task 组成的API 可以轻易地调用线程池,让各种计算轻易地被我们的代码编排。
此外Task/await还有一些其他的特性
· 与UWP API高度集成,可以用简单的 await/AsTask() 扩展方法进行转换。
· 能够在Application 级别保持生存期。
· 通过CancellationToken控制执行树的定时/手动中断。
· 快速的对Event/thread/IAsyncResult进行封装,提供简易的统一调用模式。
在这篇文章里我们不会对这些用法一一展开,如果您有深入了解的需要,请参考 Asynchronous Programming Patterns。
如我们在文章开头提到的, Task/await 作为新加入Unity的成员,开发中一定会在相当的时间内与Coroutine 并存。那么我们怎样灵活的在并存的条件下调用两者呢? Task与Coroutine交互
灵活调用两者,意味着我们能够在 Coroutine 中调用async 方法,以及在async方法中调用Coroutine.
并发执行的例子与基本调用并无区别,在这里我们展示如何彼此调用并在调用执行后执行下一个一部流程的实现。
在Task中调用Coroutine并等待完成 代码: TaskAwaitACoroutine
如果想要在async方法中调用 一个Coroutine 并对其进行控制,我们需要将Coroutine 的执行封装成一个简单的Task.
Unity 并没有对Coroutine的封装的完成callbak暴露出来,所以我们需要一个父级Coroutine调用来监视目标Coroutine的完成
     IEnumerator tempCoroutine(IEnumerator coro, System.Action afterExecutionCallback)
    {
        yield return coro;
        afterExecutionCallback();
    }
这时我们可以使用 TaskCompeletionSource<T> 来将异步操作封装成Task
     public async Task TaskAwaitACoroutine()
    {
        await TaskAsyncCountDown(2, "precoro");
        var tcs = new System.Threading.Tasks.TaskCompletionSource<object>();

        StartCoroutine(
            tempCoroutine(
                CoroutineCountDown(3, "coro"),

 () => tcs.TrySetResult(null)));         await tcs.Task;

        await TaskAsyncCountDown(2, "postcoro");
    }
执行:
     void Start()
    {
        stopwatch = new System.Diagnostics.Stopwatch();
        stopwatch.Start();
        var t = TaskAwaitACoroutine();
    }
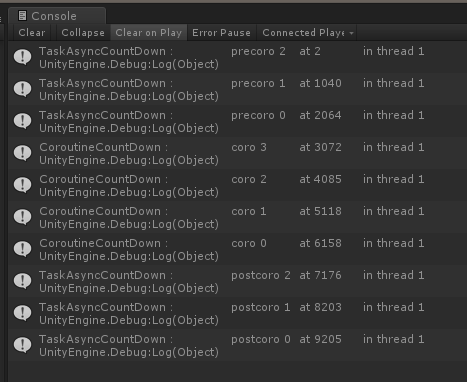
可以看到,在执行CoroutineCountDown“coro” 之后,编排器才开始执行后面的TaskAsyncCountDown “postcoro”
在Coroutine中调用Task并等待完成
和Async方法调用Coroutine不同,Coroutine调用async要借助定期的Update()检查Task是否完成或中断。这种完成检测是通过WaitUntil对象进行的。编排器会在适当的Update()过程中检查WaitUntil对象中的判断代理,来确认这个任务是否停止运行,然后将运行结果返回给调用者的后续步骤。
     public IEnumerator CoroutineAwaitATask()
    {
        yield return CoroutineCountDown(2, "pretask");

        var task = TaskAsyncCountDown(3, "task");
        yield return new WaitUntil(() => task.IsCompleted || task.IsFaulted || task.IsCanceled);
        //Check task's return;
        if (task.IsCompleted)
        {
            LogToTUnityConsole("TDone", "task");
        }
        yield return CoroutineCountDown(2, "posttask");
    }
执行:
     void Start()
    {
        stopwatch = new System.Diagnostics.Stopwatch();
        stopwatch.Start();
        StartCoroutine(CoroutineAwaitATask());
    }
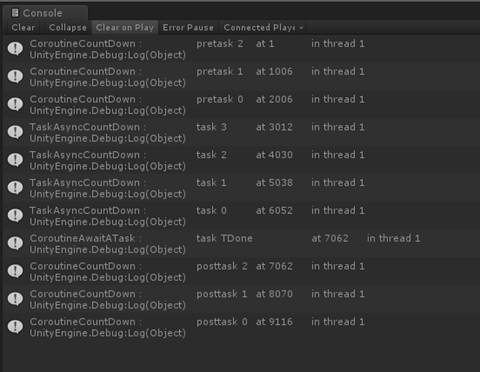
可以观察到, 在执行过TaskAsyncCountDown "task"的 async method之后,Unity编排器继续执行后面的CoroutineCountDown“posttask”
高级封装:CoTaskHelper
上面我们演示了如何让Task和Coroutine 互相调用。 那么我们是否有办法简化这一流程,让操作更有生产力呢?
由于我们已经使用了.net 4.6 subset, 将这些调用模式转化为扩展方法就非常容易了。 于是我建立了 CoTaskHelper.cs 来进行简化调用。
 using System.Collections;
using System.Collections.Generic;
using System.Threading.Tasks;
using UnityEngine;

public static class CoTaskHelper
{


    public static async Task ExecuteCoroutineAsync(this MonoBehaviour monoBehavior, IEnumerator coroutine)
    {
        var tcs = new System.Threading.Tasks.TaskCompletionSource<object>();

        monoBehavior.StartCoroutine(
            tempCoroutine(
              coroutine,
                () => tcs.TrySetResult(null)));

        await tcs.Task;
    }


    static IEnumerator tempCoroutine(IEnumerator coro, System.Action afterExecutionCallback)
    {
        yield return coro;
        afterExecutionCallback();
    }

    public static IEnumerator WaitAsCoroutine(this Task task)
    {
        yield return new WaitUntil(() => task.IsCompleted || task.IsFaulted || task.IsCanceled);
    }

}


此时上一小结的代码可以简写为
     public async Task TaskAwaitACoroutineWithEx()
    {
        await TaskAsyncCountDown(2, "precoro");
        await this.ExecuteCoroutineAsync(CoroutineCountDown(3, "coro"));
        await TaskAsyncCountDown(2, "postcoro");
    }
     public IEnumerator CoroutineAwaitATaskWithEx()
    {
        yield return CoroutineCountDown(2, "pretask");
        var task = TaskAsyncCountDown(3, "task");
        yield return task.WaitAsCoroutine();
        LogToTUnityConsole("TDone", "task");
        yield return CoroutineCountDown(2, "posttask");
    }
代码更清晰,更加有原生味道。
总结
在这篇文章里我们简要的介绍和比较了 Unity原生的Coroutine 编程方式和在Unity 2017.1 版本中引入的 .net 4.6 subset + TAP编程方式,并提供了两种方式互相调用的代码范例。希望这些例子可以启发读者,并会成为大家使用Unity提高生产力的助力。
P.S.
经过在一些项目中使用CoTaskHelper, 我将其重新包装了一个新版本,增加了对 YeildInstruction 的支持.大家使用中有什么建议,请在留言中告诉我哦
     /// <summary>
    /// Coroutine and Task Async Interactive Helper
    /// Based on artical https://blogs.msdn.microsoft.com/appconsult/2017/09/01/unity-coroutine-tap-en-us/
    /// </summary>
    public static class CoroutineTaskHelper
    {
        /// <summary>
        /// Translate a coroutine to Task and run. It needs a Mono Behavior to locate Unity thread context.
        /// </summary>
        /// <param name="monoBehavior">The Mono Behavior that managing coroutines</param>
        /// <param name="coroutine">the coroutine that needs to run </param>
        /// <returns>Task that can be await</returns>
        public static async Task StartCoroutineAsync(this MonoBehaviour monoBehavior, IEnumerator coroutine)
        {
            var tcs = new TaskCompletionSource<object>();
            monoBehavior
                .StartCoroutine(
                    emptyCoroutine(
                        coroutine,
                        tcs));
            await tcs.Task;
        }

        /// <summary>
        /// Translate a YieldInstruction to Task and run. It needs a Mono Behavior to locate Unity thread context.
        /// </summary>
        /// <param name="monoBehavior">The Mono Behavior that managing coroutines</param>
        /// <param name="yieldInstruction"></param>
        /// <returns>Task that can be await</returns>
        public static async Task StartCoroutineAsync(this MonoBehaviour monoBehavior, YieldInstruction yieldInstruction)
        {
            var tcs = new TaskCompletionSource<object>();
            monoBehavior
                .StartCoroutine(
                    emptyCoroutine(
                        yieldInstruction,
                        tcs));
            await tcs.Task;
        }

        /// <summary>
        /// Wrap a Task as a Coroutine.
        /// </summary>
        /// <param name="task">The target task.</param>
        /// <returns>Wrapped Coroutine</returns>
        public static CoroutineWithTask<System.Object> AsCoroutine(this Task task)
        {
            var coroutine = new WaitUntil(() => task.IsCompleted || task.IsFaulted || task.IsCanceled);
            return new CoroutineWithTask<object>(task);
        }

        /// <summary>
        /// Wrap a Task as a Coroutine.
        /// </summary>
        /// <param name="task">The target task.</param>
        /// <returns>Wrapped Coroutine</returns>
        public static CoroutineWithTask<T> AsCoroutine<T>(this Task<T> task)
        {

            return new CoroutineWithTask<T>(task);
        }

        private static IEnumerator emptyCoroutine(YieldInstruction coro, TaskCompletionSource<object> completion)
        {
            yield return coro;
            completion.TrySetResult(null);
        }

        private static IEnumerator emptyCoroutine(IEnumerator coro, TaskCompletionSource<object> completion)
        {
            yield return coro;
            completion.TrySetResult(null);
        }

        /// <summary>
        /// Wrapped Task, behaves like a coroutine
        /// </summary>
        public struct CoroutineWithTask<T> : IEnumerator
        {

            private IEnumerator _coreCoroutine;

            /// <summary>
            /// Constructor for Task with a return value;
            /// </summary>
            /// <param name="coreTask">Task that need wrap</param>
            public CoroutineWithTask(Task<T> coreTask)
            {
                WrappedTask = coreTask;
                _coreCoroutine = new WaitUntil(() => coreTask.IsCompleted || coreTask.IsFaulted || coreTask.IsCanceled);
            }

            /// <summary>
            /// Constructor for Task without a return value;
            /// </summary>
            /// <param name="coreTask">Task that need wrap</param>
            public CoroutineWithTask(Task coreTask)
            {
                WrappedTask = Task.Run(async () =>
                {
                    await coreTask;
                    return default(T);
                });
                _coreCoroutine = new WaitUntil(() => coreTask.IsCompleted || coreTask.IsFaulted || coreTask.IsCanceled);
            }

            /// <summary>
            /// The task have wrapped in this coroutine.
            /// </summary>
            public Task<T> WrappedTask { get; private set; }


            /// <summary>
            /// Task result, if it have.  Calling this property will wait execution synchronously.
            /// </summary>
            public T Result { get { return WrappedTask.Result; } }


            /// <summary>
            /// Gets the current element in the collection.
            /// </summary>
            public object Current => _coreCoroutine.Current;

            /// <summary>
            /// Advances the enumerator to the next element of the collection.
            /// </summary>
            /// <returns>
            /// true if the enumerator was successfully advanced to the next element; false if
            /// the enumerator has passed the end of the collection.
            /// </returns>
            public bool MoveNext()
            {
                return _coreCoroutine.MoveNext();
            }

            /// <summary>
            /// Sets the enumerator to its initial position, which is before the first element
            /// in the collection.
            /// </summary>
            public void Reset()
            {
                _coreCoroutine.Reset();
            }
        }
    }